"
"
Team:Alberta/Protocols
From 2013.igem.org
(Difference between revisions)
| Line 458: | Line 458: | ||
<p class="content-title">Protocols</p> | <p class="content-title">Protocols</p> | ||
</div> | </div> | ||
| - | <a class="anchor" id=" | + | <a class="anchor" id="Build"></a> |
<div class="block"> | <div class="block"> | ||
| - | < | + | <h2>Building the Plasmids</h2> |
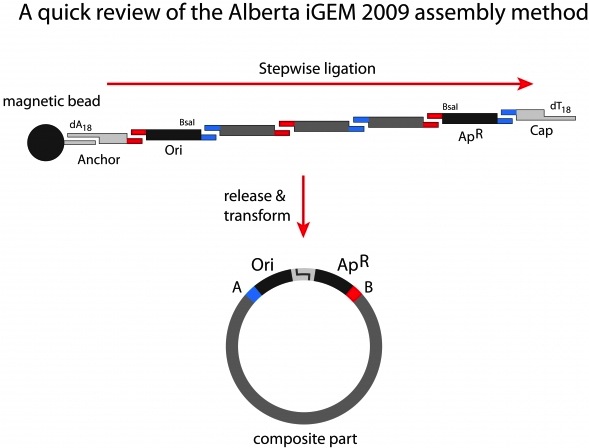
| - | + | <p>Our plasmid assembly system relies upon the achievements of previous Team Alberta iGEM entries, 2009’s BioBytes and 2010’s Genomikon assembly methods. This process begins with origins of replication anchored at one end to magnetic beads in a suspension within a reaction microfuge tube. The anchored strands have a single, free-floating sticky end, onto which successive genes are ligated. Once the new gene has been ligated on, we use a magnet to hold the beads (along with the anchored DNA) inside the reaction tube, while washing away the rest of the reaction, including the enzyme, buffers, and any non-ligated DNA that remains. The beads are then resuspended in a new reaction mixture, containing the next ligation step.</p> | |
| - | + | <img src="/wiki/images/b/b4/2013Alberta-Poster2.jpg" align="middle" style="width:100%;"> | |
| - | + | ||
| - | + | ||
| - | + | ||
| - | + | ||
| - | + | ||
| - | + | ||
| - | + | ||
| - | + | ||
| - | + | ||
| - | + | ||
| - | + | ||
| - | + | ||
| - | + | ||
</div> | </div> | ||
</div> | </div> | ||
Revision as of 02:09, 29 October 2013
The Littlest Mapmaker
"Exploration into the world of DNA Computing"
Team Alberta: University of Alberta
Protocols
Building the Plasmids
Our plasmid assembly system relies upon the achievements of previous Team Alberta iGEM entries, 2009’s BioBytes and 2010’s Genomikon assembly methods. This process begins with origins of replication anchored at one end to magnetic beads in a suspension within a reaction microfuge tube. The anchored strands have a single, free-floating sticky end, onto which successive genes are ligated. Once the new gene has been ligated on, we use a magnet to hold the beads (along with the anchored DNA) inside the reaction tube, while washing away the rest of the reaction, including the enzyme, buffers, and any non-ligated DNA that remains. The beads are then resuspended in a new reaction mixture, containing the next ligation step.