 "
"
Team:BIT/project microchip
From 2013.igem.org
(Difference between revisions)
| Line 296: | Line 296: | ||
<td><p><br> | <td><p><br> | ||
</p> | </p> | ||
| - | <p> Microfluidic technology is a biological, chemical and medical analyzing process, which contains sample preparation, reaction, separation, detection and other basic operation units that were integrated into a chip on the micron level. The microfluidic chip is the outcome that can meet the demand of corresponding analysis and measurement.<br> | + | <p> Microfluidic technology is a biological, chemical and medical analyzing process, which contains sample preparation, reaction, separation, detection and other basic operation units that were integrated into a chip on the micron level. The microfluidic chip is the outcome that can meet the demand of corresponding analysis and measurement.<br><br> |
| - | How is a microfluidic chip manufactured?<br> | + | How is a microfluidic chip manufactured?<br><br> |
<strong>Material Preparation</strong><br> | <strong>Material Preparation</strong><br> | ||
| Line 306: | Line 306: | ||
(2) is transparent<br> | (2) is transparent<br> | ||
(3) has elasticity to a certain extent<br> | (3) has elasticity to a certain extent<br> | ||
| + | <p><img src=" https://static.igem.org/mediawiki/2013/e/e9/BIT_MC_1.png" width="374" height="280"></p> | ||
2. Two kinds of baseboard<br> | 2. Two kinds of baseboard<br> | ||
(1) Strong translucent glass<br> | (1) Strong translucent glass<br> | ||
| + | <p><img src=" https://static.igem.org/mediawiki/2013/d/dd/BIT_MC_2.png" width="374" height="280"></p> | ||
(2) Glass with chromium-covered surface<br> | (2) Glass with chromium-covered surface<br> | ||
| - | + | <p><img src=" https://static.igem.org/mediawiki/2013/0/07/BIT_MC_3.png" width="374" height="280"></p><br> | |
<strong>Mask</strong><br> | <strong>Mask</strong><br> | ||
We used Adobe Illustrator to design the structure of each layer. We added black color on the optical adhesive in places that were not supposed to be ossified and printed it on photographic paper.<br> | We used Adobe Illustrator to design the structure of each layer. We added black color on the optical adhesive in places that were not supposed to be ossified and printed it on photographic paper.<br> | ||
| - | + | <p><img src=" https://static.igem.org/mediawiki/2013/9/9e/BIT_MC_4.png" width="600" height="314"></p><br> | |
<strong>Production process</strong><br> | <strong>Production process</strong><br> | ||
There are many kinds of materials that can be used to produce Microfluidic chips. Now, we have three kinds of materials, including Optical Adhesive, PDMS and glass. To meet the requirements of the chip’s vertical structure, we chose the Optical Adhesive in the end.<br> | There are many kinds of materials that can be used to produce Microfluidic chips. Now, we have three kinds of materials, including Optical Adhesive, PDMS and glass. To meet the requirements of the chip’s vertical structure, we chose the Optical Adhesive in the end.<br> | ||
| - | + | <p><img src=" https://static.igem.org/mediawiki/2013/1/18/BIT_MC_5.png" width="706" height="395"></p><br> | |
We fixed photographic paper, which had holes in the middle, on the backboard. By controlling the layers of the holed photographic paper, we could adjust the thickness of the corresponding chip layer. Then we covered it with mask, the photographic paper that has channel holes on it, after injecting the optical cement and irradiating the chip with ultraviolet light. | We fixed photographic paper, which had holes in the middle, on the backboard. By controlling the layers of the holed photographic paper, we could adjust the thickness of the corresponding chip layer. Then we covered it with mask, the photographic paper that has channel holes on it, after injecting the optical cement and irradiating the chip with ultraviolet light. | ||
| Line 327: | Line 329: | ||
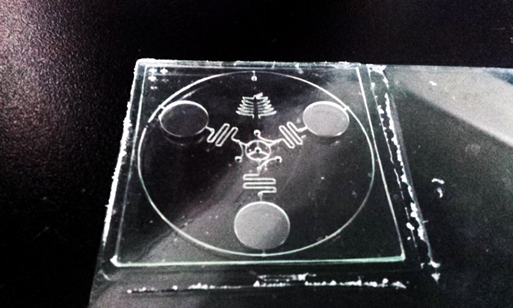
After that, a light plastic microfluidic chip was completed.<br> | After that, a light plastic microfluidic chip was completed.<br> | ||
Bing!!!!! | Bing!!!!! | ||
| - | + | <p><img src=" https://static.igem.org/mediawiki/2013/a/a9/BIT_MC_6.png" width="513" height="308"></p> | |
Revision as of 08:30, 13 September 2013


Micro Chip |
Microfluidic technology is a biological, chemical and medical analyzing process, which contains sample preparation, reaction, separation, detection and other basic operation units that were integrated into a chip on the micron level. The microfluidic chip is the outcome that can meet the demand of corresponding analysis and measurement.
(1) Strong translucent glass
Mask We used Adobe Illustrator to design the structure of each layer. We added black color on the optical adhesive in places that were not supposed to be ossified and printed it on photographic paper.
Production process There are many kinds of materials that can be used to produce Microfluidic chips. Now, we have three kinds of materials, including Optical Adhesive, PDMS and glass. To meet the requirements of the chip’s vertical structure, we chose the Optical Adhesive in the end.
We fixed photographic paper, which had holes in the middle, on the backboard. By controlling the layers of the holed photographic paper, we could adjust the thickness of the corresponding chip layer. Then we covered it with mask, the photographic paper that has channel holes on it, after injecting the optical cement and irradiating the chip with ultraviolet light. Optical Adhesive has a different viscosity with glass and chrome glass plate, so it will separate from the mask when on the glass plate and separate from the chrome when on the chrome plate. The Optical Adhesive that was not solidified will be removed by Ethanol - acetone solution (volume ratio 8:2) and dried by a drier. First, we made the bottom layer on the glass. After solidifying the bottom layer, we formed another layer on the top of it. At the same time, we made the top and second layer on the chrome plate and glued these two layers successively on the glass whose bottom two layers had been finished. After that, a light plastic microfluidic chip was completed. Bing!!!!!
|


Beijing Institutte of Technology © 2013 | Privacy Policy