Team:ATOMS-Turkiye/Project/Module1:Experiment
From 2013.igem.org
(→-The Experiments about EpCAM – Anti EpCAM Binding) |
|||
| Line 1: | Line 1: | ||
==Experiment Results / Discussion == | ==Experiment Results / Discussion == | ||
===-The Experiments about EpCAM – Anti EpCAM Binding=== | ===-The Experiments about EpCAM – Anti EpCAM Binding=== | ||
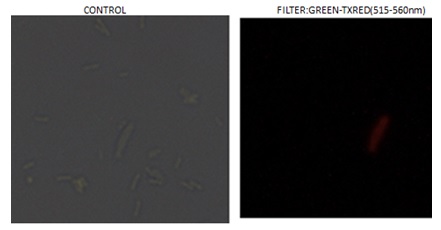
| - | + | First of all, we wanted to test if our bacteria were able to produce C215 (Anti-EpCAM). To determine this, we performed Immunofluorescence experiments by placing OmpA (a signal peptide which sends the proteins into the membrane) signal peptide and his-tag before the C215 protein sequence in one of our parts. We then accomplished immunofluorescence colouring and were able to see red circles around our bacteria. ''Including his-tag in the sequence was to our bacteria.'' During the experiments we used anti-his-tag which was situated after the colouring substance in the sequence. This allowed us to comprehend if our bacteria were able to produce C215; in which case they were. | |
| - | + | ||
| + | Our second set of immunofluorescence experiments was to confirm the binding of EpCAM to C215. The first set of experiments had proved that our bacteria were successfuly producing C215, however we were unable to comprehend if C215 was able to bind to EpCAM or not. Therefore we carried out another experiment, where purified C215 was presented to cancer cells in well-plates. Our expectations were fulfilled and we were able to see red coloured cancer cells and blue nucleus'. | ||
| + | |||
------------------------------------------------------------------------- | ------------------------------------------------------------------------- | ||
| Line 25: | Line 27: | ||
====Immunofluorescence c215==== | ====Immunofluorescence c215==== | ||
| - | + | For our project to work, the active domain of anti EpCAM was required to bind to the membranes of cancer cells. Pic. 1 show vague red shining cells which prove that our C215 is working. With these results we were able to say that our nanofactories would be able to bind to our cancer cells successfully. | |
| + | |||
====Immunofluorescence OmpA==== | ====Immunofluorescence OmpA==== | ||
| - | Before | + | Before beginning with experiments we decided to use an alternative method to detect the cancer cells. We decided to use our bacteria as nanofactory itself (quorum sensing). Therefore OmpA was placed before C215 to determine so that our bacteria would bind to the cancer cells. We tested the production of OmpA by our bacteria with immunofluorescence experiments and were able to see shinning red lights in the Pic 2 which proved that our OmpA was presented by our cell’s outer membrane successfully; meaning that our bacteria could be used as a nanofactory. |
| + | =Ellmans Assay= | ||
| + | Ellman’s assay is a test which enables us to measure the concentration of AI-2. In order to perform Ellman’s assay liquid culture of bacteria which produce the enzymes Luxs-Pfs were required. The liquid cultures resistant to CHL were incubated for 16 hours which then followed on by adding 0,1 mM substrate (SAH in 10X PBS containing %1 BSA) and SAH containing liquid cultures were continued to be incubated but this time at room temprature for a period of two hours. During the incubations, our enzymes were producing autoinducer 2. To determine the quantity of autoinducer-2 produced, we centrifuged and measured light density of our supernatants with the light spectrophotometer. Our negative control were transformed bacteria. The results of the Ellman’s assay our below: | ||
| + | |||
| + | This results show that enzymes are expressed by e.coli are succesfully producing autoinducer2. | ||
| + | ===Lsrk/ Lslr Inducible promoter experiment=== | ||
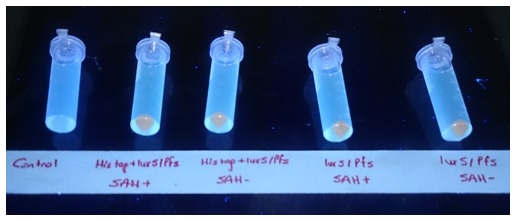
| + | To observe inducible promoters response, we co incubated two different bacteria. The first bacteria culture was expressing the enzyme system luxs-pfs and the second culture included our inducible promoter which produce RFP in the presence of AI-2. During the experiment, we incubated them seperately for 16 hours then mixed them into one flask and waited for 4 hours, we then add 0,1 mM SAH (with 10x PBS containing %1 BSA). After incubating them with SAH for one day, we took 2 ml of liquid culture into centrifuge tubes for centrifugation. Below is a photo which shows the resulting red pellet of our experiment meaning that our inducible promoter was succesfully working to produce AI-2. | ||
| + | |||
| + | |||
| + | [[File:Oncoli-exp1-i7.jpg|800px]] | ||
| + | |||
| + | ===Discussion of ellman’s assay=== | ||
| + | Our results proved that our system was working as expected and the challenges were overcome. According to our Ellman’s assay experience, our enzyme system is succesfully producing auto inducer 2. As described in the ‘design’ section, AI-2 will induce bacteria to move towards the cancer cells. | ||
| + | We searched for an inducible system which would become activated at the presence of antigen on bacteria. As an activating molecule, autoinducer2 activates LsrR-LsrK promoter system for express the killer protein by bacteria. | ||
| + | The centrifuged tubes of liquid cultures were addedwith an inducible promoter containing the RFP gene which would be a marker of its activation. Therefore the results of co-incubation significantly show us that the promoter system is activated in the presence of autoindcer2. | ||
| + | |||
| + | ==Protein G binding experiment== | ||
| + | Our nanofactory is formed with an antibody, Protein G and an enzyme complex. A connection between the enzyme system and antibody was required, therefore we used a linker. We used a molecule called protein G which was derived from group C and G Streptococcus strains that binds to the Fc region of numerous immunogloblulins. Protein G facilitates binding of enzyme construct to the Fc region of the targeting antibody. We also cloned the nanofactories into pSB1C3 and we expressed this protein in the BL21 strain of E. coli. Futhermore we tagged his6x at N terminus of protein G for purification. | ||
| + | |||
| + | The aim of protein G and Ig G binding experiment was to construct a nanofactory complex composed of two parts that is the antibody and enzyme system. | ||
| + | Protein G has a natural affinity to bind to the antibody in phosphate buffer. Therefore we incubated protein G with the antibodies in 10mM phosphate buffer for 2,5 hours and measured the quantity of fused proteins via Western Blotting experiment. | ||
| + | Result; | ||
| + | |||
| + | |||
| + | [[File:Oncoli-exp1-i8.jpg|800px]] | ||
| + | |||
| + | |||
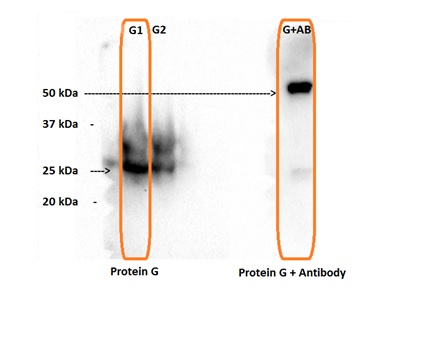
| + | Our protein G weight was 25 kDas and our combined Protein G + antibody protein’s weight was about 50 kDas. In our view, the experimental results were acceptable as the weight of protein G is known to be approximately 25 kDas line as well as the complex being close 50 kDas. | ||
| + | |||
| + | ==DISCUSSION== | ||
| + | First of all, liquid culture was prepared for our TorA-GFP and GFP-HlyA experiments. We added TritonX into half of our TorA-GFP samples and didn’t add any chemicals into the other half of TorA-GFP samples . After the Overnight process of incubation we centrifuged to receive our supernatants from our samples because our aim was to extract the proteins. | ||
| + | The results of the TorA-GFP supernatant samples showed that the samples with TritonX & Glycine had no GFP. We assumed this was due to the cellular necroses due to TritonX & glycine being high in concentration caused secretion of low amount of GFP. Because of the secretion of the GFP in periplasmic gap we used %2 TritonX*+%1 Glycine* that wrote in article and we destroy outer memrane. We got this concentration from article. | ||
| + | Our TorA-GFP experiment results show that the samples with only TritonX added contains more GFP than the Negative(-) Control. The results show us that our signal peptides worked properly and our chemicals TritonX and Glycine showed the right effects of our desires. | ||
| + | GFP-HlyA also resulted in the production of high amount of GFP in our Negative(-) Controls. | ||
| + | Another set of results showed that liquid culture of only LB produced maximum amount of GFP. | ||
| + | |||
| + | *Tang et al 2008 ., Jin-bao Tanga, Hong-ming Yanga, Shu-liang Songb, Peng Zhub, Ai-guo Jib | ||
| + | (Effect of Glycine and Triton X-100 on secretion and expression of ZZ–EGFP fusion protein) | ||
| + | 1)Blobel G, Dobberstein B. (Dec. 1975). "Transfer of proteins across membranes. I. Presence of proteolytically processed and unprocessed nascent immunoglobulin light chains on membrane-bound ribosomes of murine myeloma." | ||
| + | |||
| + | |||
| + | ===Optimization of constitutive promoter for protein over expression=== | ||
| + | The over expression experiments aim was to increase the synthesis of our protein in a new medium we prepared. We predicted that the over expression of our desired protein by our bacteria would be a good idea to observe the net results. So we decided to prepare the “best medium” for the bacteria. Then we generated different media combinations. We generated the combinations by altering conditions of bacteria, liquid culture incubation time, bacteria strain and temperature of incubator. So at the end of the experiment there were 60 different conditions and media we designed. | ||
| + | Different media and conditions in our experiment: | ||
| + | |||
| + | |||
| + | [[File:Oncoli-exp1-i10.jpg|800px]] | ||
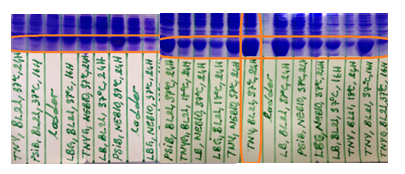
| + | After preparing the media we started the experiment stage. Our experiment includes protein isolation and SDS page parts. We got the total amount of protein of the bacteria after the protein isolation by using sonicator. Then we measure the band of our proteins in the SDS Page experiment. Finally we chose the winner a medium called TNY, BL21, 24H, 37C | ||
| + | SDS Page results; | ||
| + | [[File:Oncoli-exp1-i11.png|800px]] | ||
| + | TNY, BL21, 37C, 24Hr TNY, NEB10, 37C, 24Hr | ||
| + | We were excepting LB as the expression maximizer but the results were surpising as the TNY medium resulted in high level of protein. İngredients of LB and TNY were the same. The only difference was the concentration of each component. Interestingly, the medium with low density was better than our routine medium, LB. There was small percentage dissimilarity between the medias like 7/200 and 4/200. Our TNY was prepared by diluting 4gr TNY extract with distilled water. | ||
| + | To conclude, protein expression level of TNY is 10 times higher than LB(see above). | ||
==Ellman’s assay experiment== | ==Ellman’s assay experiment== | ||
Revision as of 15:01, 19 May 2014
Contents |
Experiment Results / Discussion
-The Experiments about EpCAM – Anti EpCAM Binding
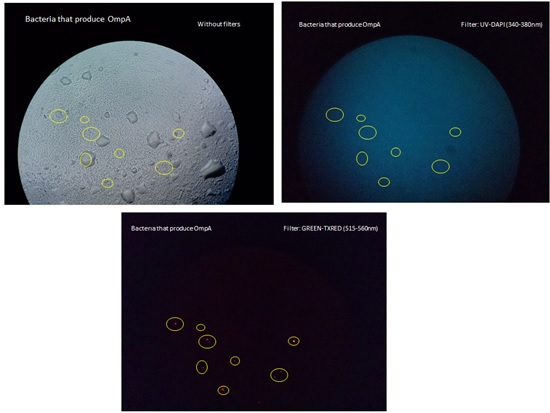
First of all, we wanted to test if our bacteria were able to produce C215 (Anti-EpCAM). To determine this, we performed Immunofluorescence experiments by placing OmpA (a signal peptide which sends the proteins into the membrane) signal peptide and his-tag before the C215 protein sequence in one of our parts. We then accomplished immunofluorescence colouring and were able to see red circles around our bacteria. Including his-tag in the sequence was to our bacteria. During the experiments we used anti-his-tag which was situated after the colouring substance in the sequence. This allowed us to comprehend if our bacteria were able to produce C215; in which case they were.
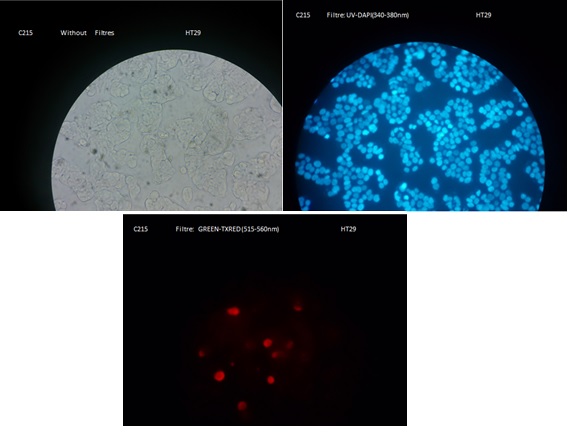
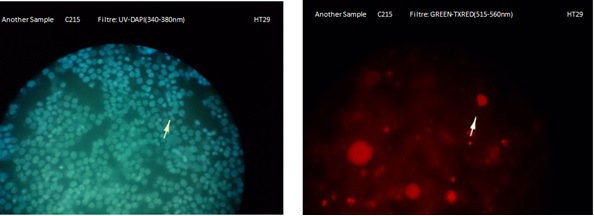
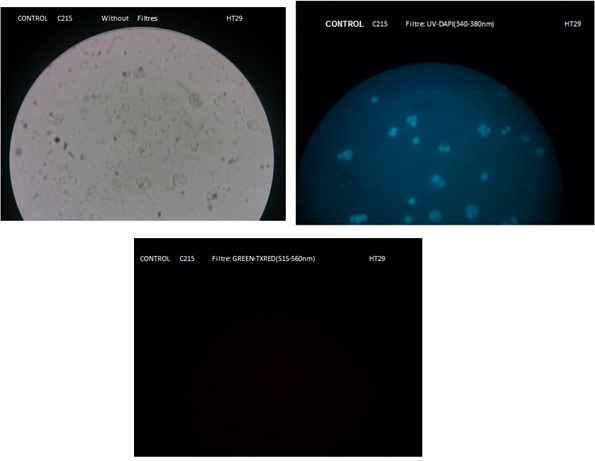
Our second set of immunofluorescence experiments was to confirm the binding of EpCAM to C215. The first set of experiments had proved that our bacteria were successfuly producing C215, however we were unable to comprehend if C215 was able to bind to EpCAM or not. Therefore we carried out another experiment, where purified C215 was presented to cancer cells in well-plates. Our expectations were fulfilled and we were able to see red coloured cancer cells and blue nucleus'.
---
Immunofluorescence c215
For our project to work, the active domain of anti EpCAM was required to bind to the membranes of cancer cells. Pic. 1 show vague red shining cells which prove that our C215 is working. With these results we were able to say that our nanofactories would be able to bind to our cancer cells successfully.
Immunofluorescence OmpA
Before beginning with experiments we decided to use an alternative method to detect the cancer cells. We decided to use our bacteria as nanofactory itself (quorum sensing). Therefore OmpA was placed before C215 to determine so that our bacteria would bind to the cancer cells. We tested the production of OmpA by our bacteria with immunofluorescence experiments and were able to see shinning red lights in the Pic 2 which proved that our OmpA was presented by our cell’s outer membrane successfully; meaning that our bacteria could be used as a nanofactory.
Ellmans Assay
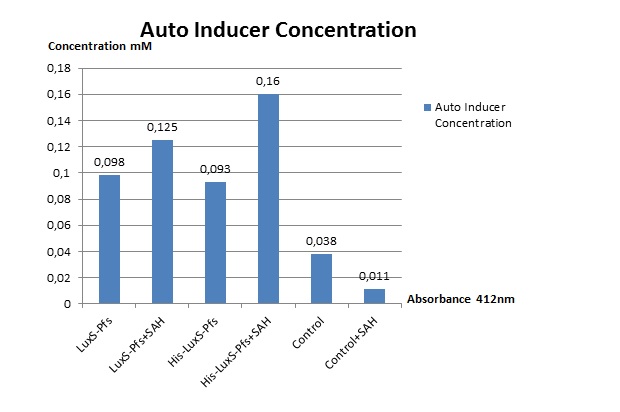
Ellman’s assay is a test which enables us to measure the concentration of AI-2. In order to perform Ellman’s assay liquid culture of bacteria which produce the enzymes Luxs-Pfs were required. The liquid cultures resistant to CHL were incubated for 16 hours which then followed on by adding 0,1 mM substrate (SAH in 10X PBS containing %1 BSA) and SAH containing liquid cultures were continued to be incubated but this time at room temprature for a period of two hours. During the incubations, our enzymes were producing autoinducer 2. To determine the quantity of autoinducer-2 produced, we centrifuged and measured light density of our supernatants with the light spectrophotometer. Our negative control were transformed bacteria. The results of the Ellman’s assay our below:
This results show that enzymes are expressed by e.coli are succesfully producing autoinducer2.
Lsrk/ Lslr Inducible promoter experiment
To observe inducible promoters response, we co incubated two different bacteria. The first bacteria culture was expressing the enzyme system luxs-pfs and the second culture included our inducible promoter which produce RFP in the presence of AI-2. During the experiment, we incubated them seperately for 16 hours then mixed them into one flask and waited for 4 hours, we then add 0,1 mM SAH (with 10x PBS containing %1 BSA). After incubating them with SAH for one day, we took 2 ml of liquid culture into centrifuge tubes for centrifugation. Below is a photo which shows the resulting red pellet of our experiment meaning that our inducible promoter was succesfully working to produce AI-2.
Discussion of ellman’s assay
Our results proved that our system was working as expected and the challenges were overcome. According to our Ellman’s assay experience, our enzyme system is succesfully producing auto inducer 2. As described in the ‘design’ section, AI-2 will induce bacteria to move towards the cancer cells.
We searched for an inducible system which would become activated at the presence of antigen on bacteria. As an activating molecule, autoinducer2 activates LsrR-LsrK promoter system for express the killer protein by bacteria. The centrifuged tubes of liquid cultures were addedwith an inducible promoter containing the RFP gene which would be a marker of its activation. Therefore the results of co-incubation significantly show us that the promoter system is activated in the presence of autoindcer2.
Protein G binding experiment
Our nanofactory is formed with an antibody, Protein G and an enzyme complex. A connection between the enzyme system and antibody was required, therefore we used a linker. We used a molecule called protein G which was derived from group C and G Streptococcus strains that binds to the Fc region of numerous immunogloblulins. Protein G facilitates binding of enzyme construct to the Fc region of the targeting antibody. We also cloned the nanofactories into pSB1C3 and we expressed this protein in the BL21 strain of E. coli. Futhermore we tagged his6x at N terminus of protein G for purification.
The aim of protein G and Ig G binding experiment was to construct a nanofactory complex composed of two parts that is the antibody and enzyme system. Protein G has a natural affinity to bind to the antibody in phosphate buffer. Therefore we incubated protein G with the antibodies in 10mM phosphate buffer for 2,5 hours and measured the quantity of fused proteins via Western Blotting experiment. Result;
Our protein G weight was 25 kDas and our combined Protein G + antibody protein’s weight was about 50 kDas. In our view, the experimental results were acceptable as the weight of protein G is known to be approximately 25 kDas line as well as the complex being close 50 kDas.
DISCUSSION
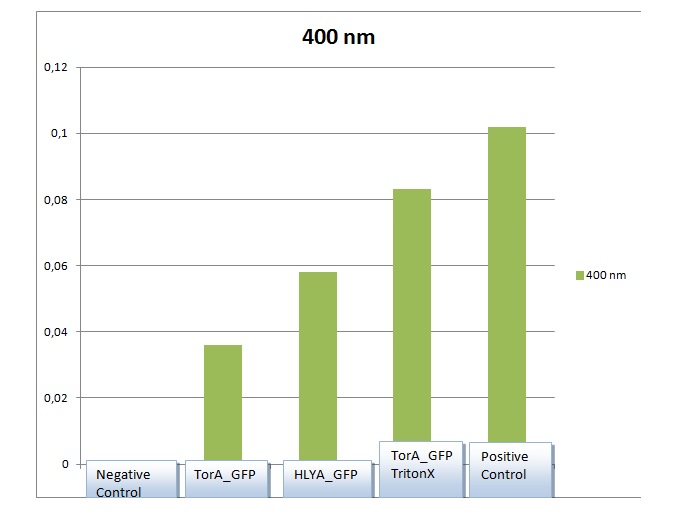
First of all, liquid culture was prepared for our TorA-GFP and GFP-HlyA experiments. We added TritonX into half of our TorA-GFP samples and didn’t add any chemicals into the other half of TorA-GFP samples . After the Overnight process of incubation we centrifuged to receive our supernatants from our samples because our aim was to extract the proteins. The results of the TorA-GFP supernatant samples showed that the samples with TritonX & Glycine had no GFP. We assumed this was due to the cellular necroses due to TritonX & glycine being high in concentration caused secretion of low amount of GFP. Because of the secretion of the GFP in periplasmic gap we used %2 TritonX*+%1 Glycine* that wrote in article and we destroy outer memrane. We got this concentration from article. Our TorA-GFP experiment results show that the samples with only TritonX added contains more GFP than the Negative(-) Control. The results show us that our signal peptides worked properly and our chemicals TritonX and Glycine showed the right effects of our desires. GFP-HlyA also resulted in the production of high amount of GFP in our Negative(-) Controls. Another set of results showed that liquid culture of only LB produced maximum amount of GFP.
- Tang et al 2008 ., Jin-bao Tanga, Hong-ming Yanga, Shu-liang Songb, Peng Zhub, Ai-guo Jib
(Effect of Glycine and Triton X-100 on secretion and expression of ZZ–EGFP fusion protein) 1)Blobel G, Dobberstein B. (Dec. 1975). "Transfer of proteins across membranes. I. Presence of proteolytically processed and unprocessed nascent immunoglobulin light chains on membrane-bound ribosomes of murine myeloma."
Optimization of constitutive promoter for protein over expression
The over expression experiments aim was to increase the synthesis of our protein in a new medium we prepared. We predicted that the over expression of our desired protein by our bacteria would be a good idea to observe the net results. So we decided to prepare the “best medium” for the bacteria. Then we generated different media combinations. We generated the combinations by altering conditions of bacteria, liquid culture incubation time, bacteria strain and temperature of incubator. So at the end of the experiment there were 60 different conditions and media we designed. Different media and conditions in our experiment:
After preparing the media we started the experiment stage. Our experiment includes protein isolation and SDS page parts. We got the total amount of protein of the bacteria after the protein isolation by using sonicator. Then we measure the band of our proteins in the SDS Page experiment. Finally we chose the winner a medium called TNY, BL21, 24H, 37C SDS Page results;
TNY, BL21, 37C, 24Hr TNY, NEB10, 37C, 24Hr
We were excepting LB as the expression maximizer but the results were surpising as the TNY medium resulted in high level of protein. İngredients of LB and TNY were the same. The only difference was the concentration of each component. Interestingly, the medium with low density was better than our routine medium, LB. There was small percentage dissimilarity between the medias like 7/200 and 4/200. Our TNY was prepared by diluting 4gr TNY extract with distilled water.
To conclude, protein expression level of TNY is 10 times higher than LB(see above).
Ellman’s assay experiment
It’s possible to measure the autoinducer concentration by ellman’s assay. Ellmans assay needs liquid culture of enzyme expressing bacteria so we preapare liquid cultures (with antibiotics) of them. After incubating liquid cultures add 0,1 mM substrate (SAH in 10X PBS containing %1 BSA) and incubated SAH added liquid cultures at room temprature for two hour. While the bacteria incubating, enzymes producted autoinducer 2. After incubating, santrifujed and measure the supernatants. We measure autoinducer concentration, enzymes production. We use transformed bacteria as a negative control. Ellman’s assay result:
This result telling us enzymes are expressed by e.coli and succesfully produced autoinducer2.
Inducible promoter experiment
To observe inducible promoters response, we co incubated two different bacteria. The first bacteria culture is expressing enzyme system and the second culture is including inducible promoter. At the experiment, we incubated them seperately for 16 hours and mixed them into one flask and 4 hour later, we add 0,1 mM SAH (with 10x PBS containing %1 BSA). Incubate with SAH for one day and, took 2 ml of liquid culture to santrifuge tube.Centrifuged it. We saw the red color at the pellet as you see below.
So, it means the enzyme system is working and inducible promoter is succesfully induced from AI-2. Discussion of ellman’s assay
Our results clearly shows that we have overcome our challenges. According to ellman’s assay experience, our enzyme system is succesfully producing auto inducer 2. As described at design part, this molecule will induce bacteria for react to cancer cell.
We were searching for inducible system that, getting activated with cancer cell antigen precense. As an activating molecule, autoinducer2 activates LsrR-LsrK promoter system for express the killer protein by bacteria. Our co-incubation liquid cultures’ santrifuged tubes are—kırmızı görünüyor we added rfp gene to continue of inducible promotor gene and rfp is marker of activating. So this co incubation result significantly shows us promoter system is activating in the precense of autoindcer2.
Protein G binding experiment
Our nanofactory includes antibody, Protein G and enzyme complex. We needed connection enzyme system between antibody as a linker.Herewith we used protein G which derived from group C and G Streptococcus strains and binds to the Fc region of numerous immunogloblulins. Protein G facilitates binding of enzyme construct to the Fc region of the targeting antibody.Also we was cloned into pSB1C3 and we express this protein in BL21 strain of E. coli. Futhermore we tagged his6x at N terminus of protein G for purificaiton.
The aim of protein G and Ig G binding experiment is to make a complex with two parts of nanofactory and construct our nanofactory.
Our nanofactory includes antibody, Protein G and enzyme complex. There is natural affinity of protein G to bind to antibody in phosphate buffer. So we incubated protein G and antibodies in 10mM phosphate buffer for 2,5 hours then we measure the quantity of fused proteins via Western Blotting experiment.
Result;
Our protein G weight is 25 kDas and our combined Protein G + antibody protein’s weight is about 50 kDas. We accepted the experiment result that protein G nearby of 25 kDas line and the complex nearby of 50 kDas. The experiment throughput was the same as we accepted as you see above.
The result show that we have produced nanofactory for definite.
Signal Peptide
A signal peptide (sometimes referred to as signal sequence, leader sequence or leader peptide) is a short (5-30 amino acids long) peptidepresent at the N-terminus of the majority of newly synthesized proteins that are destined towards the secretory pathway.[1] In prokaryotes, signal peptides direct the newly synthesized protein to the SecYEG protein-conducting channel, which is present in the plasma membrane. In this part of our project we tested are our signal peptides is working or not To secrete GFP protein via signal peptide to extracellular membrane. In overall project, our aim related with signal peptide is to secrete apoptotic proteins outer membrane. If this construct secrete GFP successfully, that means signal peptide works and TorA can be used in Apoptin or E4orf4 export. And also we use constitutive promoter in our designs because we need high amount of protein and we want to our bacteria always produce our proteins. We made santrifuge our signal peptides’ (TorA-GFP ve GFP-HlyA) liquid culture falcons and then get supernatant from falcons. Then we measured values of absorption of GFP in our supernatant in suitable wavelength. Results show that we found high amount of GFP in our supernatants. Result;
Column scale(y) shows us quantity amount of GFP in the solution.
DISCUSSION
Firstly we made liquid culture in our TorA-GFP and GFP-HlyA experiments. We added TritonX half of our TorA-GFP samples and didn’t add any chemicals our other TorA-GFP samples . After the Overnight process we made santrifuge and we get supernatants from our samples because we wait our proteins in supernatant. The results of the supernatant of the TorA-GFP samples that we didn’t add TritonX & Glycine were over 0. So we thought that we got this results becuse of the cellular necroses that caused secretion of low amount of GFP. Because of the secretion of the GFP in periplasmic gap we used %2 TritonX*+%1 Glycine* that wrote in article and we destroy outer memrane. We got this concentration from article. Our results in our TorA-GFP experiments that our samples that added TritonX contains more GFP amount than Negative(-) Control. So this results showed us that our signal peptides worked properly and our chemicals TritonX and Glycine showed their effects. Also we get another fine results from our GFP-HlyA that we found high amount of GFP in our samples more than our Negative(-) Control. Another good results that our Positive Control which is GFP that added in LB showed maximum amount of GFP in graphics. So we can said that our controls were working too.
- Tang et al 2008 ., Jin-bao Tanga, Hong-ming Yanga, Shu-liang Songb, Peng Zhub, Ai-guo Jib
(Effect of Glycine and Triton X-100 on secretion and expression of ZZ–EGFP fusion protein) 1)Blobel G, Dobberstein B. (Dec. 1975). "Transfer of proteins across membranes. I. Presence of proteolytically processed and unprocessed nascent immunoglobulin light chains on membrane-bound ribosomes of murine myeloma."
Optimization of constitutive promoter for protein over expression
Over expression experiment’s aim is over synthesis of protein in a new medium that we prepared. We thought that’s a good idea over expressing of protein by the bacteria to observe the net results. So we decided to prepare the “best medium” for the bacteria. Then we generated different media combinations. We generated the combinations by altering conditions of bacteria, liquid culture incubation time, bacteria strain and temperature of incubator. So at the end of the experiment there were 60 different conditions and media we designed. Different media and conditions in our experiment:
After preparing the media we started the experiment stage. Our experiment includes protein isolation and SDS page parts. We got the total amount of protein of the bacteria after the protein isolation by using sonicator. Then we measure the band of our proteins in the SDS Page experiment. Finally we chose the winner a medium called TNY, BL21, 24H, 37C SDS Page results;
TNY, BL21, 37C, 24Hr TNY, NEB10, 37C, 24Hr
Discussion
We were excepting the LB for the winner of the experiment but we surprised by seeing the result. Because the medium that prepared by us and called TNY was the best. The content of TNY and LB is the similar but the component percentage of media is different. It is very interesting that low rated medium is better than the LB. There is small percentage dissimilarity between the media like 7/200 and 4/200. Our TNY is preparing by diluting 4 gr TNY extract with distilled water. We observed the protein expression level of TNY 10 times more than LB as you see above.
 "
"
