 "
"
Team:Colombia Uniandes/Journal
From 2013.igem.org


Journal
Hands at work!
Here you will find the overall progression of our work at the laboratory designing Chimi.
13th June 2013
The first thing we did was to extract the plasmids from the iGEM plaque.
- From the 2013 kit, Plate 1, Well 19 – o
- From the 2013 kit, Plate 1, Well 2 – i
- From the 2013 kit, Plate 3, Well 17 – c
The iGEM parts were taken in order to perform an electroporation. For this, we use:
- 20 µ of miliQ water (ultra pure). Find the plate and stick the tip with water into the well, perforating the aluminum.
- Resuspend the well’s content by gentle pipetting.
- When the water has a dark red color, transfer it to a PCR eppendorf and put on ice.
15th June 2013
We picked the transformant colonies.
18th June 2013
We performed miniprep procedures with the GenElute HP Plasmid Miniprep kit.
This are the overall steps:
- Harvest cells.
- Resuspend cells.
- Cell lysis.
- Neutralization.
Spin method:
- Prepare column.
- Load cleared lysate.
- Wash column with wash solution 1.
- Was column with wash solution 2.
- Centrifuge.
- Elute DNA.
We did a confirmation Gel 100 V x 30 min. -> It showed 1 bond in the first two wells corresponding to Nal1 and Nal2. We succesfully extracted the Nal plasmids!
June 21st, 2013
Harju et al., “Bust n’ Grab” Protocol for Yeast Genomic DNA Extraction
- 5 mL of overnight culture of S. cerevisiae (in BHI medium) were centrifuged at 8500 rpm for 5 min. Discard de supernatant.
- 500 µL of Harju lysis buffer were added to each tube.
- Place 2 min at -20 °C, 1 min in water bath at 90 °C and repeat.
- Vortex 30 s.
- Add 500 µL of chloroform, vortex 2 min and centrifuge 3 min at 8500 rpm.
- Transfer the upper aqueous phase to a tube with 800 µL of chilled 100% ethanol and mix by inversion.
- Incubate for 5 min at room temperature or at 30 °C.
- Centrifuge for 5 min, 8500 rpm, and discard supernatant.
- Wash the pellet with 500 µL of ethanol (100%) by vortex. Repeat step 9.
- Dry pellets at room temperature or at 60 °C.
- Resuspend in 40 µL miliQ water.
June 26, 2013
- We made competent yeast following the procedure mentioned before.
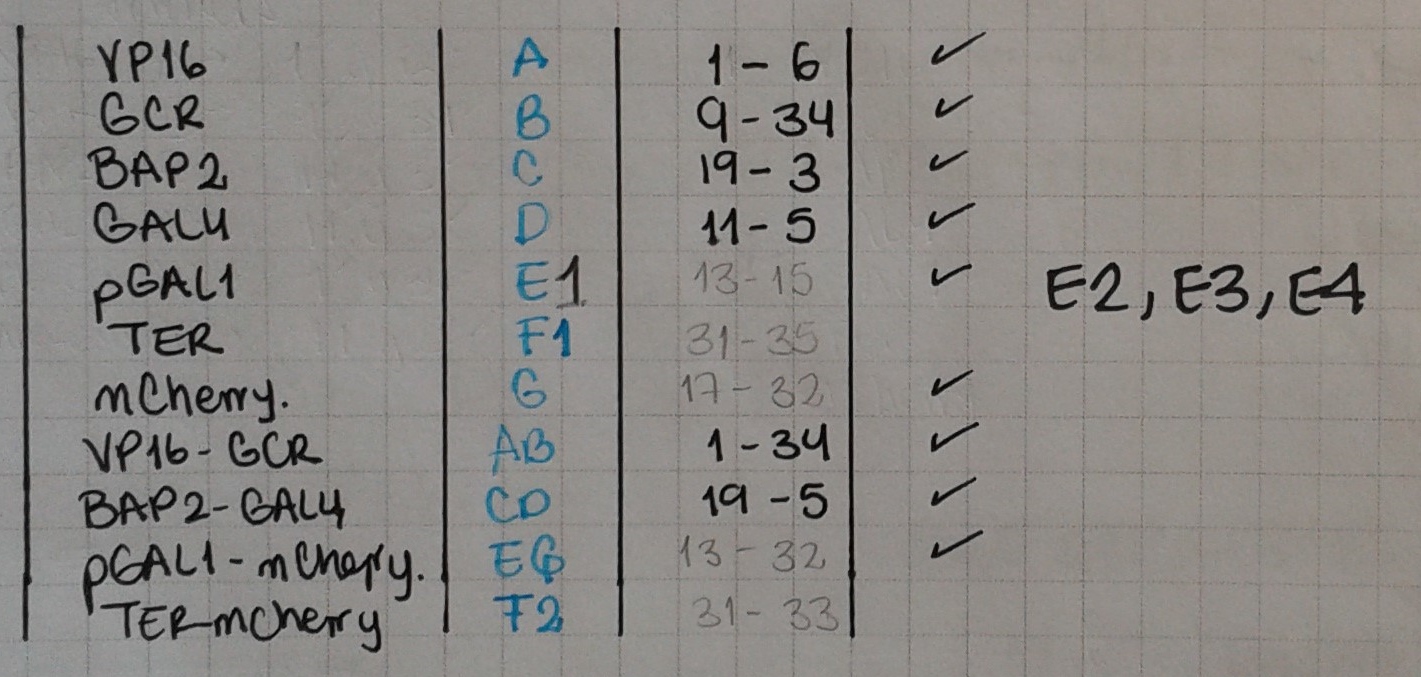
- We also made our first PCRs! We used primers 6 & 1 (A) and 34 & 9 (B) to extract VP16 and GCR from the Nal1 plasmid.
- Confirmation gel (2013-06-26 19 hr 16 min.jpg & 2013-06-26 19hr 15 min.jpg) with wells:
- Ladder
- PCR A
- PCR B
- Miniprep for Nal. 1
A = VP16
B = GCR


June 27, 2013
We repeated the PCR for A and used lambda phage DNA for carrier DNA.
We also tried extracting yeast genome using a modified Harju “Bust n’ Grab” protocol using three parallel methods:
- Method “H” used the regular lysis buffer.
- Method “C” used the following lysis buffer: 3% Triton, 100 mM LiCl, 10 mM Tris-HCl, 1 mM EDTA, 100 mM NaAc.
- Method “O” used the following lysis buffer: 2% triton, 1& SDS, 10 mM tris-HCl, 1 mM EDTA, 100 mM LiCl.
Conformation gel was run with wells:
- Ladder
- PCR A (repeated)
- Carrier lambda PCR
- Method C
- Method H
- Method O
The genome extraction still isn't working! :(
We then ran a fusion PCR with GAL4 and VP16 (A and B). These were the PCR conditions:
- 1st PCR --> 2-step PCR
Cycle steps
- Initial denaturation (98 °C, 30 s)
- 15 cycles (98 °C, 10 s; 72 °C, 35 s)
- Final extension (72 °C, 5 min)
- Hold (4 °C, indefinite time)
- 2nd PCR --> 2-step PCR (add primers)
Cycle steps
- Initial denaturation (98 °C, 30 s)
- 35 cycles (98 °C, 10 s; 72 °C, 35 s)
- Final extension (72 °C, 10 min)
- Hold (4 °C, indefinite time)
July 2nd, 2013
Still trying to successfully extract the yeast genome! This time we tried an alternate method where we used two different solutions to break the cell wall:
- Solution I: Glucose 50 mM, EDTA pH 8 10 mM, Tris-HCl pH 8 25 mM (esterilized) + Zymolyase
- Solution II: NaOH 0.2 N, SPS 1%
The rest of the protocol was taken from GenElute DNA Kit from Sigma-Aldrich.
July 3rd, 2013
The genome extraction was better, but it's mostly degraded DNA! We still have to improve the protocol.
July 5th, 2013
We're still improving our genome extraction protocol. This time we're trying 4 variations to break the cell wall
We're varying the incubation of both solutions, the one that comes with the kit (Proteinase K + Lysis buffer) and the zymolyase solution we previously used. The four variations were as follows.
- A: Zymolyase for ½ h at 37 °C
- B: Zymolyase for ½ h at 37 °C, then protease K + lysis T ½ h at 55 °C
- C: Zymolyase for ½ h at 37 °C, then protease K + lysis T ½ h at 37 °C
- D: Regular GenElute Genome extraction protocol
The rest of the steps were done following the instructions from the GenElute Genome extraction protocol.
We ran a gel in this order: WM, A, B, C, D.
Both B and C gave results, with C giving better yields! We're keeping the C protocol and we're happy we can start extracting parts from the yeast genome!
We performed PCRs for BAP2, GAL4, yeast terminator and pGAL1. These were the conditions:
PCR fusion 2 steps*, with process 3 at 72 °C for 45 s
*
- 98 °C, 1 min
- 98 °C, 10 s
- 72 °C, 45 s
Steps 2 and 3 x 35
- 72 °C, 10 min
- 4 °C
July 9th, 2013
Today we ran PCRs for pGAL1 and mCherry. Now that we have several parts, we must have a clear understanding of our notation!
July 18th, 2013
Today we ran PCRs for the following fusions: F1 = TER-GCR, with primers 31 & 35; F2 = TER – mCherry, with primers 31 & 33. We also amplified E = pGAL1, using primers 13 & 15.
July 19th, 2013
Today we amplified F2 that we obtained yesterday.
July 22nd, 2013
Today we tried to fuse C-D using primers 19 and 5, TER-GCR using primers 31 and 35 and TER-mCherry using primers 31 and 33. After 15 PCR cycles, we added the primers.
July 24th, 2013
Today we extracted the terminator from the yeast genome (F1 and F2) and pGAL1 from miniprep (E). We also did PCRs to fuse again our big parts: pBAP2 – GAL4 – VP16 – GCR (CD-AB) (primers 19 & 34) and pGAL1 – mCherry (E-G) (primers 32 & 15).
At the moment, this is our progress!:
August 5th, 2013
Things are advancing at a fast pace! Today we did miniprep to obtain PUC19!
August 6th, 2013
After doing a confirmation gel, C and CD are no longer with us! So we need to repeat them!
August 16th, 2013
Still no C nor D, so we did PCRs again with different methods to obtain C1, C2, D1 and D2.
August 17th,2013
We're now starting with the reporter construct's PCRs. We got the synthetised parts (E2, E3, E4 and F (the terminator)) which means we need to start fusing them. First off, we'll fuse the terminator with the reporter, since it's common to all reporters.
August 19th,2013
Today we'll perform the fusion between FG and the four Es.
August 20th,2013
The fusion didn't work out, so we reamplified FG and tried again.
August 30th, 2013
We finally have the E*GF fusions complete!
We did the digestion for the E*GF parts and the pSB1C3 plasmid as follows:
- Buffer 5x: 5 uL
- SpeI: 1 uL
- XbaI: 1 uL
- DNA: 10 uL
- Water: 33 uL
They were placed for two hours at 37°C and then were inactivated at 80°C for 20 minutes. Then we added alkaline phosphatase for 1 hour at 37°C.
Then, we did the ligation protocol as follows:
- Buffer 5x: 2 uL
- plasmid: 3 uL
- insert: 9 uL
- ligase: 1 uL
- Water: 5 uL
We then transformed them. Tomorrow we'll confirm the transformation by miniprep kit.
August 31st
After transforming them we got these minipreps
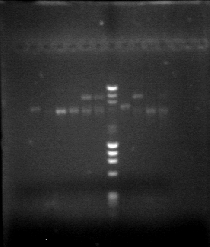
Here we can see all four E*GF parts (the four to the left of the weight marker), some with more than one plasmid conformation.
September 2nd, 2013
We contransformed the E*GF parts with the NAL plasmid in order to validate their function. Once again we did electrocompetent cells and transformed immediately.
September 3rd, 2013
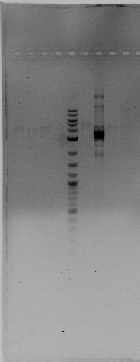
We did the PCR confirmation for the parts. The bands aren't very bright but it's enough for us! We'll run the validation experiments tomorrow!
Wells are as follows: E1FG - E1FG(2) - E2FG - E2FG(2) - Weight marker - E3FG - E3FG(2) - E4FG - E4FG(2).
Something strange happened with E3FG(2)
September 4th, 2013
Everything is ready for the validation experiments. We're both nervous and excited!
We inoculated cells with dexamethasone. The original syringe had a concentration of 8mg/2mL. We obtained a total initial volume of 3.189*10^-2 µL, so we had to dilute first the dexamethasone: 9900 µL water + 100 µL dexamethasone.
Induction experiment ON: 5 mL LB + 20 µL ampicillin + 20 µL kanamycin + 10 µL inoculum + 32 µL dexamethasone (1:1000) (inoculate ON).
We ran a gel for several PCRs: F-H-P-E1GF2-MP-E2GF-E3GF1-E3GF2-E4GF- Everything was succesful except E1GF2.
Then we digested the PCRs with 5 µL Buffer CutSmart + 15 µL PCR + 1 µL XbaI + 1 µL SpeI + 28 µL water (for each PCR)
Dear Journal! :)
Here we will place all the information about the work we have been doing during this time, it will be named by date.
We hope you enjoy our work and thoughts as much as we do!
 Our Notebook
18-Jun-2013
Hello! Hello! Hola! Hola!
After we went over the project, we proceed to design our primers so we could place our order, taking into account that we are going to use Fusion PCR as our main protocol. If you want to check our primers, go to How to: Parts. Our primers take around 2 weeks to arrive… sooo meanwhilee all the team started making our ''E.coli'' babies electrocompetent, so we can work with them later on.
25-Jun-2013
So today we took our bacterial cells (Top 10) onto an LB medium (no antibiotics). We let it ON at 37 °C on the shaker. Also we prepared all the material we need for tomorrow: ddwater, 10 % glycerol, LB medium and microfuge tubes.
26-Jun-2013
Today we are going to start preparing our cells, we inoculated in the morning and placed all our material that needs to be cold in the fridge 4 °C(ddWater and glycerol), also the centifuge rotor needs to be chilled.
Then we just waited for the perfect OD and made our cells around 4:00pm. We made a lot!
We placed them in the -80, ready to start our work!!!
2-Jul-2013
Our primers are FINALLY here and we are anxious to start working!!!
So we made our plan(in theory)on big steps for the next weeks!:
1. DNA extraction from E.coli and Cupriavidus metallidurans CH34
2. PCR
 2.1 PrcnR, RBS, rcnR, stop (Amplified as one piece)
 2.2 PrcnA,RBS
 2.3 hoxN, stop
3. Fusion PCR
 3.1 PrcnA/hoxN
 3.2 PrcnR,RBS,rcnR/PrcnA/hoxN
On each PCR add 30 steps more of making gels for confirmation, again and again and again.
3-Jul-2013
Fortunately our team member Silvia Cañas already had a DNA extraction from ''E.coli'' so she donated it to us so we could start working! Thank you Silvia! :)
We asked for ''Cupriavidus metallidurans'' to our teacher Jenny Dussan at her lab here in the university. She is giving us the strain tomorrow morning! Thank you Jenny!
This done, did the extraction of ''C.metallidurans'' and store it in the -30 °C.
4-Jul-2013
Today we started with the 2-step PCR of PrcnR, RBS, ''rcnR'', stop (Fragment that will be called "R" from now on).
Results were negative :(
5-Jul-2013
Today we repeated "R" PCR and also did ''hoxN'' with the ''Cupriavidus metallidurans'' genome. The quantities used for the reaction of ''hoxN'' are shown in the table below.
Results were negative :( as we could see in our sad, SAD gel.
PCR reagents and amounts for one 50 ul reaction
Reagent
Amount
C.metallidurans DNA
3,0 ul
Primer FW
2,5 ul
Primer RV
2,5 ul
DMSO
2,0 ul
Master Mix
25 ul
dH2O
15 ul
9-Jul-2013
So, our PCRs are NOT working....We think our problem is the length of the primers and their constitution that could form secondary structures very VERY easily.
That's why we tried a new procotol of PCR for "R" with a temperature gradient, and we tried new buffers for ''hoxN''. Reagents and quantities are shown in the table below.
PCR reagents and amounts for one 50 ul reaction
Reagent
Amount
Escherichia coli DNA
2,0 ul
Primer FW
2,5 ul
Primer RV
2,5 ul
DMSO
2,0 ul
Master Mix
25 ul
dH2O
16 ul
We got a POSITIVE result on hoxN, and POSITIVE with "R" at "low" temperatures of annealing. Here is our BEAUTIFULLL gel.
 GoodNewsGEL

On 5,7,8,9 we can see "R" fragment of 359bp.
On 12 we can see hoxN fragment of 837bp.
11-Jul-2013
Today we did the PrcnA PCR and it didn't work out.
15-Jul-2013
We started hoxN PCR with the phusion primers, over the C. metallidurans genome, using 2-step PCR protocol.
Results are negative.
17-Jul-2013
We repeated hoxN PCR with the fusion primers over the genome and PrcnA PCR with E.coli genome.
Nothing worked OUT :( !!!
We are going to try to do the PCR of hoxN with the phusion primers over the fragment already amplified and see, as fas as PrcnA goes...we will try a temperature ramp with a 3-step PCR protocol.
End for today :(
18-Jul-2013
Today we did E. coli chimiocompetent cells to mRFP transformation using TransforrmAid Bacterial Transformation Kit (Thermo Scientific). We did mRFP transformation from iGEM plate.
19-Jul-2013
We have transformants!!!! Beautiful, aren´t they?
 Transformants
24-Jul-2013
Today we are going to do pRcnA PCR. Besides iGEM kit, we used Phusion High Fidelity PCR kit and tested its two buffers: Phusion HF reaction Buffer and Phusion GC Reaction Buffer. We used a 2-step PCR protocol. Reagents and quantities of iGEM kit are the same we have been using until now, but reagents and quantities used for Phusion High Fidelity PCR kit are shown in the table below.
PCR reagents and amounts for one 50 ul reaction
Reagent
Amount
Escherichia coli DNA
4,0 ul
Primer FW
2,5 ul
Primer RV
2,5 ul
Buffer
10 ul
dNTPs
1,0 ul
DMSO
1,5 ul
Pol
0,5 ul
dH2O
28,3 ul
25-Jul-2013
We did hoxN PCR by using the same kits than yesterday and 2-steps protocol. However, results are negative :'(.
26-Jul-2013
Since we have been having troubles with PCRs, we decided to do genome extraction of our bacteria again. For this purpose we used Easy DNA Isolation Kit, Invitrogen. We followed manufacturer's instructions. We confirmed the extraction by gel electrophoresis. Genomes of ''C. metallidurans'' and new ''E.coli'' Extracted :D
 GenomeNewExtractionWithOUTRnase
- Remember you can review protocols in the section named Protocols
29-Jul-2013
Today we did PCR of hoxN from the new C. metallidurans genome exracted and guess what? We got hoxN a beatiful band around 600 pb :D :D. Blue arrow shows HoxN and yellow arrow shows rcnR...FAIL
 GelHoxN
30-Jul-2013
We did PCR of rcnR using the E. coli genome extracted last Friday and Phusion High Fidelity PCR kit. On the gel we got a diffuse band around 400 pb, so we could not conclude anything.
31-Jul-2013
We did PCR of ''pRcnA'' and ''rcnR'' again using a annealing temperature gradient between 45°C and 60° and using the two buffers: Phusion HF reaction Buffer and Phusion GC Reaction Buffer. On the gel we saw a band that corresponded to ''pRcnA'' when the annealing temperature had been around 53°C and GC buffer had been used. On the other hand, in ''rcnR'' reactions we got a band when buffer HF had been used and when annealing temperature was around 58°C.
So...u CAN BARELY see them BUT THEY ARE THERE!
 Prcna,rcnR
01-Aug-2013
Today we did ''hoxN''-''rfp'' phusion. We used Phusion High Fidelity PCR kit, Phusion HF reaction Buffer and the amounts of other reagents described below. We got our first phusion!!! What a great day :)
Phusion PCR
Reagent
Amount
rfp DNA
2,0 ul
hoxN DNA
2,0 ul
Primer FW
1,0 ul
Primer RV
1,0 ul
Buffer
4 ul
dNTPs
0,4 ul
DMSO
1,0 ul
Pol
0,2 ul
dH2O
8,4 ul
 hoxNRFP fusion!
02-Aug-2013
Another try of PrcnR-rcnR and then again...nothing.
 rcnR
rcnR
05-Aug-2013
Since we obtained PrcnA and HoxN, we made a Prcna-HoxN fusion and we also amplified hoxN-RFP fusion. All was obtained and we can see that in our beautifull gel :)Go guys!! The fisrt column next to the DNA ladder is HoxN-RFP fusion on the first pink arrow, on the second pink arrow there is our fusion Prcna-HoxN.
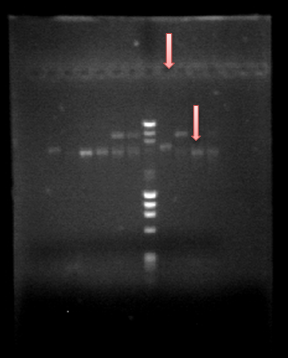 Prcna-HoxN and HoxN-RFP
07-Aug-2013
Today we decided to digest our parts with EcoRI in order to insert our parts in the backbone. Thats why first we did the digestion with EcoRI on the Backbone and also the same process with the parts. We digested for 2 hours and then desactivated the ennzymes at 80°C for 20 min. For protocol see: https://www.neb.com/products/r0101-ecori#tabselect2
We then used antarctic phosphatase for the backbone for 1h. For protocol see: https://www.neb.com/protocols/1/01/01/vector-dephosphorylation-protocol
Finally we let the ligation all night at room temperature.
09-Aug-2013
Today we desactivated the ligase at 80°C for 15 min and started THE TRANSFORMATION!
We transformated our cells and let them in 37°C. Lets see tomorrow :)
10-Aug-2013
They were NO colonies At ALL! not even halfffffff, not even a tiny oneee!!
We are repeating process on monday.
13-Aug-2013
Today we did electrocompetent cells with E.coli DH10B and we tranformed and well...hopefully we will see something tomorrow!
Hopes up!
14-Aug-2013
We have some colonies! but only on HoxN-RFP fusion! We are going to leave those on ON and we are transforming Prcna-HoxN again.
15-Aug-2013
Transformation not succesfull, do it one more time!
16-Aug-2013
Transformation not succesfull, do it one more time!
19-Aug-2013
Transformation not succesfull, do it one more time!
20-Aug-2013
Tranformation succesfull!!!! :) Growing on ON!
21-Aug-2013
Miniprep DAY! :)
Parts Ready!
23-Aug-2013
We are sending Prcna-HoxN and HoxN-RFP :)
We are still trying to get Prcnr-rcnR so lets go!
24-Aug-2013
We tried PCR Prcnr-rcnR and IS NOT THEREEEEEEEEEEEE!
Journal
Hands at work!
Here you will find the overall progression of our work at the laboratory designing Chimi.
13th June 2013
The first thing we did was to extract the plasmids from the iGEM plaque.
- From the 2013 kit, Plate 1, Well 19 – o
- From the 2013 kit, Plate 1, Well 2 – i
- From the 2013 kit, Plate 3, Well 17 – c
The iGEM parts were taken in order to perform an electroporation. For this, we use:
- 20 µ of miliQ water (ultra pure). Find the plate and stick the tip with water into the well, perforating the aluminum.
- Resuspend the well’s content by gentle pipetting.
- When the water has a dark red color, transfer it to a PCR eppendorf and put on ice.
15th June 2013
We picked the transformant colonies.
18th June 2013
We performed miniprep procedures with the GenElute HP Plasmid Miniprep kit.
This are the overall steps:
- Harvest cells.
- Resuspend cells.
- Cell lysis.
- Neutralization.
- Prepare column.
- Load cleared lysate.
- Wash column with wash solution 1.
- Was column with wash solution 2.
- Centrifuge.
- Elute DNA.
Spin method:
We did a confirmation Gel 100 V x 30 min. -> It showed 1 bond in the first two wells corresponding to Nal1 and Nal2. We succesfully extracted the Nal plasmids!
June 21st, 2013
Harju et al., “Bust n’ Grab” Protocol for Yeast Genomic DNA Extraction
- 5 mL of overnight culture of S. cerevisiae (in BHI medium) were centrifuged at 8500 rpm for 5 min. Discard de supernatant.
- 500 µL of Harju lysis buffer were added to each tube.
- Place 2 min at -20 °C, 1 min in water bath at 90 °C and repeat.
- Vortex 30 s.
- Add 500 µL of chloroform, vortex 2 min and centrifuge 3 min at 8500 rpm.
- Transfer the upper aqueous phase to a tube with 800 µL of chilled 100% ethanol and mix by inversion.
- Incubate for 5 min at room temperature or at 30 °C.
- Centrifuge for 5 min, 8500 rpm, and discard supernatant.
- Wash the pellet with 500 µL of ethanol (100%) by vortex. Repeat step 9.
- Dry pellets at room temperature or at 60 °C.
- Resuspend in 40 µL miliQ water.
June 26, 2013
- We made competent yeast following the procedure mentioned before.
- We also made our first PCRs! We used primers 6 & 1 (A) and 34 & 9 (B) to extract VP16 and GCR from the Nal1 plasmid.
- Confirmation gel (2013-06-26 19 hr 16 min.jpg & 2013-06-26 19hr 15 min.jpg) with wells:
- Ladder
- PCR A
- PCR B
- Miniprep for Nal. 1
A = VP16
B = GCR

June 27, 2013
We repeated the PCR for A and used lambda phage DNA for carrier DNA. We also tried extracting yeast genome using a modified Harju “Bust n’ Grab” protocol using three parallel methods:
- Method “H” used the regular lysis buffer.
- Method “C” used the following lysis buffer: 3% Triton, 100 mM LiCl, 10 mM Tris-HCl, 1 mM EDTA, 100 mM NaAc.
- Method “O” used the following lysis buffer: 2% triton, 1& SDS, 10 mM tris-HCl, 1 mM EDTA, 100 mM LiCl.
Conformation gel was run with wells:
- Ladder
- PCR A (repeated)
- Carrier lambda PCR
- Method C
- Method H
- Method O
The genome extraction still isn't working! :(
We then ran a fusion PCR with GAL4 and VP16 (A and B). These were the PCR conditions:
- 1st PCR --> 2-step PCR
Cycle steps- Initial denaturation (98 °C, 30 s)
- 15 cycles (98 °C, 10 s; 72 °C, 35 s)
- Final extension (72 °C, 5 min)
- Hold (4 °C, indefinite time)
- 2nd PCR --> 2-step PCR (add primers)
Cycle steps- Initial denaturation (98 °C, 30 s)
- 35 cycles (98 °C, 10 s; 72 °C, 35 s)
- Final extension (72 °C, 10 min)
- Hold (4 °C, indefinite time)
- Solution I: Glucose 50 mM, EDTA pH 8 10 mM, Tris-HCl pH 8 25 mM (esterilized) + Zymolyase
- Solution II: NaOH 0.2 N, SPS 1%
- A: Zymolyase for ½ h at 37 °C
- B: Zymolyase for ½ h at 37 °C, then protease K + lysis T ½ h at 55 °C
- C: Zymolyase for ½ h at 37 °C, then protease K + lysis T ½ h at 37 °C
- D: Regular GenElute Genome extraction protocol
- 98 °C, 1 min
- 98 °C, 10 s
- 72 °C, 45 s
- 72 °C, 10 min
- 4 °C
- Buffer 5x: 5 uL
- SpeI: 1 uL
- XbaI: 1 uL
- DNA: 10 uL
- Water: 33 uL
- Buffer 5x: 2 uL
- plasmid: 3 uL
- insert: 9 uL
- ligase: 1 uL
- Water: 5 uL
July 2nd, 2013
Still trying to successfully extract the yeast genome! This time we tried an alternate method where we used two different solutions to break the cell wall:
The rest of the protocol was taken from GenElute DNA Kit from Sigma-Aldrich.
July 3rd, 2013
The genome extraction was better, but it's mostly degraded DNA! We still have to improve the protocol.
July 5th, 2013
We're still improving our genome extraction protocol. This time we're trying 4 variations to break the cell wall
We're varying the incubation of both solutions, the one that comes with the kit (Proteinase K + Lysis buffer) and the zymolyase solution we previously used. The four variations were as follows.
The rest of the steps were done following the instructions from the GenElute Genome extraction protocol.
We ran a gel in this order: WM, A, B, C, D.
Both B and C gave results, with C giving better yields! We're keeping the C protocol and we're happy we can start extracting parts from the yeast genome!

We performed PCRs for BAP2, GAL4, yeast terminator and pGAL1. These were the conditions:
PCR fusion 2 steps*, with process 3 at 72 °C for 45 s
- *
Steps 2 and 3 x 35
July 9th, 2013
Today we ran PCRs for pGAL1 and mCherry. Now that we have several parts, we must have a clear understanding of our notation!
July 18th, 2013
Today we ran PCRs for the following fusions: F1 = TER-GCR, with primers 31 & 35; F2 = TER – mCherry, with primers 31 & 33. We also amplified E = pGAL1, using primers 13 & 15.
July 19th, 2013
Today we amplified F2 that we obtained yesterday.
July 22nd, 2013
Today we tried to fuse C-D using primers 19 and 5, TER-GCR using primers 31 and 35 and TER-mCherry using primers 31 and 33. After 15 PCR cycles, we added the primers.
July 24th, 2013
Today we extracted the terminator from the yeast genome (F1 and F2) and pGAL1 from miniprep (E). We also did PCRs to fuse again our big parts: pBAP2 – GAL4 – VP16 – GCR (CD-AB) (primers 19 & 34) and pGAL1 – mCherry (E-G) (primers 32 & 15).
At the moment, this is our progress!:

August 5th, 2013
Things are advancing at a fast pace! Today we did miniprep to obtain PUC19!
August 6th, 2013
After doing a confirmation gel, C and CD are no longer with us! So we need to repeat them!
August 16th, 2013
Still no C nor D, so we did PCRs again with different methods to obtain C1, C2, D1 and D2.
August 17th,2013
We're now starting with the reporter construct's PCRs. We got the synthetised parts (E2, E3, E4 and F (the terminator)) which means we need to start fusing them. First off, we'll fuse the terminator with the reporter, since it's common to all reporters.
August 19th,2013
Today we'll perform the fusion between FG and the four Es.
August 20th,2013
The fusion didn't work out, so we reamplified FG and tried again.
August 30th, 2013
We finally have the E*GF fusions complete! We did the digestion for the E*GF parts and the pSB1C3 plasmid as follows:
They were placed for two hours at 37°C and then were inactivated at 80°C for 20 minutes. Then we added alkaline phosphatase for 1 hour at 37°C.
Then, we did the ligation protocol as follows:
We then transformed them. Tomorrow we'll confirm the transformation by miniprep kit.
August 31st
After transforming them we got these minipreps

Here we can see all four E*GF parts (the four to the left of the weight marker), some with more than one plasmid conformation.
September 2nd, 2013
We contransformed the E*GF parts with the NAL plasmid in order to validate their function. Once again we did electrocompetent cells and transformed immediately.
September 3rd, 2013
We did the PCR confirmation for the parts. The bands aren't very bright but it's enough for us! We'll run the validation experiments tomorrow!
Wells are as follows: E1FG - E1FG(2) - E2FG - E2FG(2) - Weight marker - E3FG - E3FG(2) - E4FG - E4FG(2). Something strange happened with E3FG(2)

September 4th, 2013
Everything is ready for the validation experiments. We're both nervous and excited!
We inoculated cells with dexamethasone. The original syringe had a concentration of 8mg/2mL. We obtained a total initial volume of 3.189*10^-2 µL, so we had to dilute first the dexamethasone: 9900 µL water + 100 µL dexamethasone.
Induction experiment ON: 5 mL LB + 20 µL ampicillin + 20 µL kanamycin + 10 µL inoculum + 32 µL dexamethasone (1:1000) (inoculate ON).
We ran a gel for several PCRs: F-H-P-E1GF2-MP-E2GF-E3GF1-E3GF2-E4GF- Everything was succesful except E1GF2.
Then we digested the PCRs with 5 µL Buffer CutSmart + 15 µL PCR + 1 µL XbaI + 1 µL SpeI + 28 µL water (for each PCR)
Dear Journal! :)
Here we will place all the information about the work we have been doing during this time, it will be named by date. We hope you enjoy our work and thoughts as much as we do!

18-Jun-2013
Hello! Hello! Hola! Hola! After we went over the project, we proceed to design our primers so we could place our order, taking into account that we are going to use Fusion PCR as our main protocol. If you want to check our primers, go to How to: Parts. Our primers take around 2 weeks to arrive… sooo meanwhilee all the team started making our ''E.coli'' babies electrocompetent, so we can work with them later on.
25-Jun-2013
So today we took our bacterial cells (Top 10) onto an LB medium (no antibiotics). We let it ON at 37 °C on the shaker. Also we prepared all the material we need for tomorrow: ddwater, 10 % glycerol, LB medium and microfuge tubes.
26-Jun-2013
Today we are going to start preparing our cells, we inoculated in the morning and placed all our material that needs to be cold in the fridge 4 °C(ddWater and glycerol), also the centifuge rotor needs to be chilled. Then we just waited for the perfect OD and made our cells around 4:00pm. We made a lot!
We placed them in the -80, ready to start our work!!!2-Jul-2013
Our primers are FINALLY here and we are anxious to start working!!! So we made our plan(in theory)on big steps for the next weeks!:
1. DNA extraction from E.coli and Cupriavidus metallidurans CH34
2. PCR
2.1 PrcnR, RBS, rcnR, stop (Amplified as one piece) 2.2 PrcnA,RBS 2.3 hoxN, stop
3. Fusion PCR
3.1 PrcnA/hoxN 3.2 PrcnR,RBS,rcnR/PrcnA/hoxN
On each PCR add 30 steps more of making gels for confirmation, again and again and again.
3-Jul-2013
Fortunately our team member Silvia Cañas already had a DNA extraction from ''E.coli'' so she donated it to us so we could start working! Thank you Silvia! :) We asked for ''Cupriavidus metallidurans'' to our teacher Jenny Dussan at her lab here in the university. She is giving us the strain tomorrow morning! Thank you Jenny! This done, did the extraction of ''C.metallidurans'' and store it in the -30 °C.
4-Jul-2013
Today we started with the 2-step PCR of PrcnR, RBS, ''rcnR'', stop (Fragment that will be called "R" from now on). Results were negative :(
5-Jul-2013
Today we repeated "R" PCR and also did ''hoxN'' with the ''Cupriavidus metallidurans'' genome. The quantities used for the reaction of ''hoxN'' are shown in the table below. Results were negative :( as we could see in our sad, SAD gel.
| Reagent | Amount |
| C.metallidurans DNA | 3,0 ul |
| Primer FW | 2,5 ul |
| Primer RV | 2,5 ul |
| DMSO | 2,0 ul |
| Master Mix | 25 ul |
| dH2O | 15 ul |
9-Jul-2013
So, our PCRs are NOT working....We think our problem is the length of the primers and their constitution that could form secondary structures very VERY easily. That's why we tried a new procotol of PCR for "R" with a temperature gradient, and we tried new buffers for ''hoxN''. Reagents and quantities are shown in the table below.
| Reagent | Amount |
| Escherichia coli DNA | 2,0 ul |
| Primer FW | 2,5 ul |
| Primer RV | 2,5 ul |
| DMSO | 2,0 ul |
| Master Mix | 25 ul |
| dH2O | 16 ul |
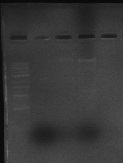
We got a POSITIVE result on hoxN, and POSITIVE with "R" at "low" temperatures of annealing. Here is our BEAUTIFULLL gel.
 |  |
On 5,7,8,9 we can see "R" fragment of 359bp. On 12 we can see hoxN fragment of 837bp.
11-Jul-2013
Today we did the PrcnA PCR and it didn't work out.
15-Jul-2013
We started hoxN PCR with the phusion primers, over the C. metallidurans genome, using 2-step PCR protocol.
Results are negative.
17-Jul-2013
We repeated hoxN PCR with the fusion primers over the genome and PrcnA PCR with E.coli genome.
Nothing worked OUT :( !!!
We are going to try to do the PCR of hoxN with the phusion primers over the fragment already amplified and see, as fas as PrcnA goes...we will try a temperature ramp with a 3-step PCR protocol. End for today :(
18-Jul-2013
Today we did E. coli chimiocompetent cells to mRFP transformation using TransforrmAid Bacterial Transformation Kit (Thermo Scientific). We did mRFP transformation from iGEM plate.
19-Jul-2013
We have transformants!!!! Beautiful, aren´t they?

24-Jul-2013
Today we are going to do pRcnA PCR. Besides iGEM kit, we used Phusion High Fidelity PCR kit and tested its two buffers: Phusion HF reaction Buffer and Phusion GC Reaction Buffer. We used a 2-step PCR protocol. Reagents and quantities of iGEM kit are the same we have been using until now, but reagents and quantities used for Phusion High Fidelity PCR kit are shown in the table below.
| Reagent | Amount |
| Escherichia coli DNA | 4,0 ul |
| Primer FW | 2,5 ul |
| Primer RV | 2,5 ul |
| Buffer | 10 ul |
| dNTPs | 1,0 ul |
| DMSO | 1,5 ul |
| Pol | 0,5 ul |
| dH2O | 28,3 ul |
25-Jul-2013
We did hoxN PCR by using the same kits than yesterday and 2-steps protocol. However, results are negative :'(.
26-Jul-2013
Since we have been having troubles with PCRs, we decided to do genome extraction of our bacteria again. For this purpose we used Easy DNA Isolation Kit, Invitrogen. We followed manufacturer's instructions. We confirmed the extraction by gel electrophoresis. Genomes of ''C. metallidurans'' and new ''E.coli'' Extracted :D

- Remember you can review protocols in the section named Protocols
29-Jul-2013
Today we did PCR of hoxN from the new C. metallidurans genome exracted and guess what? We got hoxN a beatiful band around 600 pb :D :D. Blue arrow shows HoxN and yellow arrow shows rcnR...FAIL

30-Jul-2013
We did PCR of rcnR using the E. coli genome extracted last Friday and Phusion High Fidelity PCR kit. On the gel we got a diffuse band around 400 pb, so we could not conclude anything.
31-Jul-2013
We did PCR of ''pRcnA'' and ''rcnR'' again using a annealing temperature gradient between 45°C and 60° and using the two buffers: Phusion HF reaction Buffer and Phusion GC Reaction Buffer. On the gel we saw a band that corresponded to ''pRcnA'' when the annealing temperature had been around 53°C and GC buffer had been used. On the other hand, in ''rcnR'' reactions we got a band when buffer HF had been used and when annealing temperature was around 58°C. So...u CAN BARELY see them BUT THEY ARE THERE!

01-Aug-2013
Today we did ''hoxN''-''rfp'' phusion. We used Phusion High Fidelity PCR kit, Phusion HF reaction Buffer and the amounts of other reagents described below. We got our first phusion!!! What a great day :)
| Reagent | Amount |
| rfp DNA | 2,0 ul |
| hoxN DNA | 2,0 ul |
| Primer FW | 1,0 ul |
| Primer RV | 1,0 ul |
| Buffer | 4 ul |
| dNTPs | 0,4 ul |
| DMSO | 1,0 ul |
| Pol | 0,2 ul |
| dH2O | 8,4 ul |

02-Aug-2013
Another try of PrcnR-rcnR and then again...nothing.

05-Aug-2013
Since we obtained PrcnA and HoxN, we made a Prcna-HoxN fusion and we also amplified hoxN-RFP fusion. All was obtained and we can see that in our beautifull gel :)Go guys!! The fisrt column next to the DNA ladder is HoxN-RFP fusion on the first pink arrow, on the second pink arrow there is our fusion Prcna-HoxN.

07-Aug-2013
Today we decided to digest our parts with EcoRI in order to insert our parts in the backbone. Thats why first we did the digestion with EcoRI on the Backbone and also the same process with the parts. We digested for 2 hours and then desactivated the ennzymes at 80°C for 20 min. For protocol see: https://www.neb.com/products/r0101-ecori#tabselect2
We then used antarctic phosphatase for the backbone for 1h. For protocol see: https://www.neb.com/protocols/1/01/01/vector-dephosphorylation-protocol
Finally we let the ligation all night at room temperature.
09-Aug-2013
Today we desactivated the ligase at 80°C for 15 min and started THE TRANSFORMATION!
We transformated our cells and let them in 37°C. Lets see tomorrow :)
10-Aug-2013
They were NO colonies At ALL! not even halfffffff, not even a tiny oneee!!
We are repeating process on monday.
13-Aug-2013
Today we did electrocompetent cells with E.coli DH10B and we tranformed and well...hopefully we will see something tomorrow!
Hopes up!
14-Aug-2013
We have some colonies! but only on HoxN-RFP fusion! We are going to leave those on ON and we are transforming Prcna-HoxN again.
15-Aug-2013
Transformation not succesfull, do it one more time!
16-Aug-2013
Transformation not succesfull, do it one more time!
19-Aug-2013
Transformation not succesfull, do it one more time!
20-Aug-2013
Tranformation succesfull!!!! :) Growing on ON!
21-Aug-2013
Miniprep DAY! :)
Parts Ready!
23-Aug-2013
We are sending Prcna-HoxN and HoxN-RFP :) We are still trying to get Prcnr-rcnR so lets go!
24-Aug-2013
We tried PCR Prcnr-rcnR and IS NOT THEREEEEEEEEEEEE!