 "
"
Team:Valencia Biocampus/Devices
From 2013.igem.org
(→iGEM scanner) |
Beta3designs (Talk | contribs) |
||
| (303 intermediate revisions not shown) | |||
| Line 5: | Line 5: | ||
{{:Template:Team:Valencia_Biocampus/Templates/Header}} | {{:Template:Team:Valencia_Biocampus/Templates/Header}} | ||
<html> | <html> | ||
| + | <style> | ||
| + | .thumbnail{ | ||
| + | width:215px; | ||
| + | float:left; | ||
| + | margin-right:12px; | ||
| + | margin-bottom:12px; | ||
| + | max-height:192px; | ||
| + | overflow:hidden; | ||
| + | } | ||
| + | .thumbnail img{ | ||
| + | width:215px; | ||
| + | } | ||
| + | .thumbnail-results{ | ||
| + | width:142px; | ||
| + | margin-right:5px; | ||
| + | } | ||
| + | .thumbnail-results img{ | ||
| + | width:142px; | ||
| + | } | ||
| + | #devices_overview{ | ||
| + | width:608px; | ||
| + | margin:10px auto; | ||
| + | height:308px; | ||
| + | position: relative; | ||
| + | } | ||
| + | .devices_overview-block{ | ||
| + | width: 300px; | ||
| + | height:150px; | ||
| + | float:left; | ||
| + | border:2px solid #fff; | ||
| + | position: absolute; | ||
| + | top:0; | ||
| + | left:0; | ||
| + | z-index: 10; | ||
| + | transition: 0.8s; | ||
| + | -webkit-transition: 0.8s; /* Safari */ | ||
| + | font-size: 13px; | ||
| + | } | ||
| + | .devices_overview-block h3{ | ||
| + | font-size:22px; | ||
| + | font-family: 'Bevan'; | ||
| + | font-weight: normal; | ||
| + | color:#fff; | ||
| + | position:absolute; | ||
| + | bottom:10px; | ||
| + | left:10px; | ||
| + | transition:0.8s; | ||
| + | -webkit-transition: 0.8s; /* Safari */ | ||
| + | |||
| + | } | ||
| + | #devices_overview-hardware h3, #devices_overview-wetlab h3{ | ||
| + | left:auto; | ||
| + | right:10px; | ||
| + | } | ||
| + | #devices_overview-hardware{ | ||
| + | background: #2c5381; | ||
| + | top:0; | ||
| + | left:0; | ||
| + | } | ||
| + | #devices_overview-software{ | ||
| + | background: #bfe202; | ||
| + | top:0; | ||
| + | left:302px; | ||
| + | } | ||
| + | #devices_overview-wetlab{ | ||
| + | background: #53cce2; | ||
| + | top:152px; | ||
| + | left:0px; | ||
| + | } | ||
| + | #devices_overview-drylab{ | ||
| + | background: #2d2f2a; | ||
| + | top:152px; | ||
| + | left:302px; | ||
| + | } | ||
| + | |||
| + | #devices_overview-hardware:hover{ | ||
| + | width:340px; | ||
| + | height:170px; | ||
| + | z-index:25; | ||
| + | top:-10px; | ||
| + | left:-20px; | ||
| + | } | ||
| + | #devices_overview-software:hover{ | ||
| + | width:340px; | ||
| + | height:170px; | ||
| + | z-index:25; | ||
| + | top:-10px; | ||
| + | left:282px; | ||
| + | } | ||
| + | #devices_overview-wetlab:hover{ | ||
| + | width:340px; | ||
| + | height:170px; | ||
| + | z-index:25; | ||
| + | top:142px; | ||
| + | left:-20px; | ||
| + | } | ||
| + | #devices_overview-drylab:hover{ | ||
| + | width:340px; | ||
| + | height:170px; | ||
| + | z-index:25; | ||
| + | top:142px; | ||
| + | left:282px; | ||
| + | } | ||
| + | .devices_overview-block span{ | ||
| + | width: 308px; | ||
| + | position:absolute; | ||
| + | bottom:15px; | ||
| + | right:15px; | ||
| + | color: #fff; | ||
| + | } | ||
| + | .color-wetlab{ | ||
| + | color:#53cce2; | ||
| + | } | ||
| + | .color-drylab{ | ||
| + | color:#2d2f2a; | ||
| + | } | ||
| + | .color-hardware{ | ||
| + | color:#2c5381; | ||
| + | } | ||
| + | .color-software{ | ||
| + | color:#bfe202; | ||
| + | } | ||
| + | .devices_overview-block > span { | ||
| + | visibility:hidden; | ||
| + | opacity:0; | ||
| + | transition:visibility 0s linear 0.5s,opacity 0.5s linear; | ||
| + | } | ||
| + | .devices_overview-block:hover > span { | ||
| + | visibility:visible; | ||
| + | opacity:1; | ||
| + | transition-delay:0s; | ||
| + | } | ||
| + | #devices_overview-hardware:hover h3{ | ||
| + | transform: translate(-190px,-100px); | ||
| + | -ms-transform: translate(-190px,-100px); /* IE 9 */ | ||
| + | -webkit-transform: translate(-190px,-100px); /* Safari and Chrome */ | ||
| + | } | ||
| + | #devices_overview-software:hover h3{ | ||
| + | transform: translate(205px,-100px); | ||
| + | -ms-transform: translate(205px,-100px); /* IE 9 */ | ||
| + | -webkit-transform: translate(205px,-100px); /* Safari and Chrome */ | ||
| + | } | ||
| + | #devices_overview-wetlab:hover h3{ | ||
| + | transform: translate(-220px,-100px); | ||
| + | -ms-transform: translate(-220px,-100px); /* IE 9 */ | ||
| + | -webkit-transform: translate(-220px,-100px); /* Safari and Chrome */ | ||
| + | } | ||
| + | #devices_overview-drylab:hover h3{ | ||
| + | transform: translate(220px,-100px); | ||
| + | -ms-transform: translate(220px,-100px); /* IE 9 */ | ||
| + | -webkit-transform: translate(220px,-100px); /* Safari and Chrome */ | ||
| + | } | ||
| + | .devices_overview-block em{ | ||
| + | font-style: normal; | ||
| + | } | ||
| + | </style> | ||
| + | <script type="text/javascript" src="https://2013.igem.org/wiki/index.php?title=Template:Team:Valencia_Biocampus/Templates/js/slimbox2.js&action=raw&ctype=text/javascript"></script> | ||
| + | <link rel="stylesheet" type="text/css" href="https://2013.igem.org/wiki/index.php?title=Template:Team:Valencia_Biocampus/Templates/css/slimbox2.css&action=raw&ctype=text/css" /> | ||
<div class="container"> | <div class="container"> | ||
| Line 11: | Line 169: | ||
<li><a href="#Hardware">Hardware</a></li> | <li><a href="#Hardware">Hardware</a></li> | ||
<li><a href="#Software">Software</a></li> | <li><a href="#Software">Software</a></li> | ||
| + | <li><a href="#Results">Results</a></li> | ||
</ul> | </ul> | ||
| Line 17: | Line 176: | ||
</html> | </html> | ||
== Devices - Devices Overview == | == Devices - Devices Overview == | ||
| - | |||
<html> | <html> | ||
| + | <!-- | ||
| + | <p>One of the most important parts of our project is the relationship between <b class="color-drylab">Drylab</b> and <b class="color-wetlab">Wetlab</b>, therefore at the beginning we asked ourselves: how can we use modeling to contribute to the overall project? How can the Drylab optimize our lab experiments? And above all, how can we do it useful to the team? | ||
| + | </p> | ||
| + | <br/> | ||
| + | <p> | ||
| + | To achieve our goal we had two brilliant ideas: the first one was building a machine by which we could get pictures of the plates and pass them to the computer, and the second was to create some software in order to recognize these images to improve and get information from them. </p> | ||
| + | <br/> | ||
| + | |||
| + | <p>Therefore, the engineers decided to create a sub-team called Devices and divide us into two teams: <b class="color-hardware">hardware</b> and <b class="color-software">software</b>.</p> | ||
| + | --> | ||
| + | <div id="devices_overview"> | ||
| + | <div id="devices_overview-hardware" class="devices_overview-block"> | ||
| + | <h3>Hardware</h3> | ||
| + | <span>By means of <em class="color-wetlab">experiments carried out in the laboratory</em>, Petri plates were obtained, scanned and the resulting images were ported to the computer.</span> | ||
| + | </div> | ||
| + | <div id="devices_overview-software" class="devices_overview-block"> | ||
| + | <h3>Software</h3> | ||
| + | <span>With the <em class="color-hardware">images from the scanner</em> and <em class="color-drylab">the</em> <em class="color-drylab">different</em> <em class="color-drylab">models designed</em>, we used our C++Elegans to get additional information and observe the results better. We also implemented some simulations. </span> | ||
| + | |||
| + | </div> | ||
| + | <div id="devices_overview-wetlab" class="devices_overview-block"> | ||
| + | <h3>Wetlab</h3> | ||
| + | <span>Thanks to the <em class="color-drylab">Drylab</em> and our <em class="color-software">software</em> we have been able to optimize our experiments, obtaining improved results while minimizing the required assays.</span> | ||
| + | |||
| + | </div> | ||
| + | <div id="devices_overview-drylab" class="devices_overview-block"> | ||
| + | <h3>Drylab</h3> | ||
| + | <span>A very important part of our Drylab is based on modeling with the assistance of our own <em class="color-hardware">Hardware</em> & <em class="color-software">Software</em> which helped us to improve our modeling and to check the correctness of our systems. | ||
| + | </div> | ||
| + | |||
| + | </div> | ||
| + | |||
| + | |||
<div class="clearfix"></div> | <div class="clearfix"></div> | ||
</div> | </div> | ||
<div class="tab-pane fade" id="Hardware"> | <div class="tab-pane fade" id="Hardware"> | ||
</html> | </html> | ||
| - | |||
| - | == iGEM | + | == iGEM Scanner == |
| + | <html> | ||
| + | <iframe style="float:left;margin:5px 10px 10px 0;" src="//player.vimeo.com/video/75961858" width="350" height="250" frameborder="0" wmode="Opaque" webkitallowfullscreen mozallowfullscreen allowfullscreen ></iframe> | ||
| + | </html> | ||
| + | Our iGEM Scanner is able to detect and create an image of the concentration of various substrates in order to be analysed afterwards and facilitate the modeling work. Moreover it was created entirely with LEGO! | ||
| + | <br/> | ||
| + | <br/> | ||
| + | It may seem unbelievable and unrealizable, but LEGO is no longer only for children: there is a new tool called LEGO Mindstorms that allows users to bring their own constructions to life by programming it in an integrated development environment. | ||
| + | <br/> | ||
| + | <br/> | ||
| + | Automatons designed this way, are based on two actions: they can obtain different types of measurements from their surroundings by sensing them, and also perform some work with its engines. There are many sensors that can be used are: sound, colour, proximity, touch, acceleration and light sensor, among other, but this last one was the sensor used to carry out the main function of our machine. | ||
| + | <br/> | ||
| + | <br/> | ||
| + | <br/> | ||
| + | <div style="text-align:center"> | ||
| + | https://static.igem.org/mediawiki/2013/e/ee/Sound.png | ||
| + | https://static.igem.org/mediawiki/2013/7/75/Colour.png | ||
| + | https://static.igem.org/mediawiki/2013/7/7d/Prox.png | ||
| + | https://static.igem.org/mediawiki/2013/5/50/Touch.png | ||
| + | https://static.igem.org/mediawiki/2013/0/06/Acc.png | ||
| + | https://static.igem.org/mediawiki/2013/a/a6/Light.png | ||
| + | </div> | ||
| + | <br/> | ||
| + | <br/> | ||
| + | <br/> | ||
| + | Light sensors are composed of a photodiode, an electronic component that converts the light that it receives into either current or voltage, depending on the mode of operation. There exist two: photovoltaic mode, when the voltage supplied is zero and its current and voltage in terminals don't vary much with light intensity; or photoconductive mode, when the voltage supplied is positive and its current is very sensitive to the light intensity. This last state is the most interesting, and the one we used in our machine. | ||
| + | <br/> | ||
| + | <br/> | ||
| + | <div style="text-align:center;"> | ||
| + | <html> | ||
| + | <a href="https://static.igem.org/mediawiki/2013/1/1c/Photodiode.png" rel="lightbox-photodiode" title="Characteristic curve of a photodiode"> | ||
| + | <img src="https://static.igem.org/mediawiki/2013/1/1c/Photodiode.png" style="display:inline;float:none;width:514px;height:286px;max-height:286px;" class="thumbnail" alt="Characteristic curve of a photodiode"/></a> | ||
| + | <br/> | ||
| + | <span style="font-size:10px">Characteristic curve of a photodiode</span> | ||
| + | </html> | ||
| + | </div> | ||
| + | <div class="clearfix"></div> | ||
| + | <br/> | ||
| + | <br/> | ||
| + | LEGO Mindstorms allows you to program a set of measurements taken by this sensor which spread steadily over time (in our case, less than one-hundredth of a second between two equispaced measurements). Each one of this data will be transformed in a single pixel of the final image. Also, to permit the sensor to move around the whole image to be scanned, we implemented three engines in order to obtain the two degrees of freedom needed for 2D: two of them, for the forward displacement, and another for the scanning movement. | ||
| + | <br/> | ||
| + | <br/> | ||
| + | Here you can see some pictures we took of the finished scanner (<i>Tip: Click on each image to open a bigger version of it</i>): | ||
| + | <br/> | ||
| + | <br/> | ||
| + | <html> | ||
| + | <div style="text-align:center; display: block;"> | ||
| - | + | <a href="https://static.igem.org/mediawiki/2013/thumb/d/df/P8260021.JPG/800px-P8260021.JPG" rel="lightbox-hardware" title="Overview" class="thumbnail"> | |
| + | <img src="https://static.igem.org/mediawiki/2013/thumb/d/df/P8260021.JPG/800px-P8260021.JPG" width="256" height="192" alt="File:P8260031.JPG"/></a> | ||
| + | <a href="https://static.igem.org/mediawiki/2013/thumb/9/9f/P8260023.JPG/800px-P8260023.JPG" rel="lightbox-hardware" title="Overview" class="thumbnail"> | ||
| + | <img src="https://static.igem.org/mediawiki/2013/thumb/9/9f/P8260023.JPG/800px-P8260023.JPG" width="256" height="192" alt="File:P8260031.JPG"/></a> | ||
| - | + | <a href="https://static.igem.org/mediawiki/2013/thumb/e/e8/P8260024.JPG/800px-P8260024.JPG" rel="lightbox-hardware" title="Overview" class="thumbnail"> | |
| + | <img src="https://static.igem.org/mediawiki/2013/thumb/e/e8/P8260024.JPG/800px-P8260024.JPG" width="256" height="192" alt="File:P8260031.JPG"/></a> | ||
| + | <a href="https://static.igem.org/mediawiki/2013/thumb/8/8b/P8260025.JPG/450px-P8260025.JPG" rel="lightbox-hardware" title="Overview" class="thumbnail"> | ||
| + | <img src="https://static.igem.org/mediawiki/2013/thumb/8/8b/P8260025.JPG/450px-P8260025.JPG" width="192" height="256" alt="File:P8260031.JPG"/></a> | ||
| - | + | <a href="https://static.igem.org/mediawiki/2013/thumb/a/a1/P8260026.JPG/450px-P8260026.JPG" rel="lightbox-hardware" title="Overview" class="thumbnail"> | |
| + | <img src="https://static.igem.org/mediawiki/2013/thumb/a/a1/P8260026.JPG/450px-P8260026.JPG" width="192" height="256" alt="File:P8260031.JPG"/></a> | ||
| + | <a href="https://static.igem.org/mediawiki/2013/thumb/0/06/P8260027.JPG/800px-P8260027.JPG" rel="lightbox-hardware" title="Overview" class="thumbnail"> | ||
| + | <img src="https://static.igem.org/mediawiki/2013/thumb/0/06/P8260027.JPG/800px-P8260027.JPG" width="256" height="192" alt="File:P8260031.JPG"/></a> | ||
| - | + | <a href="https://static.igem.org/mediawiki/2013/thumb/3/3b/P8260030.JPG/800px-P8260030.JPG" rel="lightbox-hardware" title="Overview" class="thumbnail"> | |
| + | <img src="https://static.igem.org/mediawiki/2013/thumb/3/3b/P8260030.JPG/800px-P8260030.JPG" width="256" height="192" alt="File:P8260031.JPG"/></a> | ||
| + | <a href="https://static.igem.org/mediawiki/2013/thumb/4/48/P8260031.JPG/800px-P8260031.JPG" rel="lightbox-hardware" title="Overview" class="thumbnail"> | ||
| + | <img src="https://static.igem.org/mediawiki/2013/thumb/4/48/P8260031.JPG/800px-P8260031.JPG" width="256" height="192" alt="File:P8260031.JPG"/></a> | ||
| + | </div> | ||
| + | </html> | ||
| + | <br/> | ||
<html> | <html> | ||
<div class="clearfix"></div> | <div class="clearfix"></div> | ||
| Line 45: | Line 296: | ||
</html> | </html> | ||
| - | == C++Elegans == | + | <html> |
| + | <div style="padding: 8px;"><img src="https://static.igem.org/mediawiki/2013/c/c7/CppElegansIcon.png" width="48" height="48" alt="SimuElegans logo" style="display: inline;"/> <h2 style="display: inline;">C++Elegans</h2></div> | ||
| + | <div class="accordion" id="cppelegans-accordion"> | ||
| + | <div class="accordion-group"> | ||
| + | <div class="accordion-heading"> | ||
| + | <a class="accordion-toggle" data-toggle="collapse" data-parent="#cppelegans-accordion" href="#collapseOne"> | ||
| + | Overview | ||
| + | </a> | ||
| + | </div> | ||
| + | <div id="collapseOne" class="accordion-body collapse in"> | ||
| + | <div class="accordion-inner"></html> | ||
C++Elegans is a lightweight and easy to use image manipulation and analysis | C++Elegans is a lightweight and easy to use image manipulation and analysis | ||
software written in C++. It is cross-platform in part due to the use of the | software written in C++. It is cross-platform in part due to the use of the | ||
| Line 55: | Line 316: | ||
<br/> | <br/> | ||
C++Elegans is being written as part of our iGEM project and makes use | C++Elegans is being written as part of our iGEM project and makes use | ||
| - | of some | + | of some useful image analysis algorithms. |
| - | == Downloads == | + | <html> |
| - | == Screenshots == | + | </div> |
| - | == Usage == | + | </div> |
| + | </div> | ||
| + | <div class="accordion-group"> | ||
| + | <div class="accordion-heading"> | ||
| + | <a class="accordion-toggle" data-toggle="collapse" data-parent="#cppelegans-accordion" href="#collapseTwo"> | ||
| + | Downloads | ||
| + | </a> | ||
| + | </div> | ||
| + | <div id="collapseTwo" class="accordion-body collapse"> | ||
| + | <div class="accordion-inner"></html> | ||
| + | One can find the latest binaries of C++Elegans for the different available platforms at <i>sourceforge</i>: <html><a href="https://sourceforge.net/projects/cppelegans/files/bin/" target="_blank">Binaries</a></html> | ||
| + | <br/> | ||
| + | |||
| + | The complete source code is also freely available at <i>sourceforge</i>: <html><a href="https://sourceforge.net/projects/cppelegans/files/src/" target="_blank">Source code</a></html> | ||
| + | <br/> | ||
| + | |||
| + | For any other downloads please refer to the main sourceforge project page: <html><a href="https://sourceforge.net/projects/cppelegans/" target="_blank">C++Elegans</a></html> | ||
| + | <br/> | ||
| + | |||
| + | (Note: For the time being only binaries for Lubuntu 13.04 are available). | ||
| + | |||
| + | <html> | ||
| + | </div> | ||
| + | </div> | ||
| + | </div> | ||
| + | <div class="accordion-group"> | ||
| + | <div class="accordion-heading"> | ||
| + | <a class="accordion-toggle" data-toggle="collapse" data-parent="#cppelegans-accordion" href="#collapseThree"> | ||
| + | Usage | ||
| + | </a> | ||
| + | </div> | ||
| + | <div id="collapseThree" class="accordion-body collapse"> | ||
| + | <div class="accordion-inner"></html> | ||
| + | C++Elegans is very easy to use thanks to the descriptive menus and the simple graphical user interface. The menu is divided into different categories: File, View, Edit and Help. Each of these menus are subdivided into different sub-menus. The status bar gives information about the tools, the current state of C++Elegans, the zoom factor and the local data & time. The menu bar hierarchy (explained) is as follows: | ||
| + | *File | ||
| + | **Open → Opens and loads an image, supported formats are: .bmp, .gif, .png, .jpeg, .jpg, .tga, .tiff, .iff, .pcx, .pnm, .xpm, .ico, .ani and .cur. | ||
| + | **Save → Saves the current image with the same filename (overwrite), supported formats are: .bmp, .png, .jpg, .tga and .tiff. | ||
| + | **Save As → Saves the current image with a new filename, supported formats are: .bmp, .png, .jpg, .tga and .tiff. | ||
| + | **Quit → Simply quits C++Elegans, it will remind you of changes made to the image that were not saved. | ||
| + | *View | ||
| + | **Zoom Reset → Resets the zoom (Set zoom factor to 100%). | ||
| + | **Zoom In → Increments the zoom factor. | ||
| + | **Zoom Out → Decrements the zoom factor. | ||
| + | **Status Bar → Toggles status bar visibility. | ||
| + | **Toolbar → Toggles toolbar visibility. | ||
| + | *Edit | ||
| + | **Undo → Undo the last action. | ||
| + | **Redo → Redo the last action. <br/> <p> As of now the maximum supported undo / redo levels is 32, defined in ScrolledImageWindow.h by the UNDO_LEVELS constant (Thus, one can only change this, currently, at compile time). </p> | ||
| + | **Colour | ||
| + | ***Invert colours → Inverts the colours of the image. Negative image. | ||
| + | ***Convert to greyscale → Converts the image to greyscale colours. | ||
| + | ***Brightness & Contrast → Allows to change the brightness and the contrast of the image by means of two sliders. | ||
| + | ***Hue, Saturation & Value → Allows to adjust the hue, saturation and value of the image. | ||
| + | ***Automatically adjust value → As its name describes it auto-adjusts the value of the image by means of a simple algorithm. | ||
| + | ***Automatically adjust colours → As its name describes it auto-adjusts the colours of the image by means of a simple algorithm. | ||
| + | ***Automatically adjust levels → As its name describes it auto-adjusts the levels of the image by means of a simple algorithm. | ||
| + | **Filters → Shows the filters dialog, which allows to apply several different filters to the image with a specific size and as many times as the iterations field indicates. As of now the available filters are: | ||
| + | **#Median | ||
| + | **#Mean | ||
| + | **#Midpoint | ||
| + | **#Gaussian | ||
| + | **Edge detection | ||
| + | ***Gaussian → Shows simple gaussian border detection dialog. | ||
| + | ***Sobel → Apply the sobel operator (3x3). $G_x = \left( \begin{array}{ccc} -1 & 0 & 1 \\ -2 & 0 & 2 \\ -1 & 0 & 1 \end{array} \right), G_y = \left( \begin{array}{ccc} -1 & -2 & -1 \\ 0 & 0 & 0 \\ 1 & 2 & 1 \end{array} \right) $ | ||
| + | ***Prewitt → Apply the prewitt operator (3x3). $G_x = \left( \begin{array}{ccc} -1 & 0 & 1 \\ -1 & 0 & 1 \\ -1 & 0 & 1 \end{array} \right), G_y = \left( \begin{array}{ccc} -1 & -1 & -1 \\ 0 & 0 & 0 \\ 1 & 1 & 1 \end{array} \right) $ | ||
| + | ***Scharr → Apply the scharr operator (3x3). $G_x = \left( \begin{array}{ccc} -3 & 0 & 3 \\ -10 & 0 & 10 \\ -3 & 0 & 3 \end{array} \right), G_y = \left( \begin{array}{ccc} -3 & -10 & -3 \\ 0 & 0 & 0 \\ 3 & 10 & 3 \end{array} \right) $ | ||
| + | ***Canny → Shows the canny edge detection dialog. | ||
| + | *Help | ||
| + | **Help → Shows the help dialog which contains the C++Elegans documentation. | ||
| + | **About → Information about C++Elegans, version, credits, license, etc. | ||
| + | <br/> | ||
| + | <html> | ||
| + | </div> | ||
| + | </div> | ||
| + | </div> | ||
| + | <div class="accordion-group"> | ||
| + | <div class="accordion-heading"> | ||
| + | <a class="accordion-toggle" data-toggle="collapse" data-parent="#cppelegans-accordion" href="#collapseFour"> | ||
| + | Screenshots | ||
| + | </a> | ||
| + | </div> | ||
| + | <div id="collapseFour" class="accordion-body collapse"> | ||
| + | <div class="accordion-inner"> | ||
| + | Click on each image to open a bigger version of it in a new tab:<br/><br/> | ||
| + | <div style="text-align:center; display: block;"> | ||
| + | <a href="https://static.igem.org/mediawiki/2013/3/39/CppElegansScreenshot1.png" rel="lightbox-cppelegans" title="C++Elegans Screenshot"> | ||
| + | <img src="https://static.igem.org/mediawiki/2013/3/39/CppElegansScreenshot1.png" alt="C++Elegans Screenshot #1" class="thumbnail" style="float:none;display:inline;" width="200" height="200"/> | ||
| + | </a> | ||
| + | |||
| + | <a href="https://static.igem.org/mediawiki/2013/0/07/C%2B%2BElegansScreenshot1.jpg" rel="lightbox-cppelegans" title="C++Elegans Source Code"> | ||
| + | <img src="https://static.igem.org/mediawiki/2013/6/6c/C%2B%2BElegansThumbnail1.gif" alt="C++Elegans Thumbnail #1" class="thumbnail" style="float:none;display:inline;" /> | ||
| + | </a> | ||
| + | </div> | ||
| + | </div> | ||
| + | </div> | ||
| + | </div> | ||
| + | <div class="accordion-group"> | ||
| + | <div class="accordion-heading"> | ||
| + | <a class="accordion-toggle" data-toggle="collapse" data-parent="#cppelegans-accordion" href="#collapseFive"> | ||
| + | License | ||
| + | </a> | ||
| + | </div> | ||
| + | <div id="collapseFive" class="accordion-body collapse"> | ||
| + | <div class="accordion-inner"></html> | ||
| + | As mentioned before, C++Elegans and its complete source code is freely available under the GPL license, which can be found here: <br/> | ||
| + | [http://www.gnu.org/licenses/gpl.html GPL v3.0 License] | ||
| + | <html> | ||
| + | </div> | ||
| + | </div> | ||
| + | </div> | ||
| + | </div> | ||
| + | </html> | ||
| + | |||
| + | <html> | ||
| + | <div style="padding: 8px;"><img src="https://static.igem.org/mediawiki/2013/5/5a/SimuElegansIcon.png" width="48" height="48" alt="SimuElegans logo" style="display: inline;"/> <h2 style="display: inline;">SimuElegans</h2></div> | ||
| + | <div class="accordion" id="simuelegans-acordion"> | ||
| + | <div class="accordion-group"> | ||
| + | <div class="accordion-heading"> | ||
| + | <a class="accordion-toggle" data-toggle="collapse" data-parent="#simuelegans-accordion" href="#collapseSix"> | ||
| + | Overview | ||
| + | </a> | ||
| + | </div> | ||
| + | <div id="collapseSix" class="accordion-body collapse in"> | ||
| + | <div class="accordion-inner"></html> | ||
| + | SimuElegans is a simple simulation and visualization program written in C++. It is cross-platform and only makes use of standard C++ libraries and the <i>Open Source Graphics Library</i> a.k.a [http://www.opengl.org/ OpenGL]. This means | ||
| + | it can be compiled and run in several different Operating Systems, such | ||
| + | as Linux, Windows and Mac OSX. It is also open-source which means all | ||
| + | the code will be freely available and modifiable under the | ||
| + | [http://www.gnu.org/licenses/gpl.html GPL v3.0 License]. | ||
| + | <html> | ||
| + | </div> | ||
| + | </div> | ||
| + | </div> | ||
| + | <div class="accordion-group"> | ||
| + | <div class="accordion-heading"> | ||
| + | <a class="accordion-toggle" data-toggle="collapse" data-parent="#simuelegans-accordion" href="#collapseSeven"> | ||
| + | Downloads | ||
| + | </a> | ||
| + | </div> | ||
| + | <div id="collapseSeven" class="accordion-body collapse"> | ||
| + | <div class="accordion-inner"></html> | ||
| + | One can find the latest binaries of SimuElegans for the different available platforms at <i>sourceforge</i>: <html><a href="https://sourceforge.net/projects/simuelegans/files/bin/" target="_blank">Binaries</a></html> | ||
| + | <br/> | ||
| + | |||
| + | The complete source code is also freely available at <i>sourceforge</i>: <html><a href="https://sourceforge.net/projects/simuelegans/files/src/" target="_blank">Source code</a></html> | ||
| + | <br/> | ||
| + | |||
| + | For any other downloads please refer to the main sourceforge project page: <html><a href="https://sourceforge.net/projects/simuelegans/" target="_blank">SimuElegans</a></html> | ||
| + | <br/> | ||
| + | |||
| + | (Note: For the time being only binaries for Windows Vista/7/8 (x64) and Lubuntu 13.04 are available). | ||
| + | <html> | ||
| + | </div> | ||
| + | </div> | ||
| + | </div> | ||
| + | <div class="accordion-group"> | ||
| + | <div class="accordion-heading"> | ||
| + | <a class="accordion-toggle" data-toggle="collapse" data-parent="#simuelegans-accordion" href="#collapseEight"> | ||
| + | Usage | ||
| + | </a> | ||
| + | </div> | ||
| + | <div id="collapseEight" class="accordion-body collapse"> | ||
| + | <div class="accordion-inner"></html> | ||
| + | SimuElegans is just being used for the sole purpose of visualazing some of our simulations so its usage is straightforward, in the sense that one has to follow the simple on-screen menu. | ||
| + | <html> | ||
| + | </div> | ||
| + | </div> | ||
| + | </div> | ||
| + | <div class="accordion-group"> | ||
| + | <div class="accordion-heading"> | ||
| + | <a class="accordion-toggle" data-toggle="collapse" data-parent="#simuelegans-accordion" href="#collapseNine"> | ||
| + | Screenshots | ||
| + | </a> | ||
| + | </div> | ||
| + | <div id="collapseNine" class="accordion-body collapse"> | ||
| + | <div class="accordion-inner"> | ||
| + | Click on each image to open a bigger version of it in a new tab:<br/><br/> | ||
| + | <div style="text-align:center; display: block;"> | ||
| + | |||
| + | <a href="https://static.igem.org/mediawiki/2013/d/d0/SimuElegansScreenshot1.jpg" rel="lightbox-simuelegans" title="SimuElegans Random Walk"> | ||
| + | <img src="https://static.igem.org/mediawiki/2013/d/df/SimuElegansThumbnail1.gif" alt="SimuElegans Thumbnail #1" class="thumbnail" style="float:none;display:inline;" /> | ||
| + | </a> | ||
| + | |||
| + | <a href="https://static.igem.org/mediawiki/2013/b/b7/SimuElegansScreenshot2.jpg" rel="lightbox-simuelegans" title="SimuElegans Biased Walk"> | ||
| + | <img src="https://static.igem.org/mediawiki/2013/b/b8/SimuElegansThumbnail2.gif" alt="SimuElegans Thumbnail #2" class="thumbnail" style="float:none;display:inline;" /> | ||
| + | </a> | ||
| + | |||
| + | <a href="https://static.igem.org/mediawiki/2013/2/25/SimuElegansScreenshot3.jpg" rel="lightbox-simuelegans" title="SimuElegans Source Code"> | ||
| + | <img src="https://static.igem.org/mediawiki/2013/e/e4/SimuElegansThumbnail3.gif" alt="SimuElegans Thumbnail #3" class="thumbnail" style="float:none;display:inline;" /> | ||
| + | </a> | ||
| + | |||
| + | </div> | ||
| + | </div> | ||
| + | </div> | ||
| + | </div> | ||
| + | <div class="accordion-group"> | ||
| + | <div class="accordion-heading"> | ||
| + | <a class="accordion-toggle" data-toggle="collapse" data-parent="#simuelegans-accordion" href="#collapseTen"> | ||
| + | License | ||
| + | </a> | ||
| + | </div> | ||
| + | <div id="collapseTen" class="accordion-body collapse"> | ||
| + | <div class="accordion-inner"></html> | ||
| + | SimuElegans and its complete source code is also freely available under the GPL license, which can be found here: <br/> | ||
| + | [http://www.gnu.org/licenses/gpl.html GPL v3.0 License] | ||
| + | <html> | ||
| + | </div> | ||
| + | </div> | ||
| + | </div> | ||
| + | </div> | ||
| + | |||
| + | |||
| + | <img src="https://static.igem.org/mediawiki/2013/f/fb/Vlc_biocampus_Simuelegansonline.png" style="float:left;display:block;widht:180px;vertical-align:middle;" class="thumbail" alt="SimuElegans Online" /> | ||
| + | <div style="float:left; width:700px;padding:15px;padding-top:35px;margin-left:15px;"> | ||
| + | <h2 style="display: inline;">SimuElegans Online</h2> | ||
| + | <br/> | ||
| + | <br/> | ||
| + | We have also developed an online version of SimuElegans. It allows you to simulate and visualize <a href="https://2013.igem.org/Team:Valencia_Biocampus/Simuelegans">random walk</a> and <a href="https://2013.igem.org/Team:Valencia_Biocampus/Simuelegans-Chemotaxis">chemotaxis</a> directly in our wiki. <br/> | ||
| + | It is written in <i>javascript</i>, using <a href="http://www.jquery.org">jQuery</a> and <a href="http://raphaeljs.com/">raphaëljs</a> libraries. <br/> | ||
| + | </div> | ||
| + | |||
| + | <div class="clearfix"></div> | ||
| + | <br/> | ||
| + | <h2 style="display: inline;">SciLab</h2> | ||
| + | <br/> | ||
| + | <br/> | ||
| + | We also ran a lot of simulations using SciLab so we thought it was very important to release our source code, so you can now download it from our <i>Google Drive</i> folder: | ||
| + | <br/> | ||
| + | <a href="https://drive.google.com/folderview?id=0B6ibwR2N4iZ_aTFnbmc1Q3NVM28&usp=sharing" target="_blank">Source code download</a> | ||
| + | <br/> | ||
| + | |||
| + | </html> | ||
<html> | <html> | ||
<div class="clearfix"></div> | <div class="clearfix"></div> | ||
</div> | </div> | ||
| + | <div class="tab-pane fade" id="Results"> | ||
| + | </html> | ||
| + | |||
| + | == Results == | ||
| + | At first the scanner didn't work as well as we expected, the images we took with our [[Team:Valencia_Biocampus/Devices#Hardware|scanner]] were very blurry and noisy at first but then by working hard on the hardware and improving our scanner and also our software, and by putting the scanned images through some of our [[Team:Valencia_Biocampus/Devices#Software|software]] noise suppression algorithms we obtained much clearer and detail-rich images. We now proceed to present some of the results we obtained. | ||
| + | <br/> | ||
| + | <br/> | ||
| + | <html> | ||
| + | <div style="text-align:center;"> | ||
| + | |||
| + | <a href="https://static.igem.org/mediawiki/2013/e/e1/I-original.jpg" rel="lightbox-results1" title="iGEM Original"> | ||
| + | <img src="https://static.igem.org/mediawiki/2013/e/e1/I-original.jpg" width="150" height="100" class="thumbnail thumbnail-results" alt="iGEM Original"/> | ||
| + | </a> | ||
| + | |||
| + | <a href="https://static.igem.org/mediawiki/2013/e/ed/I-v1.jpg" rel="lightbox-results1" title="iGEM v1"> | ||
| + | <img src="https://static.igem.org/mediawiki/2013/e/ed/I-v1.jpg" class="thumbnail thumbnail-results" width="150" height="100" alt="iGEM v1" /> | ||
| + | </a> | ||
| + | <a href="https://static.igem.org/mediawiki/2013/f/f8/I-v2.jpg" rel="lightbox-results1" title="iGEM v2"> | ||
| + | <img src="https://static.igem.org/mediawiki/2013/f/f8/I-v2.jpg" class="thumbnail thumbnail-results" width="150" height="100" alt="iGEM v2"/> | ||
| + | </a> | ||
| + | <a href="https://static.igem.org/mediawiki/2013/4/4e/I-v3.jpg" rel="lightbox-results1" title="iGEM v3"> | ||
| + | <img src="https://static.igem.org/mediawiki/2013/4/4e/I-v3.jpg" class="thumbnail thumbnail-results" width="150" height="100" alt="iGEM v3"/> | ||
| + | </a> | ||
| + | <a href="https://static.igem.org/mediawiki/2013/c/ce/Igemfiltered1.jpg" rel="lightbox-results1" title="iGEM Filtered"> | ||
| + | <img src="https://static.igem.org/mediawiki/2013/c/ce/Igemfiltered1.jpg" class="thumbnail thumbnail-results" width="150" height="100" alt="iGEM Filtered"/> | ||
| + | </a> | ||
| + | <a href="https://static.igem.org/mediawiki/2013/c/c4/Igemfilteredandscharr.jpg" rel="lightbox-results1" title="iGEM Scharr Operator"> | ||
| + | <img src="https://static.igem.org/mediawiki/2013/c/c4/Igemfilteredandscharr.jpg" class="thumbnail thumbnail-results" width="150" height="100" alt="iGEM Scharr Operator"/> | ||
| + | </a> | ||
</div> | </div> | ||
| - | + | <div class="clearfix"></div> | |
| - | + | ||
| - | + | <div style="text-align:center;"> | |
| - | + | ||
| - | + | <a href="https://static.igem.org/mediawiki/2013/7/7f/M-original.jpg" rel="lightbox-results2" title="M-original"> | |
| - | + | <img src="https://static.igem.org/mediawiki/2013/7/7f/M-original.jpg" class="thumbnail thumbnail-results" width="150" height="100" alt="M-original"/> | |
| + | </a> | ||
| + | <a href="https://static.igem.org/mediawiki/2013/2/2a/M-v1.jpg" rel="lightbox-results2" title="M-v1"> | ||
| + | <img src="https://static.igem.org/mediawiki/2013/2/2a/M-v1.jpg" class="thumbnail thumbnail-results" width="150" height="100" alt="M-v1"/> | ||
| + | </a> | ||
| + | <a href="https://static.igem.org/mediawiki/2013/1/10/M-v2.jpg" rel="lightbox-results2" title="M-v2"> | ||
| + | <img src="https://static.igem.org/mediawiki/2013/1/10/M-v2.jpg" class="thumbnail thumbnail-results" width="150" height="100" alt="M-v2"/> | ||
| + | </a> | ||
| + | <a href="https://static.igem.org/mediawiki/2013/7/7c/M-v3.jpg" rel="lightbox-results2" title="M-v3"> | ||
| + | <img src="https://static.igem.org/mediawiki/2013/7/7c/M-v3.jpg" class="thumbnail thumbnail-results" width="150" height="100" alt="M-v3"/> | ||
| + | </a> | ||
| + | <a href="https://static.igem.org/mediawiki/2013/2/2c/Setafiltered.jpg" rel="lightbox-results2" title="Mushroom Filtered"> | ||
| + | <img src="https://static.igem.org/mediawiki/2013/2/2c/Setafiltered.jpg" class="thumbnail thumbnail-results" width="150" height="100" alt="Mushroom Filtered"/> | ||
| + | </a> | ||
| + | |||
| + | <a href="https://static.igem.org/mediawiki/2013/5/5c/Setafilteredscharr.jpg" rel="lightbox-results2" title="Mushroom Scharr Operator"> | ||
| + | <img src="https://static.igem.org/mediawiki/2013/5/5c/Setafilteredscharr.jpg" class="thumbnail thumbnail-results" width="150" height="100" alt="Mushroom Scharr Operator"/> | ||
| + | </a> | ||
| + | |||
| + | </div> | ||
| + | <div class="clearfix"></div> | ||
| + | <br/> | ||
| + | </html> | ||
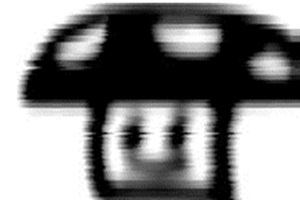
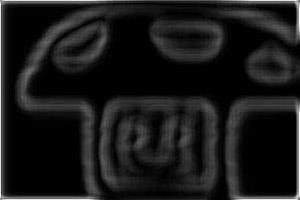
| + | Both sequences of images from <i>left to right</i> follow the same pattern: | ||
| + | <br/> | ||
| + | 1. Original image.<br/> | ||
| + | 2. Image scanned with our first scanner.<br/> | ||
| + | 3. Image scanned with our second scanner.<br/> | ||
| + | 4. Image scanned with our third scanner.<br/> | ||
| + | 5. Image filtered using a <i>3x3 Median Filter</i> (4 iterations) and a <i>3x3 Mean Filter</i> (1 iteration) in [[Team:Valencia_Biocampus/Devices#Software|C++Elegans]]. <br/> | ||
| + | 6. Resulting image of applying a Scharr Operator in [[Team:Valencia_Biocampus/Devices#Software|C++Elegans]]. <br/> | ||
| + | <br/> | ||
| + | <br/> | ||
| + | These were obviously early tests, afterwards we obtained some biological results. | ||
| + | <br/> | ||
| + | <br/> | ||
| + | <html> | ||
| + | <div style="text-align: center; display: block;"> | ||
| + | |||
| + | <a href="https://static.igem.org/mediawiki/2013/e/eb/Eleganstrack.jpg" rel="lightbox-results3" title="C.Elegans tracks & colonies"><img src="https://static.igem.org/mediawiki/2013/e/eb/Eleganstrack.jpg" alt="C.Elegans tracks & colonies" style="display: inline; float: none;" class="thumbnail"/></a> | ||
| + | |||
| + | <a href="https://static.igem.org/mediawiki/2013/d/dc/EleganstrackFiltered.jpg" rel="lightbox-results3" title="C.Elegans tracks & colonies filtered"><img src="https://static.igem.org/mediawiki/2013/d/dc/EleganstrackFiltered.jpg" alt="C.Elegans tracks & colonies filtered" style="display: inline; float: none;" class="thumbnail"/></a> | ||
| + | |||
| + | <a href="https://static.igem.org/mediawiki/2013/f/fb/EleganstrackHints.jpg" rel="lightbox-results3" title="C.Elegans tracks & colonies hints"><img src="https://static.igem.org/mediawiki/2013/f/fb/EleganstrackHints.jpg" alt="C.Elegans tracks & colonies hints" style="display: inline; float: none;" class="thumbnail"/></a> | ||
| + | |||
| + | </div> | ||
| + | <br/> | ||
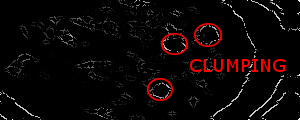
| + | <div class="clearfix"></div> | ||
| + | </html> | ||
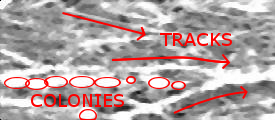
| + | The image sequence from <i>left to right</i> is as follows:<br/> | ||
| + | 1. Scanned image.<br/> | ||
| + | 2. Image with <i>3x3 Median filter</i> applied for noise removal and homogeneization.<br/> | ||
| + | 3. Image with some information added.<br/> | ||
| + | <br/> | ||
| + | <br/> | ||
| + | Here are some results for <i>C.elegans</i> <b>clumping</b>: | ||
| + | <br/> | ||
| + | <br/> | ||
| + | <html> | ||
| + | <div style="text-align: center; display: block;"> | ||
| + | <a href="https://static.igem.org/mediawiki/2013/e/ea/Placa2.jpg" rel="lightbox-results4"><img src="https://static.igem.org/mediawiki/2013/e/ea/Placa2.jpg" width="150" height="100" alt="Plate 1" class="thumbnail thumbnail-results" style="display: inline; float: none;"/></a> | ||
| + | |||
| + | <a href="https://static.igem.org/mediawiki/2013/c/c9/Placa2_filtered.jpg" rel="lightbox-results4"><img src="https://static.igem.org/mediawiki/2013/c/c9/Placa2_filtered.jpg" width="150" height="100" alt="Plate 1 Filtered" class="thumbnail thumbnail-results" style="display: inline; float: none;"/></a> | ||
| + | |||
| + | <a href="https://static.igem.org/mediawiki/2013/5/5b/Placa2_scharr.jpg" rel="lightbox-results4"><img src="https://static.igem.org/mediawiki/2013/5/5b/Placa2_scharr.jpg" width="150" height="100" alt="Plate 1 Scharr" class="thumbnail thumbnail-results" style="display: inline; float: none;"/></a> | ||
| + | |||
| + | <a href="https://static.igem.org/mediawiki/2013/a/a7/Placa2_edges.jpg" rel="lightbox-results4"><img src="https://static.igem.org/mediawiki/2013/a/a7/Placa2_edges.jpg" width="150" height="100" alt="Plate 1 Canny Edge Detection" class="thumbnail thumbnail-results" style="display: inline; float: none;"/></a> | ||
| + | |||
| + | <a href="https://static.igem.org/mediawiki/2013/f/fd/Placa2clumping.jpg" rel="lightbox-results4"><img src="https://static.igem.org/mediawiki/2013/f/fd/Placa2clumping.jpg" width="150" height="100" alt="Plate 1 Info" class="thumbnail thumbnail-results" style="display: inline; float: none;"/></a> | ||
| + | |||
| + | </div> | ||
| + | <div class="clearfix"></div> | ||
| + | <br/> | ||
| + | <div style="text-align: center; display: block;"> | ||
| + | <a href="https://static.igem.org/mediawiki/2013/1/12/Placa3.jpg" rel="lightbox-results5"><img src="https://static.igem.org/mediawiki/2013/1/12/Placa3.jpg" width="150" height="100" alt="Plate 2" class="thumbnailthumbnail-results" style="display: inline; float: none;"/></a> | ||
| + | |||
| + | <a href="https://static.igem.org/mediawiki/2013/1/19/Placa3_filtered.jpg" rel="lightbox-results5"><img src="https://static.igem.org/mediawiki/2013/1/19/Placa3_filtered.jpg" width="150" height="100" alt="Plate 2 Filtered" class="thumbnail thumbnail-results" style="display: inline; float: none;"/></a> | ||
| + | |||
| + | <a href="https://static.igem.org/mediawiki/2013/3/34/Placa3_scharr.jpg" rel="lightbox-results5"><img src="https://static.igem.org/mediawiki/2013/3/34/Placa3_scharr.jpg" width="150" height="100" alt="Plate 2 Scharr" class="thumbnail thumbnail-results" style="display: inline; float: none;"/></a> | ||
| + | |||
| + | <a href="https://static.igem.org/mediawiki/2013/0/0e/Placa3_edges.jpg" rel="lightbox-results5"><img src="https://static.igem.org/mediawiki/2013/0/0e/Placa3_edges.jpg" width="150" height="100" alt="Plate 2 Canny Edge Detection" class="thumbnail thumbnail-results" style="display: inline; float: none;"/></a> | ||
| + | |||
| + | <a href="https://static.igem.org/mediawiki/2013/1/1e/Placa3clumping.jpg" rel="lightbox-results5"><img src="https://static.igem.org/mediawiki/2013/1/1e/Placa3clumping.jpg" width="150" height="100" alt="Plate 2 Info" class="thumbnail thumbnail-results" style="display: inline; float: none;"/></a> | ||
| + | |||
| + | </div> | ||
| + | <div class="clearfix"></div> | ||
| + | <br/> | ||
| + | <div style="text-align: center; display: block;"> | ||
| + | <a href="https://static.igem.org/mediawiki/2013/e/e6/Placa5.jpg" rel="lightbox-results6"><img src="https://static.igem.org/mediawiki/2013/e/e6/Placa5.jpg" width="150" height="100" alt="Plate 3" class="thumbnail thumbnail-results" style="display: inline; float: none;"/></a> | ||
| + | |||
| + | <a href="https://static.igem.org/mediawiki/2013/2/2c/Placa5_filtered.jpg" rel="lightbox-results6"><img src="https://static.igem.org/mediawiki/2013/2/2c/Placa5_filtered.jpg" width="150" height="100" alt="Plate 3 Filtered" class="thumbnail thumbnail-results" style="display: inline; float: none;"/></a> | ||
| + | |||
| + | <a href="https://static.igem.org/mediawiki/2013/9/9e/Placa5_scharr.jpg" rel="lightbox-results6"><img src="https://static.igem.org/mediawiki/2013/9/9e/Placa5_scharr.jpg" width="150" height="100" alt="Plate 3 Scharr" class="thumbnail thumbnail-results" style="display: inline; float: none;"/></a> | ||
| + | |||
| + | <a href="https://static.igem.org/mediawiki/2013/2/29/Placa5_edges.jpg" rel="lightbox-results6"><img src="https://static.igem.org/mediawiki/2013/2/29/Placa5_edges.jpg" width="150" height="100" alt="Plate 3 Canny Edge Detection" class="thumbnail thumbnail-results" style="display: inline; float: none;"/></a> | ||
| + | |||
| + | <a href="https://static.igem.org/mediawiki/2013/e/eb/Placa5clumping.jpg" rel="lightbox-results6"><img src="https://static.igem.org/mediawiki/2013/e/eb/Placa5clumping.jpg" width="150" height="100" alt="Plate 3 Info" class="thumbnail thumbnail-results" style="display: inline; float: none;"/></a> | ||
| + | |||
| + | </div> | ||
| + | <div class="clearfix"></div> | ||
| + | <br/> | ||
| + | </html> | ||
| + | Each sequence of images follows the same pattern:<br/> | ||
| + | 1. Scanned image.<br/> | ||
| + | 2. <i>3x3 Median Filter</i> (1 iteration) applied to get rid of noise.<br/> | ||
| + | 3. <i>Scharr Operator</i> applied.<br/> | ||
| + | 4. <i>Canny Edge Detection</i> algorithm applied until non-maxima suppression step (inclusive). (Note: We couldn't finish the algorithm as explained in the notebook).<br/> | ||
| + | 5. Same image as 4. but with some additional information.<br/> | ||
| + | <html> | ||
| + | <div class="clearfix"></div> | ||
| + | </div> | ||
| + | </div> | ||
| + | <script type="text/javascript"> | ||
| + | |||
| + | $(".devices_overview-block .color-drylab").tooltip({ | ||
| + | 'title': 'Drylab' | ||
| + | }); | ||
| + | $(".devices_overview-block .color-wetlab").tooltip({ | ||
| + | 'title': 'Wetlab' | ||
| + | }); | ||
| + | $(".devices_overview-block .color-hardware").tooltip({ | ||
| + | 'title': 'Hardware' | ||
| + | }); | ||
| + | $(".devices_overview-block .color-software").tooltip({ | ||
| + | 'title': 'Software' | ||
| + | }); | ||
| + | |||
| + | |||
| + | $('#overlay').width($(window).width()).height($(window).height()); | ||
| + | $(document).ready(function() { | ||
| + | // cache the id | ||
| + | var navbox = $('#myTab'); | ||
| + | // activate tab on click | ||
| + | navbox.on('click', 'a', function (e) { | ||
| + | // add a hash to the URL when the user clicks on a tab | ||
| + | history.pushState(null, null, $(this).attr('href')); | ||
| + | var $this = $(this); | ||
| + | // prevent the Default behavior | ||
| + | e.preventDefault(); | ||
| + | // set the hash to the address bar | ||
| + | window.location.hash = $this.attr('href'); | ||
| + | // activate the clicked tab | ||
| + | $this.tab('show'); | ||
| + | //return false; | ||
| + | }) | ||
| + | |||
| + | // if we have a hash in the address bar | ||
| + | if(window.location.hash){ | ||
| + | // show right tab on load (read hash from address bar) | ||
| + | $('a[href="'+window.location.hash+'"]').tab('show'); | ||
| + | } | ||
| + | |||
| + | // navigate to a tab when the history changes | ||
| + | window.addEventListener("popstate", function(e) { | ||
| + | var activeTab = $('[href=' + location.hash + ']'); | ||
| + | if (activeTab.length) { | ||
| + | activeTab.tab('show'); | ||
| + | } else { | ||
| + | $('.nav-tabs a:first').tab('show'); | ||
| + | } | ||
| + | }); | ||
| + | }); | ||
| + | </script> | ||
| + | |||
</html> | </html> | ||
Latest revision as of 10:13, 26 October 2013

Devices - Devices Overview
Hardware
By means of experiments carried out in the laboratory, Petri plates were obtained, scanned and the resulting images were ported to the computer.Software
With the images from the scanner and the different models designed, we used our C++Elegans to get additional information and observe the results better. We also implemented some simulations.Wetlab
Thanks to the Drylab and our software we have been able to optimize our experiments, obtaining improved results while minimizing the required assays.Drylab
A very important part of our Drylab is based on modeling with the assistance of our own Hardware & Software which helped us to improve our modeling and to check the correctness of our systems.iGEM Scanner
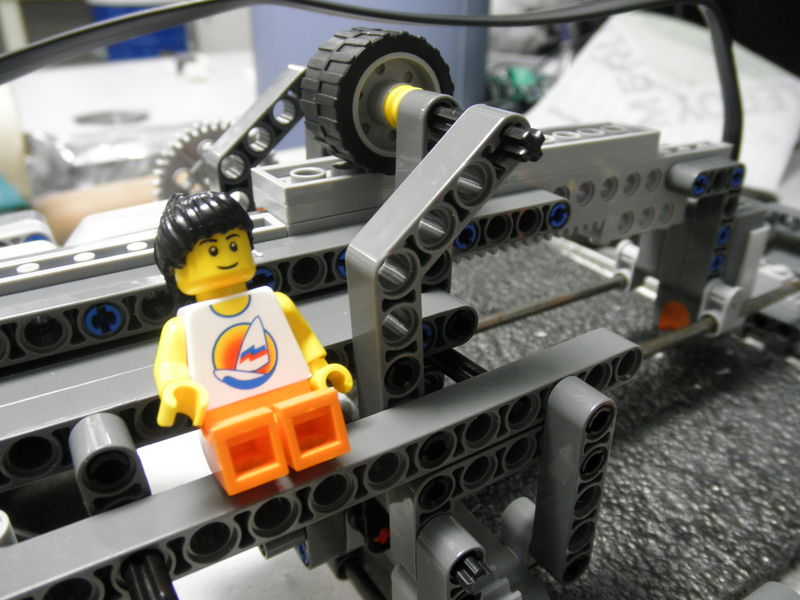
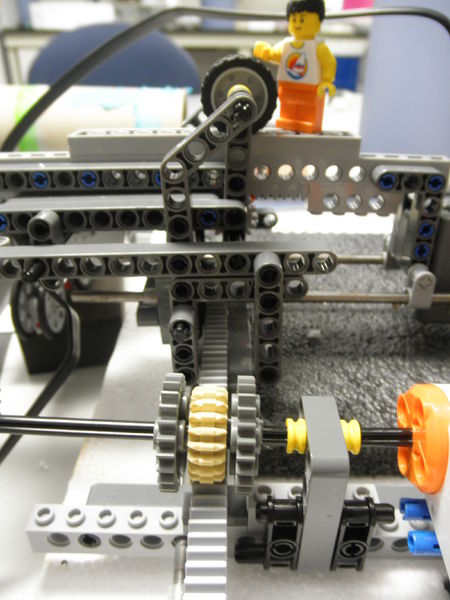
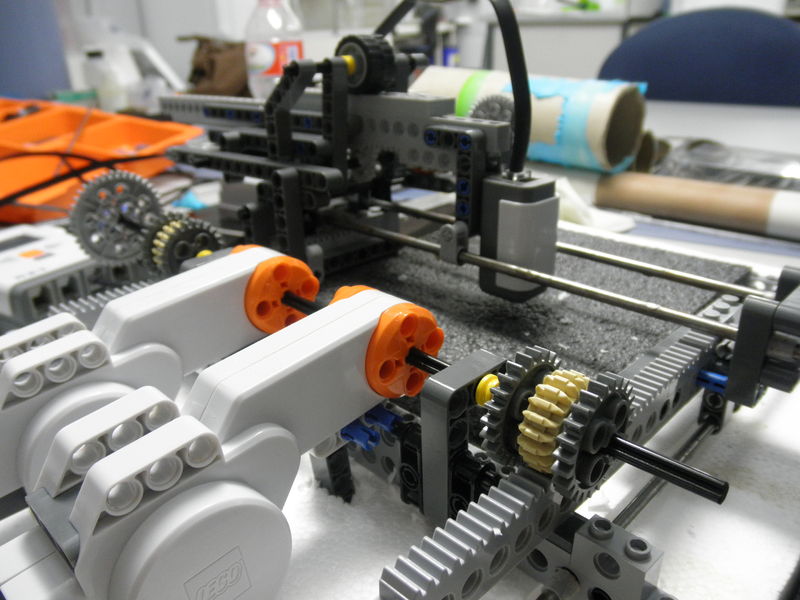
Our iGEM Scanner is able to detect and create an image of the concentration of various substrates in order to be analysed afterwards and facilitate the modeling work. Moreover it was created entirely with LEGO!
It may seem unbelievable and unrealizable, but LEGO is no longer only for children: there is a new tool called LEGO Mindstorms that allows users to bring their own constructions to life by programming it in an integrated development environment.
Automatons designed this way, are based on two actions: they can obtain different types of measurements from their surroundings by sensing them, and also perform some work with its engines. There are many sensors that can be used are: sound, colour, proximity, touch, acceleration and light sensor, among other, but this last one was the sensor used to carry out the main function of our machine.


Light sensors are composed of a photodiode, an electronic component that converts the light that it receives into either current or voltage, depending on the mode of operation. There exist two: photovoltaic mode, when the voltage supplied is zero and its current and voltage in terminals don't vary much with light intensity; or photoconductive mode, when the voltage supplied is positive and its current is very sensitive to the light intensity. This last state is the most interesting, and the one we used in our machine.

Characteristic curve of a photodiode
LEGO Mindstorms allows you to program a set of measurements taken by this sensor which spread steadily over time (in our case, less than one-hundredth of a second between two equispaced measurements). Each one of this data will be transformed in a single pixel of the final image. Also, to permit the sensor to move around the whole image to be scanned, we implemented three engines in order to obtain the two degrees of freedom needed for 2D: two of them, for the forward displacement, and another for the scanning movement.
Here you can see some pictures we took of the finished scanner (Tip: Click on each image to open a bigger version of it):


C++Elegans
C++Elegans is being written as part of our iGEM project and makes use of some useful image analysis algorithms.
The complete source code is also freely available at sourceforge: Source code
For any other downloads please refer to the main sourceforge project page: C++Elegans
(Note: For the time being only binaries for Lubuntu 13.04 are available).
- File
- Open → Opens and loads an image, supported formats are: .bmp, .gif, .png, .jpeg, .jpg, .tga, .tiff, .iff, .pcx, .pnm, .xpm, .ico, .ani and .cur.
- Save → Saves the current image with the same filename (overwrite), supported formats are: .bmp, .png, .jpg, .tga and .tiff.
- Save As → Saves the current image with a new filename, supported formats are: .bmp, .png, .jpg, .tga and .tiff.
- Quit → Simply quits C++Elegans, it will remind you of changes made to the image that were not saved.
- View
- Zoom Reset → Resets the zoom (Set zoom factor to 100%).
- Zoom In → Increments the zoom factor.
- Zoom Out → Decrements the zoom factor.
- Status Bar → Toggles status bar visibility.
- Toolbar → Toggles toolbar visibility.
- Edit
- Undo → Undo the last action.
- Redo → Redo the last action.
As of now the maximum supported undo / redo levels is 32, defined in ScrolledImageWindow.h by the UNDO_LEVELS constant (Thus, one can only change this, currently, at compile time).
- Colour
- Invert colours → Inverts the colours of the image. Negative image.
- Convert to greyscale → Converts the image to greyscale colours.
- Brightness & Contrast → Allows to change the brightness and the contrast of the image by means of two sliders.
- Hue, Saturation & Value → Allows to adjust the hue, saturation and value of the image.
- Automatically adjust value → As its name describes it auto-adjusts the value of the image by means of a simple algorithm.
- Automatically adjust colours → As its name describes it auto-adjusts the colours of the image by means of a simple algorithm.
- Automatically adjust levels → As its name describes it auto-adjusts the levels of the image by means of a simple algorithm.
- Filters → Shows the filters dialog, which allows to apply several different filters to the image with a specific size and as many times as the iterations field indicates. As of now the available filters are:
- Median
- Mean
- Midpoint
- Gaussian
- Edge detection
- Gaussian → Shows simple gaussian border detection dialog.
- Sobel → Apply the sobel operator (3x3). $G_x = \left( \begin{array}{ccc} -1 & 0 & 1 \\ -2 & 0 & 2 \\ -1 & 0 & 1 \end{array} \right), G_y = \left( \begin{array}{ccc} -1 & -2 & -1 \\ 0 & 0 & 0 \\ 1 & 2 & 1 \end{array} \right) $
- Prewitt → Apply the prewitt operator (3x3). $G_x = \left( \begin{array}{ccc} -1 & 0 & 1 \\ -1 & 0 & 1 \\ -1 & 0 & 1 \end{array} \right), G_y = \left( \begin{array}{ccc} -1 & -1 & -1 \\ 0 & 0 & 0 \\ 1 & 1 & 1 \end{array} \right) $
- Scharr → Apply the scharr operator (3x3). $G_x = \left( \begin{array}{ccc} -3 & 0 & 3 \\ -10 & 0 & 10 \\ -3 & 0 & 3 \end{array} \right), G_y = \left( \begin{array}{ccc} -3 & -10 & -3 \\ 0 & 0 & 0 \\ 3 & 10 & 3 \end{array} \right) $
- Canny → Shows the canny edge detection dialog.
- Help
- Help → Shows the help dialog which contains the C++Elegans documentation.
- About → Information about C++Elegans, version, credits, license, etc.


[http://www.gnu.org/licenses/gpl.html GPL v3.0 License]
SimuElegans
The complete source code is also freely available at sourceforge: Source code
For any other downloads please refer to the main sourceforge project page: SimuElegans
(Note: For the time being only binaries for Windows Vista/7/8 (x64) and Lubuntu 13.04 are available).


[http://www.gnu.org/licenses/gpl.html GPL v3.0 License]

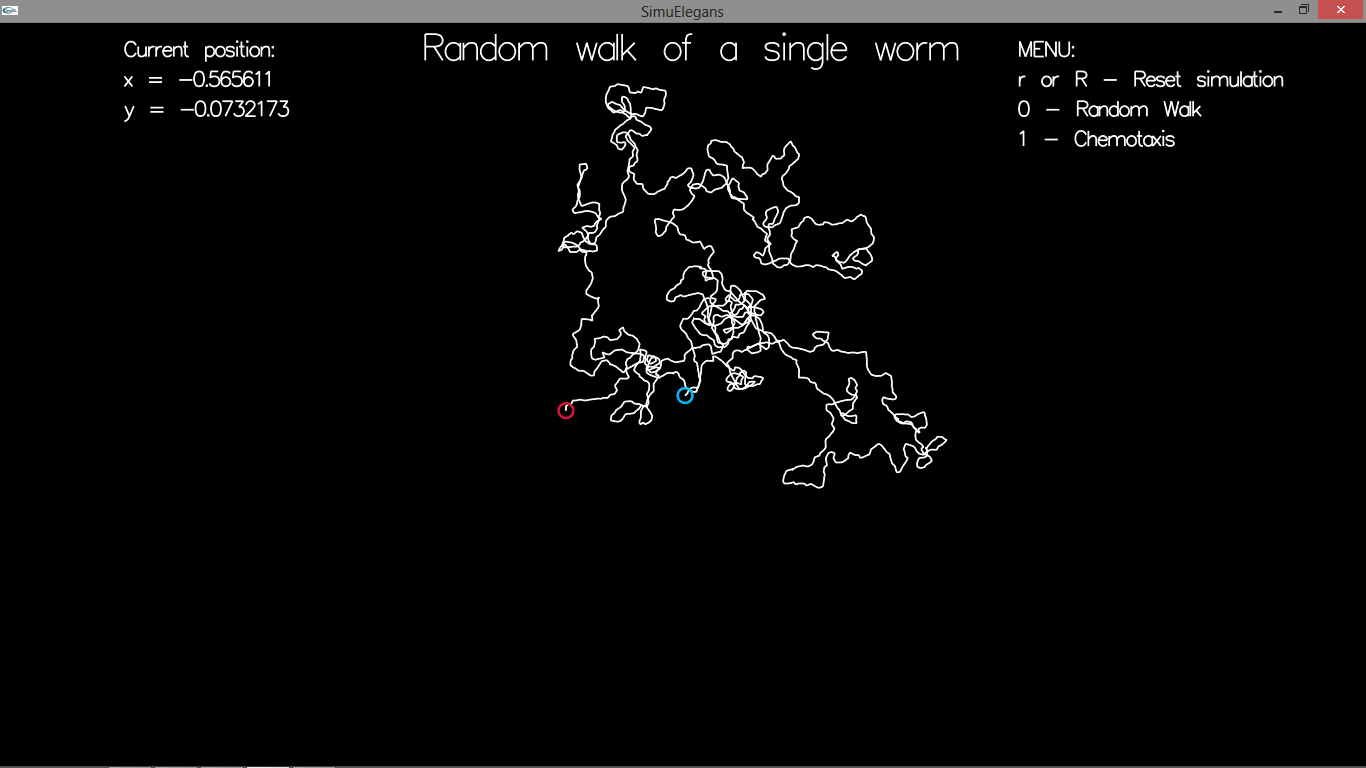
SimuElegans Online
We have also developed an online version of SimuElegans. It allows you to simulate and visualize random walk and chemotaxis directly in our wiki.
It is written in javascript, using jQuery and raphaëljs libraries.
SciLab
We also ran a lot of simulations using SciLab so we thought it was very important to release our source code, so you can now download it from our Google Drive folder:
Source code download
Results
At first the scanner didn't work as well as we expected, the images we took with our scanner were very blurry and noisy at first but then by working hard on the hardware and improving our scanner and also our software, and by putting the scanned images through some of our software noise suppression algorithms we obtained much clearer and detail-rich images. We now proceed to present some of the results we obtained.


Both sequences of images from left to right follow the same pattern:
1. Original image.
2. Image scanned with our first scanner.
3. Image scanned with our second scanner.
4. Image scanned with our third scanner.
5. Image filtered using a 3x3 Median Filter (4 iterations) and a 3x3 Mean Filter (1 iteration) in C++Elegans.
6. Resulting image of applying a Scharr Operator in C++Elegans.
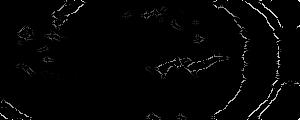
These were obviously early tests, afterwards we obtained some biological results.


The image sequence from left to right is as follows:
1. Scanned image.
2. Image with 3x3 Median filter applied for noise removal and homogeneization.
3. Image with some information added.
Here are some results for C.elegans clumping:


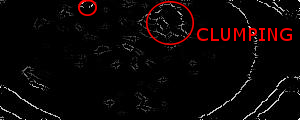


Each sequence of images follows the same pattern:
1. Scanned image.
2. 3x3 Median Filter (1 iteration) applied to get rid of noise.
3. Scharr Operator applied.
4. Canny Edge Detection algorithm applied until non-maxima suppression step (inclusive). (Note: We couldn't finish the algorithm as explained in the notebook).
5. Same image as 4. but with some additional information.