Team:KU Leuven/Protocols
From 2013.igem.org
Secret garden
Congratulations! You've found our secret garden! Follow the instructions below and win a great prize at the World jamboree!
- A video shows that two of our team members are having great fun at our favourite company. Do you know the name of the second member that appears in the video?
- For one of our models we had to do very extensive computations. To prevent our own computers from overheating and to keep the temperature in our iGEM room at a normal level, we used a supercomputer. Which centre maintains this supercomputer? (Dutch abbreviation)
- We organised a symposium with a debate, some seminars and 2 iGEM project presentations. An iGEM team came all the way from the Netherlands to present their project. What is the name of their city?
Now put all of these in this URL:https://2013.igem.org/Team:KU_Leuven/(firstname)(abbreviation)(city), (loose the brackets and put everything in lowercase) and follow the very last instruction to get your special jamboree prize!


Index
Aphid mobility experiment
Chemically competent E.coli cells: CaCl2 method
Chemically competent E.coli cells: Inoue method
Colony PCR for Streptomyces
Digestion and ligation
DNA extraction from agarose gels
Grow electrocompetent cells
Isolation of plasmid DNA from E. coli (mini prep)
Aim: To determine the effect on aphid population on Methyl Salicylate (MeS) induced plants.
Experimental setup: We induced five plants per concentration
- Plants: Small potted paprika plants in two ways: via the root or byspraying; 60 in total. Paprika plants don’t make MeS naturally but do produce salicylic acid.
- Concentration: 1ng/ml, 0,8ng/ml, 0,4ng/ml, 0.1ng/ml ,0.01ng/ml of MeS (Sigma-Aldrich, ReagentPlus®, ≥99% (GC)) in 97% pure ethanol or water.
Procedure
Induction requires 48h
- Induction via the roots
- Uproot the plant, clean off the dirt with water because compost can interfere with the uptake of MeS
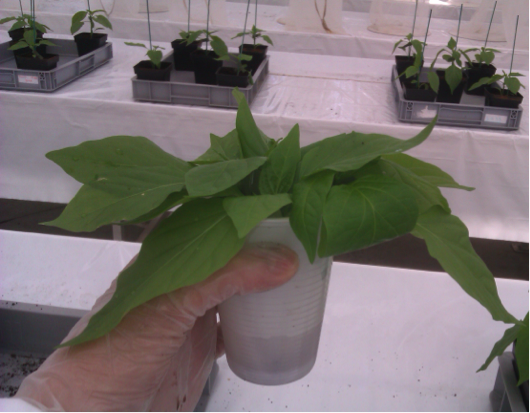
- Wipe off the water before placing the roots in a cup with the desired concentration for 10 minutes. MeSA was first suspended in ethanol before being further diluted to the desired concentration in 50ml water
- Re-pot the plant and divide the remainder of the MeSA solution amongst the 5 plants
- Induction via the leaf
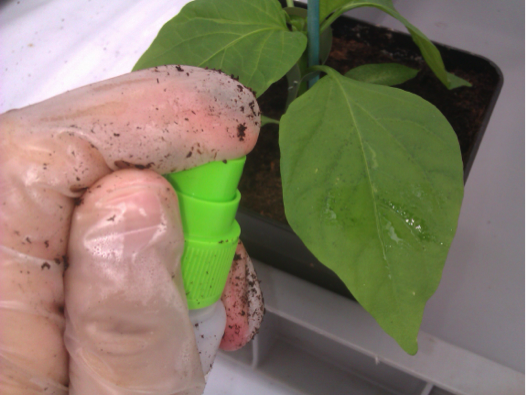
- The desired concentrations were diluted in 15ml ethanol, resulting in 3ml per plant. Ethanol has been shown to have no plant induction properties
- Each leaf of the plant is sprayed above and underneath
- Place aphids on MeS induced plants 48h post-induction
- Place 15 green peach aphids on the head of each induced plant
- Take the smallest aphids present on the aphid-infested leaf. To be sure that it is a first generation aphid
- Place each plant in a separate net
- Plants of the same concentration, induced by spraying or via the roots, are placed in the same row; 10 plants per row. The rows are roughly 1 metre apart
- Counting aphids on day 7
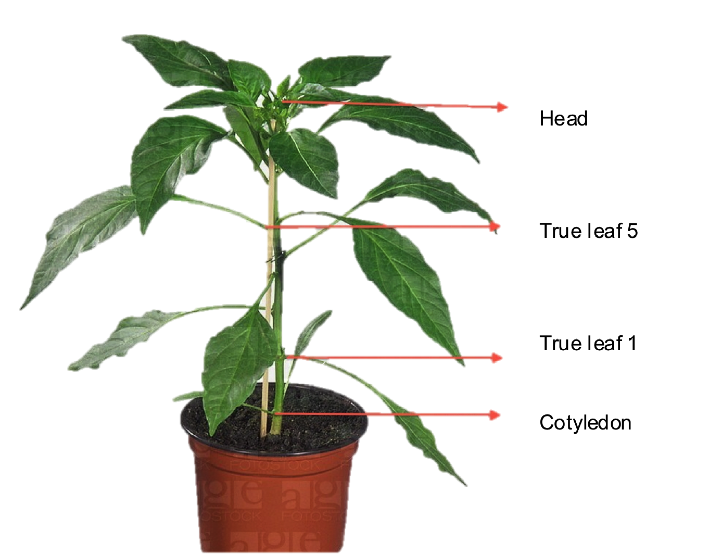
- Following a form, count how many aphids are on Cotyledon, separate true leafs and the head of the induced plants.
- See <a href"> results</a>
- There is a possibility of contamination while placing the aphids on the plant, meaning that older aphids and/or flying aphids crawled onto the plant by accident. These were removed from the plant so that the amount of aphids on day 10 would not be tainted
- Counting aphids on day 10
- We count the aphids for a second time to allow the second generation to develop. This way we investigate whether MeS has an effect on the aphid’s behaviour. That they are encouraged to leave the plant, reproduce less or generate mobile (flying) aphids.
- The head of the plant is where the majority of the secondary metabolites gather; hence we expect to see an effect on the distribution of the aphid population.
Aim: To determine the effect of EBF on aphid mobility.
Experimental setup: Leaves infested with aphids were divided in two glass containers (not sealed) randomly (n=3; 3 leaves per group). After 1h plates with bacteria, either control (BL21) or BL21 with EBF construct, were put under each leaf.
Measurement: Aphids that were on the top of each leaf were counted at start and at each time point during the experiment.
At each time point the amount of aphids moving on the leaf were also counted. The time points used were 0, 50, 150 and 200 minutes.
Procedure
Perform every action on ice – also when resuspending your cells!
Do not shock freeze (liqN2) – just transfer from ice to -80°C!
Work sterile!
- Inoculate 3 ml growth medium with your cells of choice (DH5alpha or TOP10 for plasmid maintenance & cloning)
- Grow overnight at 37°C with sufficient aeration
- Inoculate 100 ml LB with 1 ml of overnight culture
- Grow at 37°C to an OD 600nm of approx 0.5 to 0.8 (usually 2-3 hrs)
- Centrifuge cells (3700-4000 rpm 4°C 12 min – sterile 50ml tube)
- Resuspend pellet on ice with FSB to 15 ml (cold) for each 100 ml pellet
- Incubate cells 10 min on ice
- Centrifuge cells (3700 – 4000 rpm 4°C 10 min)
- Re-suspend pellet on ice in 4-8 ml FSB (cold) for each 100 ml pellet
- Aliquot cells appropriately (200-400 µl aliquots) and freeze aliquots at -80°C
Buffers and solutions
Risk assessment for pH electrode and preparation of buffers
- Growth medium
- LB 25 g/l
- Frozen Storage Buffer (FSB)
- 10 mM Potassium Acetate
- 10% glycerol
- 10 mM KCl
- 50 mM CaCl2
- Check pH – must be around 6.2 – if need be adjust with AcAc (HCl) or KOH
- Buffer should be filter-sterilized (0.45 micrometer filter)
Procedure
Perform every action on ice – also when resuspending your cells.
Work sterile
- Pick a single colony from a freshly transformed plate (after overnight growth at 37 °C)
- Transfer the colony to 25 ml growth medium in a sterile 250 ml erlenmeyer
- Incubate the culture at 37°C for 6 – 8 hrs under vigorous shaking (250 – 300 rpm)
- Prepare 3 1L flasks with 250 ml growth medium in each
- Inoculate the flasks with 10, 4 or 2 ml of the dayculture -> you create 3 different starting optical densities.
- Incubate the cultures at 18-22°C overnight under moderate shaking (180 – 220 rpm)
- Monitor the OD600nm until it reaches 0.55
- Place cells in an ice-water bath to cool them down quickly (-> swirl occasionally, keep them in for approx 10 min)
- Centrifuge cells at 4°C for 10 min at 2500 g
- Pour off supernatant – make sure all remaining droplets are removed
- Resuspend gently (swirl !) in 80 ml icecold inoue transformation buffer
- Centrifuge cells at 4°C for 10 min at 2500 g
- Pour off supernatant – make sure all remaining droplets are removed
- Resuspend gently (swirl !) in 20 ml icecold inoue transformation buffer
- Add 1.5 ml 100% DMSO – mix by swirling
- Store whole on ice for approx 10 minutes
- Aliquot as quickly as possible 100 – 200 µl aliquots into 1.5 ml tubes (precooled on ice) and snapfreeze them into a liquid N2 bath
Buffers and solutions
- Growth medium
- Inoue transformation buffer
| Reagent | Final concentration (mM) | Amount per liter |
| MnCl2 | 55 | 10.88 g (from MnCl2*4H2O) |
| CaCl2 | 15 | 2.20 g (from CaCl2*2H2O) |
| KCl | 250 | 18.65 g (from KCl) |
| PIPES | 10 | 20 ml (from 0.5M stock solution) |
| H2O | to 1 liter |
Filter sterilize with a 0.45 µm nalgene filter
Risk assessment for pH electrode and preparation of buffers
- Stock 0.5 M PIPES (piperazine-1,2-bis[2-ethanesulfonic acid]) pH 6.7
- Dissolve 15.1 g PIPES in 80ml MilliQ H2O
- Adjust pH to 6.7 with 5M KOH
- Bring volume to 100 ml with MilliQ H2O
- Filter sterilize with a 0.45 µm nalgene filter
- Aliquot (5 times) and store at -20°C
Pretreatment of Streptomyces
Because of the fact that Streptomyces are Gram-positive bacteria with a thick peptidoglycan layer, we performed 4 ways to pretreat the cells for colony PCR (all pretreatments gave positive results in the end):
- microwave Streptomyces for 4 mins
- mix Streptomyces with water and 0.2% SDS, microwave for 4 mins
- mix Streptomyces with 1% SDS, microwave for 4 mins
- mix Streptomyces with TE buffer, 0.2% SDS, microwave for 4 mins
PCR mixture
| Components | Amount |
| 2x fusion master mix (add in the end) | 25 µl |
| forward primer (final conc. 0.5 µM) | 1.25µl (of 20 µM stock) |
| reverse primer (final conc. 0.5 µM) | 1.25µl (of 20 µM stock) |
| template DNA | 1 µl |
| DMSO (recommended for high GC content) | 1.5 µl |
| H2O (PCR certified, no contamination) | add to final volume of 50µl |
Keep tubes on ice at all times!
Be sure to put Phusion Master Mix immediately back at -20!
Cycling instruction
| Step | Temperature | Time |
| 1 | 95°C | 6' |
| 2 cycle 29x | 95°C 55°C 72°C | 30" 30" 45" |
| 3 | 72°C | 10' |
| 4 | 12°C | infinite/hold |
- Restriction enzymes (EcoRI, Xbal, Spel, Pstl), NEBuffer 2.1
- 10x T4 DNA ligase Reaction Buffer, T4 DNA Ligase
- Keep all enzymes on ice; make sure buffers have no precipitation
- H20
- Small PCR Tubes or eppendorfs
- 2 µl, 200 µl pipette tips
- Destination plasmid as purified DNA
- Upstream and downstream part as purified DNA
- 2 µl and 20 µl pipette
- Heat block 37° and 80°C
- Timer
- Rack for small PCR tubes
- -20°C freezer + freeze box
Digestion
- Mark PCR tubes or eppendorfs
   a. U= upstream part : E + S restriction enzymes
   b. D= downstream part : X + P restriction enzymes
   c. P= plasmid (destination) : E + P restriction enzymes
   d. NB: if only one part for insertion insert I= Insert : E + P restriction enzymes
- In each tube 500 ng DNA for digestion + H20 until total volume is 43 µl
- Add 5 µl of NEBuffer 2.1 to each tube
- Add 1 µl of first restriction enzyme
- Add 1 µl of the second restriction enzyme TOTAL VOLUME = 50 µl
- Mix well by flicking each tube
- Incubate at 37°C for 20 min. (officially 15 min)
- Incubate at 80°C for 20 min.
   a. OPTIONAL: run 10-20 µl on 1% agarose gel and look for expected bands as confirmation
   b. OPTIONAL: store at -20°C or proceed to ligation immediately
Ligation
- Add 13 µl of H2O to a 200 µl PCR tube or eppendorf
- Add 2 µl of each part you want to ligate
- Add 2 µl of 10X T4 DNA Ligase Reaction Buffer to the tube
- Add 1 µl of the T4 DNA Ligase to the tube TOTAL VOLUME = 20 µl
- Mix well by flicking each tube
- Incubate at room temperature for 10 min
   a. Incubate at 80°C for 20 min.
   b. Store the ligation mix at -20°C or proceed immediately to the transformation step.
Procedure
- Excise DNA fragment/solubilize gel slice: take a clean scalpel to excise the DNA fragment from an agarose gel, remove all excess agarose. For each 100mg of agarose gel < 2% add 200µl buffer NTI, for gels containing > 2% agarose, double the volume of buffer NTI. Incubate sample for 5-10 min at 50°C, vortex the sample briefly every 2-3 min until the gel slice is completely dissolved.
- Binding DNA: place a PCR clean-up column into a collection tube (2ml) and load up to 700µl sample, centrifuge for 30s at 11000g, discard flow-through and place the column back into the collection tube.
- Wash silica membrane: add 700µl buffer NT3 to the column, centrifuge for 30s at 11000g, discard flow-through and place the column back into the collection tube. Repeat the washing again.
- Dry silica membrane: centrifuge for 1min at 11000g to remove buffer NT3 completely. Make sure the spin column does not come in contact with the flow-through while removing it from the centrifuge and the collection tube.
- Elute DNA: place the column into a new 1.5ml microcentrifuge tube, add 15-30µl buffer NE and incubate at room temperature for 1 min, centrifuge for 1 min at 11000g.
(source: adapted from openwetware.org)
Materials
- GYT (glycerol, yeast extract, tryptone)
- 10%(v/v) glycerol
- 0.125% (w/v) yeast extract
- 0.25% (w/v) tryptone
- DI water
- 10% Glycerol
Special Equipment
- Centrifuge
- Ice water bath
- Liquid nitrogen
Procedure
Important: All steps in this protocol should be carried out aseptically
- Inoculate: Prepare flask containing 5 ml of LB medium. Pick up a single colony of cells from plate (using a sterile toothpick) and swirl around inside flask. Incubate the culture overnight at 37°C with vigorous aeration (250 pm in a rotary shaker).
- Dilute and incubate: Inoculate two aliquots of 495 ml of prewarmed LB medium in separate 2-liter flasks with 5 ml of the overnight bacterial culture. Incubate the flasks at 37°C with agitation (300 cycles/min in a rotary shaker). Measure the OD-600 every twenty minutes (this step will take around 1.5-2 hrs). (or judge the OD by eyes to avoid always taking the sample to disturb the growth as well as avoiding the contamination)
- Rapidly cool culture: Once the OD-600 of the culture reaches 0.6-1.0 (Molecular Cloning recommends 0.4), rapidly transfer the flasks to the pre-made ice-water bath for 15-30 minutes. Swirl the culture occasionally to ensure that cooling occurs evenly. In preparation for the next step, place the centrifuge bottles in the ice-water bath as well.
Note: After this point, do not let your cells warm up past 4°C always keep on ice
Note: When harvesting cells by decanting, be very careful not to disturb the pellet-- this could result in a much lower yield. If necessary, aspirate instead or decant the supernatant. Ask someone to show you how to aspirate. Also, if the pellet seems loose, sometimes it is helpful to re-spin the cells down.
- Centrifuge 1: Transfer the cultures to ice-cold centrifuge bottles. Harvest the cells by centrifugation at 1000 g (2500 rpm) for 15 minutes at 4°C. Decant the supernantant and resuspend the cell pellet in 20 ml of ice-cold 10% glycerol. Note: this should be done for each of the two 500ml cultures, i.e this is a 1:1 resuspension rather than a concentration by a factor of 2 BC.
- Centrifuge 2 (10% glycerol): Harvest the cells by centrifugation at 1000 g for 20 minutes at 4°C. Decant the supernatant and resuspend the cell pellet in 20 ml ice-cold 10% glycerol.
- Centrifuge 3 (10% glycerol): Harvest the cells by centrifugation at 1000 g for 20 minutes at 4°C. Decant the supernatant and resuspend the cell pellet in 10 ml ice-cold 10% glycerol.
- Centrifuge 4 (10% glycerol): Harvest the cells by centrifugation at 1000 g for 20 minutes at 4°C. Carefully decant the supernatant and use a Pasteur pipette attached to a vacuum line to remove any remaining drops of buffer.
- Resuspend in GYT: Resuspend in 1 ml ice cold GYT. This is best done by gently swirling rather pipetting or vortexing.
- Test for arcing: Transfer 40 µl of the suspension to an ice-cold electroporation cuvette and test whether arcing occurs when an electrical discharge is applied. Place the cuvette in the holder attached to the machine. Go to option 4, Pre-set protocols; choose bacterial; choose the correct choice for your size cuvette, probably the first option for a .1 cm cuvette. If arcing occurs, wash the remainder of the cell suspension once more with ice-cold GYT medium to ensure that the conductivity of the bacterial suspension is sufficiently low (<5 mEq). (or check the pulse time, if the pulse time < 4, redo the wash, if the pulse time > 4, it's ok)
- Storage: Store cells at -80°C until they are required for use. For storage, dispense 40 µl aliquots of the cell suspension into sterile, ice-cold .5 ml microcentrifuge tubes, drop into a bath of liquid nitrogen and transfer to a -80°C freezer. To remove the tubes from the liquid nitrogen bath, bring out into the hall along with a storage box, and pour the tubes and liquid nitrogen into the box. Once all the tubes are out, close the box most of the way and let the liquid run out into the hallway. Try not to do this in the very center of the walkway!
- To use frozen cells: Remove an appropriate number of aliquots of cells from the -80°C freezer. Thaw the tubes on ice.
(source: NucleoSpin® plasmid - Macherey-Nagel)
Nanodrop protocol
Nanodrop can be used to measure the DNA, RNA and protein
Measure the concentration and purity of extracted DNA using absorbance (using the automated nanodrop machine!)
Method:
- Log onto computer and select Nanodrop program from the desktop (ND 1000)
- To clean Nanodrop machine wipe pedestal and top and add 3 µl of water to nib of pedestal. Press blank.
- Wipe the water off, to initialize/equalize the equipment add 3 μl of the elution buffer [EB] used in the sample and press blank. Set to DNA-50 for DNA.
- Wipe to remove buffer and apply 3 μl of sample to nib. Press measure.
- If dealing with multiple samples, clean the equipment with water at regular intervals (about every 10 samples).
- After measurements, clean the equipment with 3 μl of water on the spectrometer and press blank. Wipe and log off.
This is used for PCR clean-up as well as DNA concentration and removal of salts, enzymes, etc. from enzymatic reactions (SDS<0.1%)
- Adjust DNA binding condition: mix 1 volume of sample with 2 volumes of buffer NTI (eg. mix 100 µl PCR reaction and 200 µl buffer NTI).
- Binding DNA: place a PCR clean-up column into a collection tube (2 ml) and load up to 700 µl sample, centrifuge for 30 s at 11000 g, discard flow-through and place the column back into the collection tube.
- Wash silica membrane: add 600µl buffer NT3 to the column, centrifuge for 30 s at 11000 g, discard flow-through and place the column back into the collection tube. Repeat the washing again.
- Dry silica membrane: centrifuge for 1 min at 11000 g to remove buffer NT3 completely. Make sure the spin column does not come in contact with the flow-through while removing it from the centrifuge and the collection tube.
- Elute DNA: place the column into a new 1.5 ml microcentrifuge tube, add 50 µl buffer NE and incubate at room temperature for 1 min, centrifuge for 1 min at 11000 g.
Reaction set up
Risk assessment for PCR
We recommend assembling all reaction components on ice and quickly transferring the reactions to a thermocycler preheated to the denaturation temperature (95°C).
| Components | 25 μl reaction | 50 μl reaction | Final concentration |
| 10X Standard Taq Reaction Buffer | 2.5 µl | 5 µl | 1X |
| 10 mM dNTPs | 0.5 µl | 1 µl | 200 µM |
| 10 µM Forward Primer | 0.5 µl | 1 µl | 0.2 µM (0.05–1 µM) |
| 10 µM Reverse Primer | 0.5 µl | 1 µl | 0.2 µM (0.05–1 µM) |
| template DNA | variable | variable | <1,000 ng |
| Taq DNA Polymerase | 0.125 µl | 0.25 µl | 1.25 units/50 µl PCR |
| Nuclease-free water | to 25 µl | to 50 µl |
Notes: Gently mix the reaction. Collect all liquid to the bottom of the tube by a quick spin if necessary. Overlay the sample with mineral oil if using a PCR machine without a heated lid. Transfer PCR tubes from ice to a PCR machine with the block preheated to 95°C and begin thermocycling.
Thermocyclingconditions for a routine PCR
| Step | Temperature | Time |
| Initial denaturation | 95°C | 30" |
| 30 cycles | 95°C 48-65°C 68°C | 15-30" 15-60" 1min/kb |
| Final extension | 68°C | 5' |
| Hold | 12°C | infinite/hold |
Procedure
Risk assessment for plasmid DNA purification kit
- Bring 1.5 ml culture in an eppendorf, centrifuge for 1 min with maximum speed
- Pour away the supernatant
- Bring another 1.5 ml culture into the same eppendorf, centrifuge for 1 min and pour away supernatant
- Resuspend the pellet with 200µl GTE-solution we made earlier
- Add 4 µl RNase A (10mg/ml)
- Add 400 µl premade solution (contains 0.2M NaOH and 1%SDS in sterile water)
- Mix them well, place on ice for 5 min
- Add 300 µl ice cold 7.5 M ammonium acetate, vortex for 10 s, place on ice for 5 mins
- Centrifuge for 5min with 13000 rpm
- Bring the supernatant into a new eppendorf
- Centrifuge this supernatant for a second time (5 min, 13000 rpm) and bring the supernatant in a new eppendorf
- Add isopropanol to the supernatant (60% in volume of the supernatant), leave at room temp. for 5 min
- Centrifuge for 10 min with 13000 rpm, immediately remove the supernatant, keep the transparent pellet in the tube, put the tube upside down on a tissue to dry it
- Add 1 ml of cold 70% ethanol to the pellet, invert 5 times
- Centrifuge 3 min with 13000 rpm
- Remove supernatant, the droplet on the tube wall can be removed by tissue
- Let the pellet dry
- Add 50 µl elution buffer (or sterile water) to the pellet
Buffers and Solutions
- GTE-buffer
- 50 mM glucose
- 25 mM Tris-Cl (pH 8.0)
- 10 mM EDTA
- 4 mg/ml lysozyme
- IPTG stock solution
- 238 mg in 10 ml AD
- Filter sterilize
- Split into 1 ml aliquots
- Store in -20 freezer
Final concentration/work concentration in agar plates = 0.1mM – 1 mM
Sigma recommends 0.2 mM for blue-white screening
Thermo Scientific recommends 0.1 mM
Experimental setup: We continue with the same plants used in the experiments to determine aphid population preference (see above), this way we try to create an as close as possible in vivo situation. The predators were subjected to choice experiment - cafetaria model.
- Predators: Macrolophus adults
- Plants: Small potted MeS induced paprika plants in two ways: via the root or via the leaf, 60 in total.
- Concentration: 1ng/ml, 0,8ng/ml, 0,4ng/ml, 0.1ng/ml, 0.01ng/ml of MeS (Sigma-Aldrich, ReagentPlus®, ≥99% (GC)).
Cafetaria model
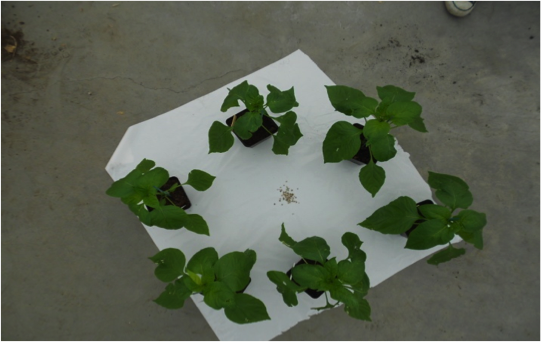
In the cafeteria model shown above, each concentration will be placed, plus the control, randomly in a circle. The plants should not be close to the edge of the cage in which the experiments are carried out. The plants should be placed in rotation with every repeat of the set-up to eliminate other factors.
- Releasing the Macrolophus:
- 10 Macrolophus (adult) are shaken out of the pot and placed in the middle of the cafetaria model (see picture)
- We release around 50 Macrolophus (adult) per set-up
- Counting the Macrolophus:
- After every 45 min from the moment we released the Macrolophus, the amount per plant is counted and recorded
- The Macrolophus are then shaken off the plant back into the middle of the circle so that they can make their choice again
- We will take 3 recordings
Aim: To determine a working concentration of methyl salicylate (MeS) concentration which attracts predators .
Experimental setup: We continue with the same plants used in the experiments to determine aphid population preference (see above), this way we try to create an as close as possible in vivo situation. The predators were subjected to choice experiment - cafetaria model.
- Predators: Adalia bipunctata (ladybugs): adult and larvae
- Concentration: 1000ng/ml, 100ng/ml, 10ng/ml, 1ng/ml, 0.1ng/ml, 0.01ng/ml of MeS (Sigma-Aldrich, ReagentPlus®, ≥99% (GC)) in 96% ethanol.
Biobest setup
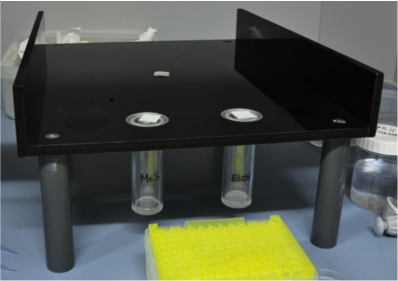
The predators were subjected to a choice experiment between one of the MeS concentrations and a control (pure EtOH).
We repeated each dilution three times with different ladybugs.
After using the ladybugs, we collected them in a different tube and didn’t use them again.
These experiments were performed in a chemical safety cabinet to prevent the distribution of MeS in the air.
pcfruit setup

The predators were subjected to a choice experiment between one of the MeS concentrations and a control (pure hexane or paraffin oil).
We repeated each dilution three times with different ladybugs.
After using the ladybugs, we collected them in a different tube and didn’t use them again.
These experiments were performed in a chemical safety cabinet to prevent the distribution of MeS in the air.
General experiment: 3 biological repeats of stationary phase cultures 16 hrs growth.
Sample preparation
- Inoculate fresh LB plate with the strain harbouring the MS brick
- Isolate plasmid DNA, MS brick
- Nanodrop plasmid (minimum concentration 20 ng/µl) = 155 ng/µl
- Design primers for pcha/pchb and for bsmt1 using Primer express. Primer sequence can be found in document “Genes_qPCR_primers_IC.docx”.
- Inoculate E. Coli with Methylsalicylate brick (MIT 2006) on LB plate.
- Add 5 µl of Kanamicin (50 mg/ml) and 10 µl of IPTG (100 mM) to 5 ml of LB medium (tubes).
- Incubate 16h at 37 °C under shaking conditions.
- Measure OD of 3 cultures.
- Account for differences in OD: ex. If you have an OD of 1 take 1 ml of this sample, if you have an OD of 0,8 take 1,2 ml.
- Add 1/5 volume of stopsolution (95% ethanol, 5% phenol).
- Freeze 5 minutes in liquid Nitrogen.
- Centrifuge needed amount of cells.
mRNA isolation
For mRNA isolation use the Promega SV total RNA isolation kit ([http://be.promega.com/resources/protocols/technical-manuals/0/sv-total-rna-isolation-system-protocol/?origUrl=http%3a%2f%2fwww.promega.com%2fresources%2fprotocols%2ftechnical-manuals%2f0%2fsv-total-rna-isolation-system-protocol%2f Promega SV total RNA isolation protocol])
- Section 8.C (Isolation of RNA from Gram-positive and Gram-negative bacteria)
- Section 4.E (RNA Purification by Centrifugation) We did not do step 4 and 5 (addition of DNase) but instead used the DNase protocol of [http://products.invitrogen.com/ivgn/product/AM2238 Ambion Turbo DNase]
For 100 µl of RNA:
- Add 10 µl 10x buffer. Add 1 µl Turbo DNase and mix gently.
- Put on 37 °C for 20 to 30 min.
- Add 1 µl of Turbo DNase.
- Put on 37 °C for 20 to 30 min.
- Add 20 µl of DNase inactivation reagent and mix well.
- Put on room temperature for 5 min. Mix occasionally by flicking the tube
- Centrifuge on 10000 g for 2 min.
- Transfer the RNA to a new tube.
Create cDNA
Use the Fermentas Revert aid H kit ([http://www.thermoscientificbio.com/reverse-transcription-rtpcr-rtqpcr/revertaid-h-minus-first-strand-cdna-synthesis-kit/ Fermentas Revert aid H protocol]) The protocol for RT-PCR (I. First Strand Synthesis) was followed
qPCR
qPCR kit was not yet decided.
Aim: To determine whether the different induction methods or the Methyl Salicylate (MeS) had an effect on plant growth.
Experimental setup: We measured the roots of the same plants used in the experiments to determine aphid population and predator preference (see above).
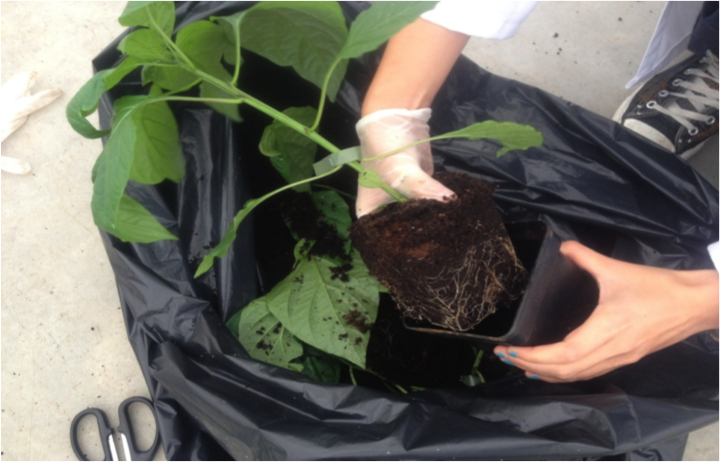
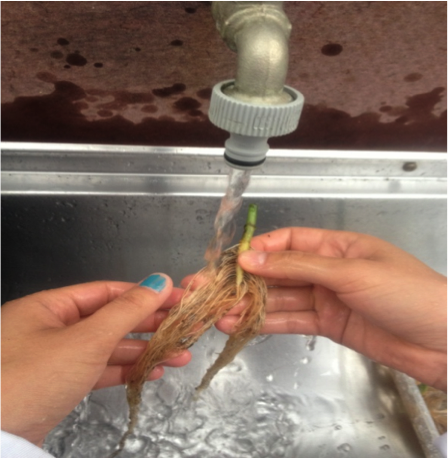
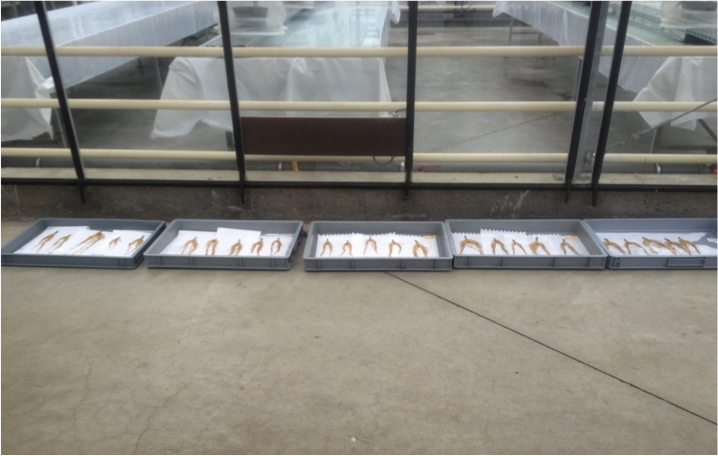
The plants were cut off at the bottom of the stem and removed from the pot.
After most of the dirt has been removed, they were carefully washed to remove the rest of the dirt.
After using the ladybugs, we collected them in a different tube and didn’t use them again.
The roots were then dried and weighed.
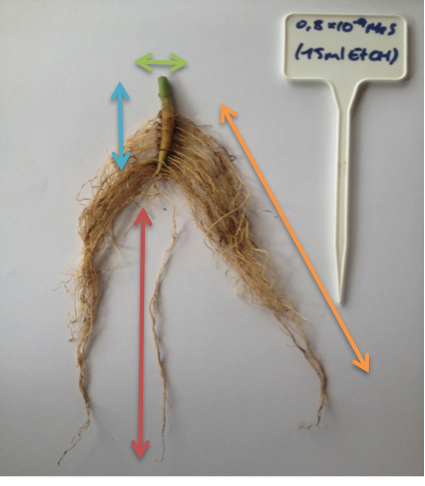

The roots were then measured and recorded.
Aim: To detect the production of MeS by our E. coli.
Sample preparation:
- At day 0: a preculture was grown at 37°C overnight (BL21 or BBa_K1060003)
- The preculture was used to inoculate 500µl into 50ml of fresh LB medium supplemented with 0 or 0.1 mM of salicylic acid and left to grow for 7 hours.
- Cultures were chilled on ice and put at 4°C
- Bacterial cells were removed by centrifugation (10’, 4000g, 4°C) and then filterstelized (0.22µm).
- Salt was added to 5 ml of this filtersterilized supernatant
Gass chromatography: Samples were analyzed with a calibrated Autosystem XL gas chromatograph with a headspace sampler (HS40; Perkin-Elmer, Wellesley, Mass.) and equipped with a CP-Wax 52 CB column (length, 50 m; internal diameter, 0.32 mm; layer thickness, 1.2 μm; Chrompack; Varian, Palo Alto, Calif.). Samples were heated for 16 min at 72°C in the headspace autosampler. The injection block and flame ionization detector (FID) temperatures were kept constant at 180 and 250°C, respectively; helium was used as the carrier gas. The oven temperature was 75°C held for 6 min and then increased to 110°C at 25°C min−1 and held at 100°C for 3.5 min. Results were analyzed with Perkin-Elmer Turbochrom Navigator software.
Aim: To detect the production of MeS by our E. coli.
Sample preparation:
- At day 0: a preculture was grown at 37°C overnight (BL21 or BBa_K1060003)
- The preculture was used to inoculate 500µl into 50ml of fresh LB medium supplemented with or without 0.1 mM salicylic acid and left to grow for overnight. Samples were induced with 0.2 mM IPTG 6 hours post inoculation.
- Cultures were then chilled on ice and put at 4°C
- Bacterial cells were removed by centrifugation (10’, 4000g, 4°C) and then filter sterilized (0.22µm).
- 2 ml of this filtersterilized supernatant was then extracted with 1 ml of hexane
- Extractions were done in glass tubes with rigorous vortexing for 10 minutes
- The upper phase was transferred to a new glass vial
- The extraction was repeated twice (total of 3 extractions with 1 ml of hexane)
- The resulting ± 3 ml of extract were then reduced by evaporation under a nitrogen flow and redissolved in 50 µl of hexane.
Gass chromatography: GC-MS analyses were carried out using a 7890A Agilent gas chromatograph coupled to a 5977A mass spectrometric detector. The GC was equiped with a HP-5MS capillary column (30m x 0.25 mm x 0.25 µm). 1 µl of each sample was injected using splitless injection at a temperature of 250 °C. The initial oven temperature of 40 °C was held for 1 min., ramped at 6 °C / min. to 124 °C, then ramped at 20 °C / min. to 320 °C and finally kept at this temperature for 5 min. The transfer line and ion source were held at 320 °C and 230 °C, respectively. Mass spectra were taken between masses m/z 30-300 with an ionization potential of 70 eV. Retention indices of standards were determined by co-injection of a C7-C30 n-alkane mixture (Supelco) and were compared with published retention indices.
 "
"


