Team:Paris Saclay/PS-PCR/detailed description
From 2013.igem.org
Contents |
PSPCR
The Paris-Saclay open source PCR thermal cycler project.
Introduction
PCR (Polymerase Chain Reaction) is a very useful procedure in the field of synthetic biology. However, this technique requires a device called a thermal cycler, which is designed to cycle the samples through different temperature steps. Commercial PCR thermal cyclers are traditionally very expensive, with prices starting at $2000, which makes them hard to afford for small labs and DIY projects.
This project aims at creating a thermal cycler for under 30€ with easily accessible parts.
Comparison with other projects
Some open source PCR thermal cycler projects already exist, but the aim of the PSPCR project is to provide a better and more affordable system, thus filling a gap in the list of existing projects.
| Project | Price | Discussion |
|---|---|---|
| [http://openpcr.org/ OpenPCR] | $649 | Heated lid, good performance, hard to manufacture. |
| [http://www.instructables.com/id/Arduino-PCR-thermal-cycler-for-under-85/ Arduino PCR] | $85 | No heated lid, room for only 2 tubes, fan-only cooling. |
| [http://lavaamp.wordpress.com/ Lava-Amp] | "pennies" | No data available, probably slow with no heated lid, 1 slot. |
| [http://www.instructables.com/id/Coffee-Cup-PCR-Thermocycler-costing-under-350/ Coffee Cup PCR] | $350 | 7 slots, no heated lid, fan-only cooling. |
| PSPCR | Under 30€ | Fast solid state heating/cooling, 16 slots, heated lid. |
Design overview
TODO inclure schema
Solid state heating/cooling
By using a [http://en.wikipedia.org/wiki/Peltier_effect#Peltier_effect peltier thermoelectric device], the system achieves fast heating and compressor-less cooling, enabling it to reach temperatures ranging from -3°C to 120°C in a relatively short time.
When powered, the Peltier block transfers heat from one of its sides to the other, thus cooling the former while heating the latter. The "heat pumping" direction can be flipped by reversing the direction of the current in the device.
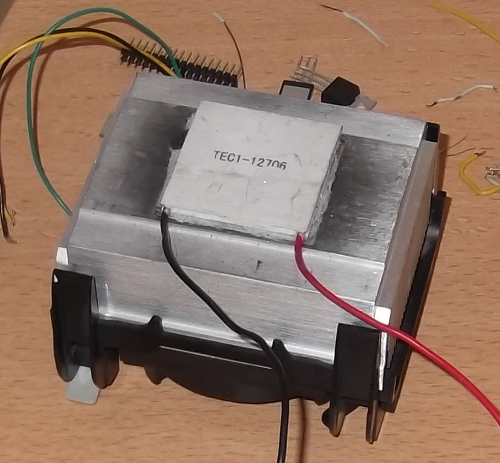
One side of the Peltier is thermally attached to the sample holding aluminium block, while the other one is attached to a computer CPU fan-thermalized radiator. Since the fan keeps the radiator at near-room temperature, the Peltier device can pump heat from(to) it in order to heat(cool) the sample holding block.
Power control
In order to control the current inside the Peltier, and therefore the heat pumping power, the system uses PWM (Pulse Width Modulation). PWM is quite a simple technique : instead of continuously adjusting the current through the Peltier, it works by switching the peltier completely on and off using a high frequency (~1kHz) square signal. The ratio between the duration of the "on time" and the duration of the "off time" in a single signal period defines the mean power provided to the device : 1.0 meaning full power (Peltier always powered), 0.0 meaning zero power (device always off), 0.2 meaning 20% power (Peltier on 20% of the time, and off 80% of the time) for example. This method uses simple binary to control the Peltier power, allowing the usage of a digital micro-controller to drive the Peltier.
TODO image signal crénau
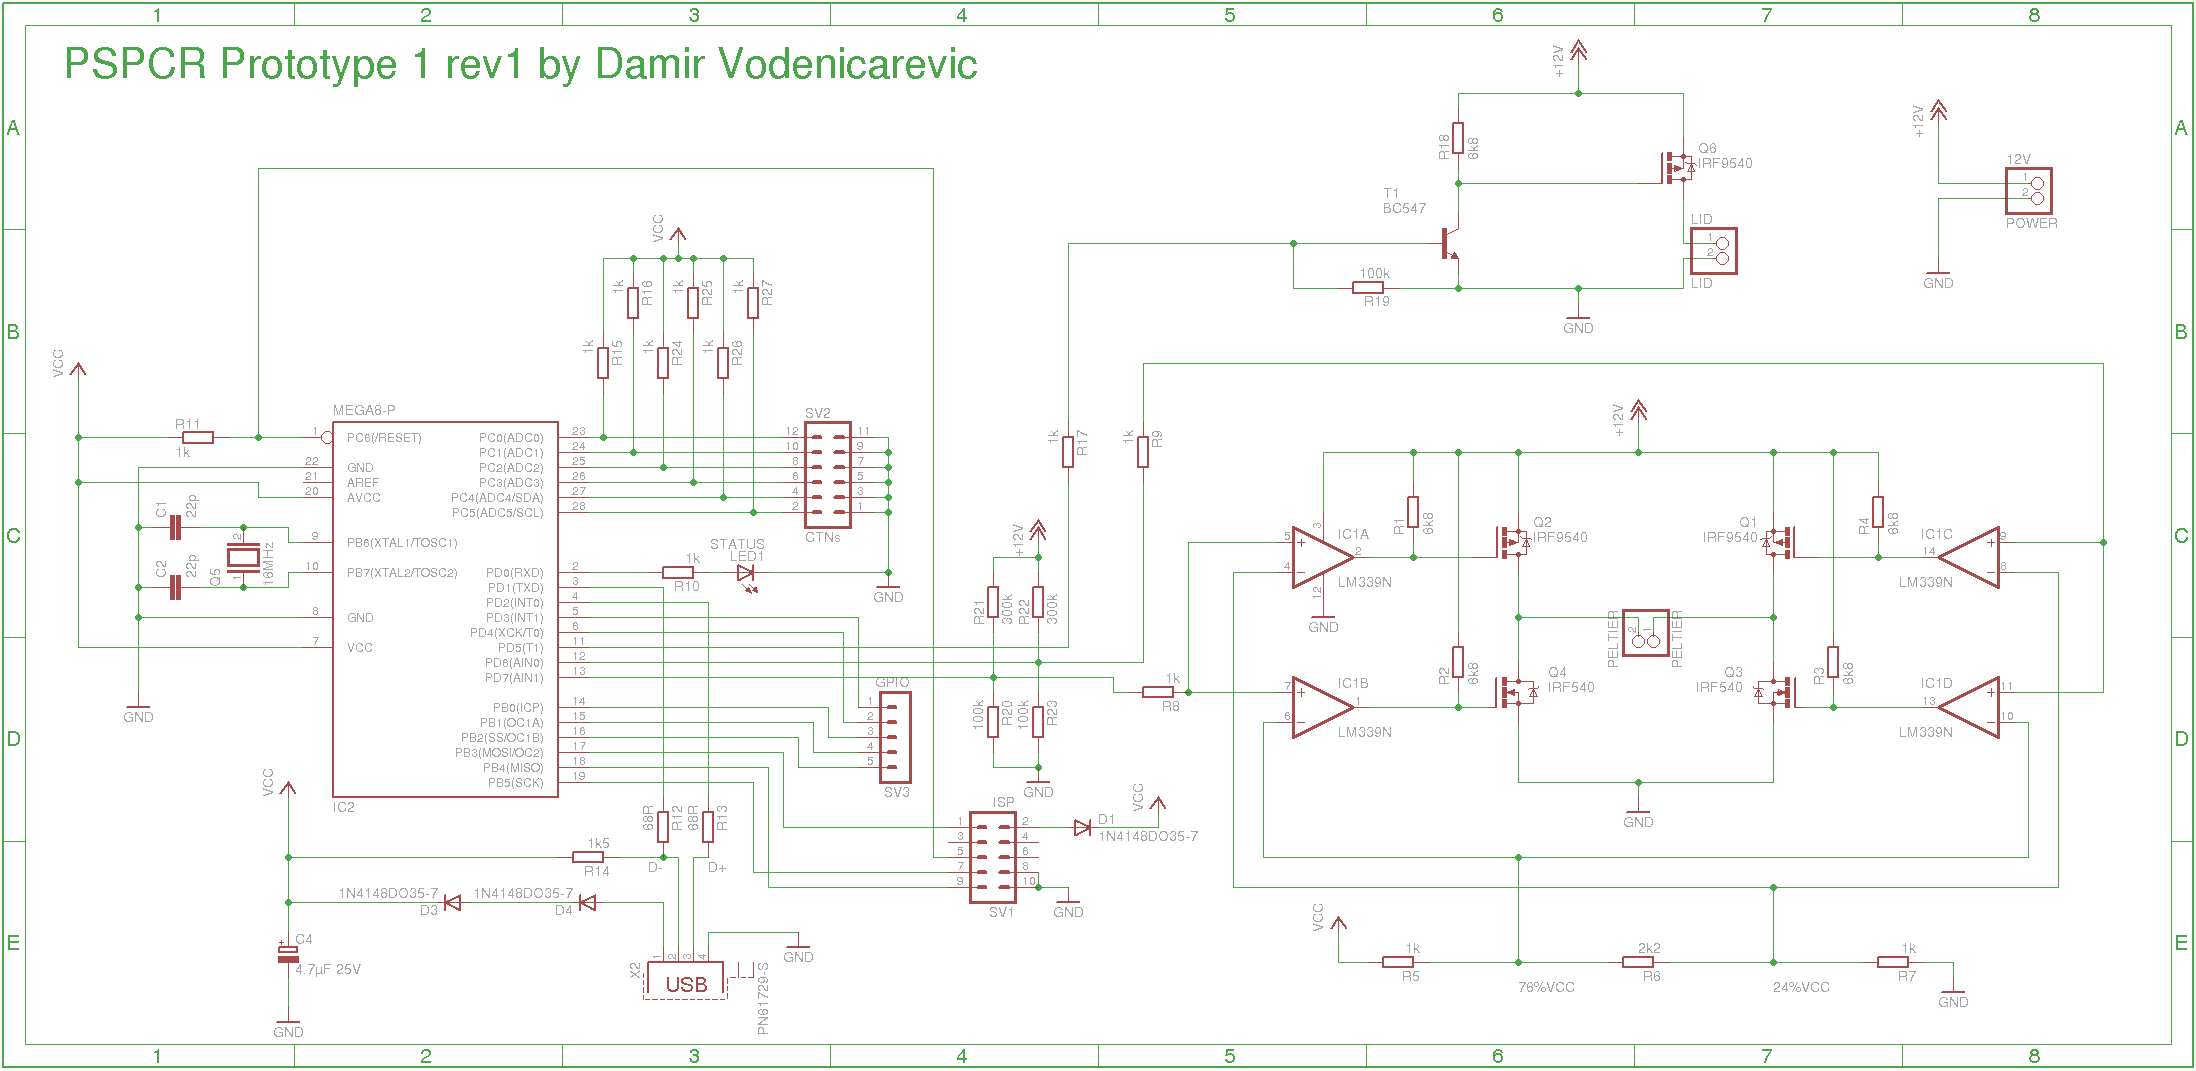
The direction of the current inside the Peltier is controlled using a power H-Bridge circuit. Our H-Bridge consists of two pairs of complementary power MOSFET transistors that can be selectively switched using digital signals in order to choose the direction of the current through the Peltier.
TODO : images 2 situations h-brige
Temperature sensing
Sample temperature feedback is done thanks to a thermistor attached to the sample holding block. A thermistor a resistor with a temperature-dependant value. By using a voltage divider, one can easily use it to obtain a measurable temperature-related voltage.
TODO schema
Digital interface
The digital control system is built around the Atmega8 inexpensive micro-controller which generates the PWM signal for the Peltier device, outputs current direction commands to the H-Bridge subsystem, acquires values from the temperature feedback sensors and provides an USB port for communication with a computer.
The whole system is controlled through the USB port by a computer running specifically designed software. The computer reads temperature feedbacks and sets the Peltier heat transfer direction and power. The software running on the computer provides a user interface allowing the user to select the PCR cycles to run.
Construction
Building the heating/cooling system
- Step 1 : stick a powerful Peltier device (100W+) to a CPU fan-thermalized radiator using thermally conductive paste.
- Step 2 : build the sample holder using a 4cm*4cm*1.6cm aluminium block pierced with 16 evenly-spaced holes. For perfect thermal contact, use this kind of drill : GaudiLabs PCR tube drill. If you don't have one, you can approximate the holes using increasingly small radius drills, and then smooth the holes. Another solution (used for the prototype shown here) is to drill simple cylindrical holes and put mineral oil for better thermal contact.
- Step 3 : stick the radiator&Peltier block to the sample holder with thermal paste and secure it in place in a thermally resistant but non-conductive way (not done yet for the first prototype shown here). Isolate the sides of the sample holder using a thermal insulator or cut a part of your smelly cooking glove to wrap it, this will limit lateral heat losses (not done yet in the first prototype shown here).
- Step 4 (Not yet implemented) : build the lid using a hinge and aluminium, and stick a less powerful Peltier element (~60W) or a Kapton heater or any other low power 12V heater so that it covers the sample holder when the lid is closed. You'll also have to stick another thermistor to it for lid temperature sensing purposes. This lid is useful for keeping the sample tops at 103 in order to prevent water condensation inside the PCR tubes.
Building the electronic control system
- Step 1 : build the electronics.
Notice : R24 to R27 are optional, add them only if you want to add other temperature sensors, otherwise, use a 4 pin header for SV2 (CTNs) with only the pins 9, 10, 11 and 12. The SV3 (GPIO) header is optional, use it only if you want to add custom electronics.
- Step 2 : Program the micro-controller.
Use the SV1 (ISP - In System Programming) to program the Atmega. The hex files can be found in the Download section.
Calibration
Construction
Download
 "
"


