Team:Evry/Protocols/Test
From 2013.igem.org
m |
|||
| Line 1: | Line 1: | ||
| - | {{:Team:Evry/ | + | {{:Team:Evry/template_protocol}} |
<html> | <html> | ||
Revision as of 14:48, 1 October 2013
Protocols' overview

Solutions, Media and Petri Dishes
Antibiotics
Carbenicillin:
Put 150 mg of Carbenicilline in 15 mL of distilled water (10 mg per mL).
Filter with a 0,22 µm millipore,divide in 2 mL tubes and store at -4 °C.
Use 1 µL of Carbenicillin for 1 mL of solution.
Chloramphenicol:
Put 525 mg of Kanamycin in 15 mL of ethanol (35 mg per mL).
Filter with a 0,22 µm millipore,divide in 2 mL tubes and store at -4 °C.
Use 25 µL of Chloramphenicol for 1 mL of solution.
Kanamycin:
Put 750 mg of Kanamycin in 15 mL of distilled water (50 mg per mL).
Filter with a 0,22 µm millipore,divide in 2 mL tubes and store at -4 °C.
Use 1 µL of Kanamycin for 1 mL of solution.
Spectinomycin:
Put mg of Spectinomycin in 15 mL of ( mg per mL).
Filter with a 0,22 µm millipore,divide in 2 mL tubes and store at °C.
Use µL of Spectinomycin for 1 mL of solution.
Thoses antibiotics are used to select bacteria with a plasmid including an interest construction and the corresponding antibiotic resistance gene.
LB and LB Agar
Mix 20 g of LB Broth in 1L of distilled water in a bottle of 1L, then put in autoclave.
Mix 17,5 g of LB Agar in 500 mL of distilled water in a bottle of 1L, then put in autoclave.
M9 Medium
Composition for 50 mL of:
| Reagent | M9 medium (without iron) | M9 medium (with iron) |
|---|---|---|
| M9 salt (5X) | 10 mL | |
| CaCl2 (1M) | 5 µL | |
| MgSO4 (1M) | 100 µL | |
| Glycerol (50%) | 800 µL | |
| Thiamine | 5 µL | |
| NaOH (pH 7.4) | 12.5 µL | |
| H2O | 40 mL | 39 mL |
| FeSO4 (10mM) | - | 50 µL |
| Casamino acids (0.2%) | - | 1 mL |
Once the mixture is prepared, the medium must be filtered to be sterilised using 0.22 µm filter.
Petri dish
Melt the LB Agar in a microwave, and split it in 50 mL tubes.
When the tubes have cooled, put the necessary amount of antibiotics in it (50 µL for Carbenicillin and Kanamycin, 1250 µL for Chloramphenicol) and mix thoroughly.
Put 25 mL of the solution in a Petri dish.
CaCl2 and CaCl2+glycerol
Solution for 1M Cacl2:
Add 14,30g of CaCl2 into 100 ml desalted water
Solution for 0,1M Cacl2:
Add 50 mL of CaCl2 1M solution into 450 ml of desalted water
Solution for 0,1M Cacl2 + 15% glycerol:
Add 50 mL of CaCl2 1M solution and 75 mL of glycerol 100% into 450 ml of desalted water
Tris-Acetate-EDTA (TAE) Buffer solutions
NaOH solution 5M 100 mL:
Add 19,99 g of NaOH in 100 mL of distilled water.
EthyleneDiamineTetraacetic Acid (EDTA) solution 0,5M 300 mL:
Add 43,8 g of EDTA in 250 mL of distilled water.
Add NaOH 5M until EDTA is solubilized and pH~8.
Add distilled water until you reach 300 mL.
TAE Stock solution 50X 300 mL:
Add 60,5 g of TAE in 187,5 mL of distilled water.
Add 14,27 mL of acetate solution (previously put at 4°C).
Add 25 mL of EDTA solution previously prepared.
Add distilled water until you reach 250 mL.
TAE solution 1X 100 mL:
Add 5 mL of TAE Stock solution 50X in 100 mL of distilled water.
Tris HCl
Disolve 4,6g of Trisbase in 30 mL of distilled water.
Adjust pH with concentrated HCl(~4 mL) until pH=7,5.
Add distilled water until 50 mL then put in autoclave.
If the solution has a yellow coloration, do the preparation again with better Trisbase.
Tris HCl is used to store DNA.
DNA genomic extraction
Goal
The aim of the extraction step is to recover Escherichia coli genomic DNA.
The different step are use to throw other bacterial components off (proteins, cell wall, plasmids,etc).
Once we have E.coli genomic DNA
Preparation
Protocol adapted from Thermo Scientific Genomic extraction notebook1. Cell culture
Cultivate cells in LB medium overnight.
2. Cell harvesting
Set saturated E.coli LM culture into 2 mL tubes. Centrifuge at 8 000 x g for 5 minutes. Discard as much as supernatant as possible.
3. Cell lysis
Add 180 μL of Digestion Solution and 20 μL of Proteinase K Solution. Resuspend the cells thoroughly with a vortex or a pipette.
Incubate the tubes at 56°C while vortexing occassionally until the cells are completely lysed(~30 minutes).
Add 20 μL of RNase A solution, mix by vortexing and incubate the tubes for 10 minutes at room temperature.
Add 200 μL of Lysis Solution to the sample. Mix thoroughly by vortexing until a homogeneous mixture is obtained. (~15 secondes)
Add 400 μL of 50% ethanol and mix with a vortex or a pipette.
4. DNA Binding
Transfer the lysate to a GeneJET Genomic DNA Purification Column inserted in a collection tube. Centrifuge the column at 12 000 x g for 1 minute.
Discard the collection tube containing flow-through solution and place the column into a new 2 mL tube.
5. Membrane washing
Add 500 μL of Wash Buffer I (previously added with ethanol). Centrifuge at 1 600 x g. Discard the flow-through and place the purification column back into the collection tube.
Add 500 μL of Wash Buffer II (previously added with ethanol)to the purification column.
6. Dry membrane
Centrifuge at 16 000 x g for 3 minutes.
7. DNA Elution
Add 200 μL of Elution Buffer to the center of the purification column membrane to elute genomic DNA. Incubate for 2 minutes at room temperature and centrifuge at 8 000 x g for 1 minute.
Discard the purification column and store the purified DNA in TrisHCl at -20°C or use it immediatly.
Test
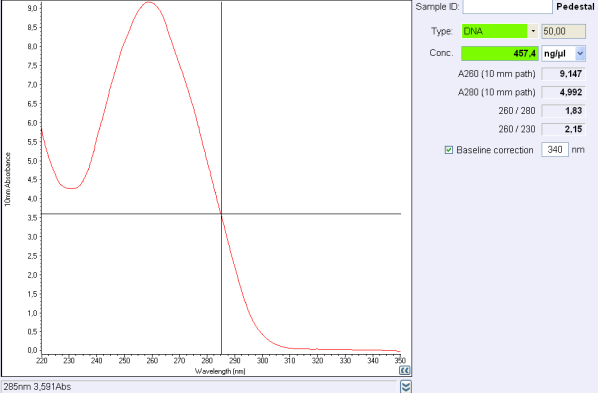
260/280 ratio and 260/230 indicate the purity of DNA (or RNA).Nucleic acids absorb at 260 nm while proteins and phenols absorb at 280 nm and carbohydrates at 230 and other contaminents at 230 nm.
For DNA, a 260/280 ratio around 1,8 is concider to be pure and ange 260/230 ratio must be between 2,0 and 2,2.
Polymerase Chain Reaction
Principle
Polymerase Chain Reaction (PCR) is a molecular biology method used to amplify a small amount of genetic material (DNA or RNA), using specific primers of a target sequence.
PCR is divided into 5 steps:
- First denaturation:
- Denaturation step
- Annealing step
- Elongation step
- Final step
Denaturation step occure between 94 and 98°C.The heat breaks the hydrogen bonds and then causes the separation of the double strand of DNA into two single strands.
Annealing step occure between 50 and 65 °C. Primers anneals to DNA simple strand by complementarity of the nitrogenized bases.
Elongation step occure between 70 and 80°C, depending on the DNA polymerase used. The polymerase synthesizes a new DNA strand complementary to the DNA template
Preparation
Mixture preparation
We use two differents polymerase for our PCR: Taq Polymerase and Q5.
As Q5 is a hight fidelity polymerase, we use it to obtain sequences without mutation (for a total of 50 μL of mixture); otherwise we use Taq Polymerase instead (for a total of 25 μL of mixture).
Afterwards, we will describe the protocol for a PCR with Q5 (total amount: 50 μL).
Note: Proportion are the same with Taq Polymerase, for 25 μL or 50 μL: 1:10 of each primer, 1:5 of Buffer, 1:50 of dNTPs, 1:50 of genomic DNA and 1:100 of polymerase
Make tubes with 5 μL (1:10) of Forward primer and 5 μL (1:10) of Reverse primer for each desidered sequence.
For positive and negative controle, use primers that worked previously in the same condition of PCR.
We use primers (Primers 009 and 010) for pEntC for ou controles.
For more details about our primers, see the corresponding page.
For n tubes, prepare a master mix with the following solutions:
- (n+1) x 10 μL of Q5 Buffer
- (n+1) x 1 μL of dNTPs
- (n+1) x 27,5 μL of distilled water.
- (n+1) x 0,5 μL of Q5
Note: Take the enzyme out of -20°C just before utilisation.
Split 39 μL of the master mix in each tube.
Add 1 μL of genomic DNA in each tube, except in your negative controle tube. In this one, put 1 μL of distilled water instead.
PCR Cycles
Set the following program on your Thermo Cycler:
- First denaturation: 30 seconds at 98°C
- Denaturation step 10 seconds at 98°C
- Annealing step 20 seconds at 56°C
- Elongation step (n+1) minutes at 72°C (as n is the number of kB of your sequence)
- Final step 5 minutes at 72°C
Steps 2, 3 and 4 are repeated 29 times.
Then let the mixture cool down at 4°C.
Note: Annealing temperature depend on your primers and elongation temperature on the polymerase used.
Optimisation
Number of primer
Temperature
Golden Gate
Goal
The aim of Golden Gate assembly is to assemble in one step various fragment of DNA.Preparation
Tests
Mettre une ou deux photos de transfos réussies/foiréesCompetent cells
Goal
Bacteria can integrate DNA fragments from the environment. Escherichia coli, contrary to Bacillus subtillis another bacteria frequently used in molecular and synthetic biology, is not naturally in a state of competence (able to integrate DNA fragments during transformation), that is why we have to prepare them.
Two methods can be used:
-Chimiocompetent cells
-Electrocompetent cells
We choose to use chimiocompetent cells for usual transformation and electrocompetent cells just for ΔFur strain preparation by homologous recombination.
Preparation
Grow overnight pre-culture of the strain you want to make competent (chimio or electro) in 2 mL of LB.
Chimiocompetent cells
Solutions preparation
Solution for 1M Cacl2:
Add 14,30g of CaCl2 into 100 ml distilledwater
Solution for 0,1M Cacl2:
Add 50 mL of CaCl2 1M solution into 450 ml of distilled water
Solution for 0,1M Cacl2 + 15% glycerol:
Add 50 mL of CaCl2 1M solution and 75 mL of glycerol 100% into 450 ml of dissilted water
Competent cells preparation
For 200 ml LB medium, add 400 µL of strain sample.
Let the bacteria grow until it reaches an Optical Density (OD) between 0,3 and 0,35. Chimiocompetent bacteria are more able to transform when they are in exponential phase.
Once it reached the right OD, put the medium on ice for 30 minutes to slow down growth.
Split the 200 mL into 4x50 mL tubes then centrifuge at 3000 rpm for 5 minutes at 4°C and suppress supernatant afterwards.
Resuspend the pellet cells with 5 mL of Cacl2 at 0,1M for each 50 mL tube.
Again, put the medium on ice for 30 minutes.
Centrifuge at 3000 rpm for 5 minutes at 4°C then suppress supernatant.
Resuspend the cells with 1 mL of Cacl2 at 0,1M + 15% glycerol for each 50 mL tube.
Split the total 4 mL into 40 tubes containing each 100 µL of concentrated cell solution. This step should be executed fast enough and on ice.
Store at - 80°C.
Electrocompetent cells
For 200 ml LB medium, add 200 µL of strain sample.
Let the bacteria grow until it reaches an OD between 0,5 and 0,7.
Once it reached the right OD, put the medium on ice for 20 minutes to slow down growth.
Split the 200 mL into 4x50 mL tubes then centrifuge at 4000 rpm for 15 minutes at 4°C and suppress supernatant afterwards.
Resuspend the pellet cells with 50 mL of ice-cold 10% glycerol for each 50 mL tube.
Centrifuge at 4000 rpm for 15 minutes at 4°C then suppress supernatant.
Resuspend the cells with 25 mL of ice-cold 10% glycerol for each 50 mL tube.
Centrifuge at 4000 rpm for 15 minutes at 4°C then suppress supernatant.
Resuspend the cells with 2 mL of ice-cold 10% glycerol for each 50 mL tube.
Centrifuge at 4000 rpm for 15 minutes at 4°C then suppress supernatant.
Resuspend the cells with 2 mL of ice-cold 10% glycerol for each 50 mL tube.
Split the total 4 mL into 40 tubes containing each 100 µL of concentrated cell solution. This step should be executed fast enough and on ice.
Store at - 80°C.
Contamination and competence tests
Plate each strain on LB medium with Ampicillin, Kanamycin or Chloramphenicol in order to evaluate if it contaminated or not.
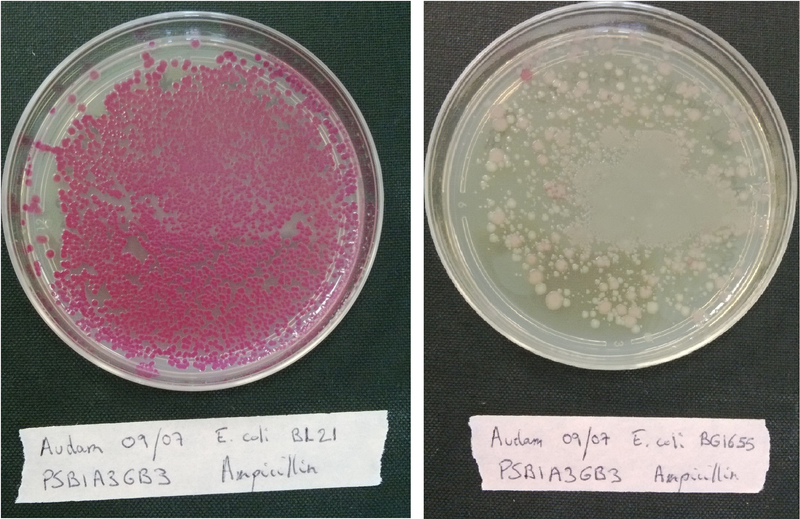
Transform each strain with a pSB1A3 plasmid (red colonies) and plated them on LB medium with Ampicillin only to evaluate wether our strains are competent or not.
If the bacteria is competent, it will incorporate the plasmid that code for a red protein and thus have a red phenotype.(see figure below)
Transformation
Goal
In this step,
à modif
the heat shock (between -80°C up to 42°C) induces chimiocompetent bacteria to be in state of competence. DNA from the environment (in this case: plasmid) can then integrate the cell.Preparation
Chimiocompetent cells
For 100 µL of chemical competent cells, add 1 µL of plasmidic DNA. If the ligation protocol is a
Golden Gate , add 5 µL instead.
Let 30 minutes on ice.
Let the cells at 42°C for exactly 50 seconds.
Let 5 minutes on ice.
Resuspend the cells with 1 mL of LB spread on a petri dish then let it at 37°C.
Electrocompetent cells
Controles
To check if the transformation have work, make a positive and a negative controle.
If the transformation have worked, colonies must have a red phenotype.
Without plasmid with antibiotic resistance, no colonies must grow.
Plasmid purification
Goal
The aim of the plasmid purification step is to recover the plasmid produced by the bacteria (cloning strain).
The different step are use to throw other bacterial components off (proteins, cell wall, genomic DNA, etc).
Preparation
Protocol adapted from Macherey-Nagel plasmid purification notebook1. Cell culture
Cultivate cells in LB medium overnight.
2. Cell harvesting
Set saturated E.coli LM culture into 2 mL tubes. Centrifuge at 11 000 x g for 30 secondes. Discard as much as supernatant as possible.
3. Cell lysis
Add 250 μL of Buffer A1 (resuspension buffer). Resuspend the cells with a vortex or a pipette.
Add 250 μL of Buffer A2 (lysis buffer). Mix gently by inverting the tube 6 - 8 times. Incubate at room temperature until lysate appears clear.
Add 300 μL of Buffer A3 (neutralisation buffer). Mix thoroughly by inverting the tube 6 - 8 times .
4. Lysate clarification
Centrifuge at 11 000 x g for 5 minutes . Repeat this step until supernatant is not clear.
5. DNA Binding
Place a NucleoSpin Plasmid Column in a Collection Tube of 2 mL and set the supernatant from the last step. Centrifuge at 11 000 x g for 1 minute. Discard flow-through and place the column back into the collection tube.
6. Membrane washing
Add 600 μL of Buffer A4 (wash buffer) previously supplemented with ethanol. Centrifuge ar 11 000 x g for 1 minute. Discard flow-through and place the column back into an empty collection tube.
7. Dry membrane
Centrifuge at 11 000 x g for 2 minutes and discard the collection tube.
8. DNA Elution
Place the column in a 1,5 mL and add 50 μL de Buffer AE (elution buffer). Incubate at room temperature and centrifuge at 11 000 x g for 1 minute.
Test
Before the storage of the tubes at -20°C, measure the concentration with nanodrop.
If the concentration is between 30 and 50 ng/μL, concentrate your DNA with SpeedVac concentrator or any other method.
If the concentration is below 30 ng/μL or if 260/280 ratio or 260/230 ratio is not correct, make another purification.
260/280 ratio and 260/230 indicate the purity of DNA (or RNA).
Nucleic acids absorb at 260 nm while proteins and phenols absorb at 280 nm and carbohydrates at 230 and other contaminents at 230 nm.
For DNA, a 260/280 ratio around 1,8 is concider to be pure and ange 260/230 ratio must be between 2,0 and 2,2.
Gel electrophoresis analysis
Principle
Electrophoresis is a method using electrical field to separate DNA or RNA sequence by size. Smaller the fragment is, the more it migrates on the gel.
Using a DNA ladder, we can know the size of DNA sequence and then check if we have the sequence we wanted.
Preparation
Analysis
PCR Purification
Goal
The aim of the PCR purification step is to recover DNA from PCR and other enzymatic reaction mixtures.
Preparation
Protocol adapted from Thermo Scientific PCR Purification notebook1.
Add 1:1 volume of Binding Buffer to completed PCR mixture (e.g. if you have 100 µL of reaction mixture, add 100 µL of Binding Buffer).
Mix thoroughly and check the solution's color: a yellow color color indicates an optimal pH for DNA binding.
If the color of the solution is orange or violet, add 10 µL of 3 M sodium acetate, pH 5,2 and mix. The color will become yellow.
If the DNA fragment is superior to 500 bp, add a 1:2 volume of 100% isopropanol (e.g. if you have 100 µL of PCR mixture combined with 100 µL (total amount of 200 µL), add 100 µL isopropanol). Mix thoroughly.
2.
Transfer up 800 µL of the solution from step previous step to the GeneJET purification column.
Centrifuge for 30-60 seconds, then discard the flow-through.
3.
Add 700 µL of Wash Buffer (previously dilted with ethanol) to the purification column.
Centrifuge for 30-60 seconds, then discard the flow-through and place the purification column back into the collection tube?
4.
Centrifuge the empty GeneJET purification for 1 minute to completely remove any residual wash buffer
5.
Transfer the GeneJET purification column to a clean 1,5 mL tube.
Add 50 µL of Elution Buffer to the center of the GeneJET purification column membrane and centrifuge for 1 minute.
6.
Discard the GeneJET purification column and store the purified DNA at -20°C.
Test
BioBrick Assembly
Goal
Once you have your constructions on your plasmids, you need to biobrick them before sending them to the registry.
Preparation
Restriction
For restriction you need: distilled water, Bovine Serum Albumin (BSA, used to stabilize restriction enzymes), Restriction Buffer 1,2,3 or 4 (buffer 2 works for all combinations of EcoRI-HF, XbaI, PstI, SpeI), two restriction enzymes per sample.
Determine which restrictions enzymes and Buffer you need using openwetware.org1.
Determine the DNA-concentration of the vector and the insert.
Prepare restriction mix for all restrictions,for each reaction add:
- 12,5 μl od distilled water
- 5,0 μl of Buffer 1,2,3 or 4
- 0,5 μl of BSA
- 1,0 μl of restriction restriction enzyme 1
- 1,0 μl of restriction restriction enzyme 2
Then, for each reaction, add:
- 20 μl restriction mix previously prepared to a PCR-tube
- 1 μg of DNA.
- Distilled water, until your reach a total volume of 50 μl
PCR Purification
Purify the restriction digest, and then determine the concentration of the purified DNA with Nanodrop.
For more information, see the PCR purification protocole.
Ligation
Prepare ligation mix.
Prepare two extra reactions, “No insert” and “No ligase” that will be used as negative controls.
| Per vector/insert | No insert | No ligase | |
|---|---|---|---|
| Ligase | 0,5 μL | 0,5 μL | 0 |
| Vector | |||
| Insert | 0 μL | ||
| Distilled water | |||
| 10X Buffer | 2 μL | 2 μL | 2 μL |
For each reaction,add:
- 50 ng of vector-DNA.
- Insert in three times molar excess, then add 3·50·(length of insert/length of vector) ng of insert-DNA.
- Distilled water, until your reach a total volume of 20 μl
Transformation Test
Transform the ligation product with competent cells, and also "No insert" and "No ligase" controles.- If no colonies form in both controle, the restriction was perfect for both the restriction enzymes.
- If colonies form in both cases, neither of the restriction enzymes worked well. Most of the transformants will contain the vector only.
- If the “No insert” control resulted in many colonies but “No ligase” did not, one of the enzymes worked well and the other did not. Most of colonies will carry the self-ligated vector.
Re-isolate colonies.
Check that colonies have been successfully transformed (e.g. by PCR).
Inoculate those colonies in overnight culture for further use.
Send your part to iGEM registry !
Reference:
- http://openwetware.org/wiki/Enzyme_selection_for_BioBricks_digest
If the concentration is between .. and .. ng/μL, concentrate your DNA with SpeedVac concentrator or any other method.
If the concentration is below .. ng/μL or if 260/280 ratio or 260/230 ratio is not correct, make another purification.
260/280 ratio and 260/230 indicate the purity of DNA (or RNA).
Nucleic acids absorb at 260 nm while proteins and phenols absorb at 280 nm and carbohydrates at 230 and other contaminents at 230 nm.
For DNA, a 260/280 ratio around 1,8 is concider to be pure and ange 260/230 ratio must be between 2,0 and 2,2.
 "
"


